
If you found this article useful and would like to thank the author, you can do so via the corresponding link on boosty
As an administrator in Authentik, you can manually create and delete users, generate complex passwords for them, and set up their login rules using TOTP codes or WebAuthn devices. This is certainly a workable mechanism, but what if there are a lot of such users? Or even if we’re talking about some home use scenario, you simply want to automate the process so that you only deal with the management side of things. In this article, we’ll talk about how to set up such automation for user registration and invitations in Authentik.
For this setup, and generally for Authentik to work correctly going forward, you should have already configured your mail server details in the .env environment variables file, from which notifications will be sent to both you and your users. You can verify the mail server is configured correctly with the simple command docker exec authentik_worker ak test_email your_email@domain.com
The application settings described in this article are accurate as of the time of writing.
The video guide linked below is accurate as of when it was created, but the configuration logic hasn’t changed.
Starting with release 2026.5, Authentik has a dedicated Invitation Wizard right in the admin panel, which can speed up sending invitations without manually assembling flows/stages. The manual method below still works and gives you more control over the details - and it’s the one I show in this article.
Creating a group for regular users#
In the Authentik interface, go to Directory > Groups > New Group
In the window that appears, give our group a name. Since these will be regular users, we don’t toggle the Superuser Privileges switch.

Click Create
Answering an unasked question - “why did I name the group so oddly, with the first word lowercase and the second capitalized?” - I’ll explain that the default group for admins is spelled exactly that way, authentik Admins. I’m just keeping the style consistent.
Creating stages and flows#
Email Stage#
Go to Flows and Stages > Stages > Create
In the menu that appears, select Email Stage

Click Next and in the next window set the necessary parameters: give the stage a name, an email subject, and the template that will be used. Click Finish

Creating the invitation flow#
Go to Flows > Create
Fill in and set the necessary parameters roughly as shown in the screenshot below. I enabled compatibility mode for better compatibility with password managers. In the Authentication field, I didn’t set any mandatory parameters. I did this intentionally - later on I’ll set a hard requirement for all users, without exception, to set up two-factor authentication.

Now go to the Enrollment flow we created > Stage Bindings > Bind existing stage (as you probably guessed, you can also create stages from this menu by clicking Create and Bind Stage, but I think my approach is more illustrative).
In the menu that appears, fill it in following my screenshot. Select the existing stage default-source-enrollment-prompt, and set the processing order for this stage.
Note that I have the evaluate when flow is planned toggle enabled. If you’re familiar with the topic, you can choose a different option.

Now we need to make changes to the newly created stage. Click Edit Stage and select the data fields we need, which new users will need to fill in when registering.
We select the following values: name, email, password, repeat password. The username value is already selected by default. In the Validation Policy section, select the password complexity policy we created (you can read how to set password complexity values in the article on password recovery). Click Update

Now let’s create a new stage binding for the flow: click Bind existing stage > default-source-enrollment-write, set the processing order, click Create.
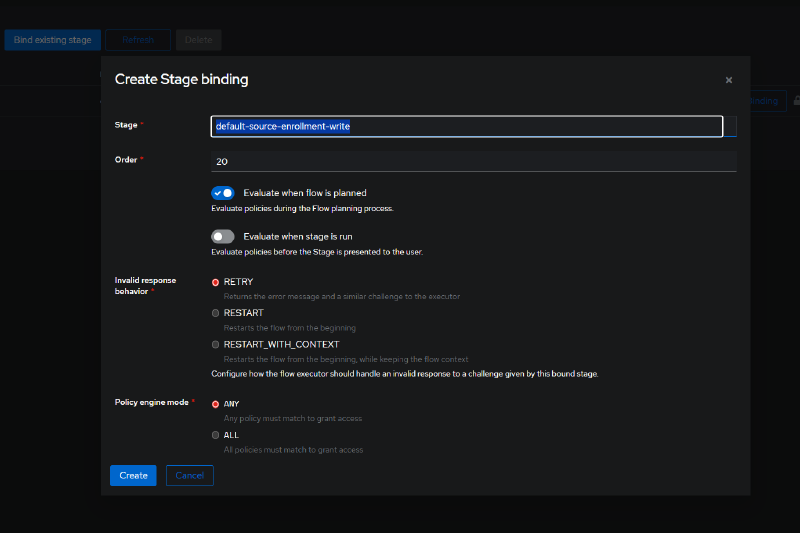
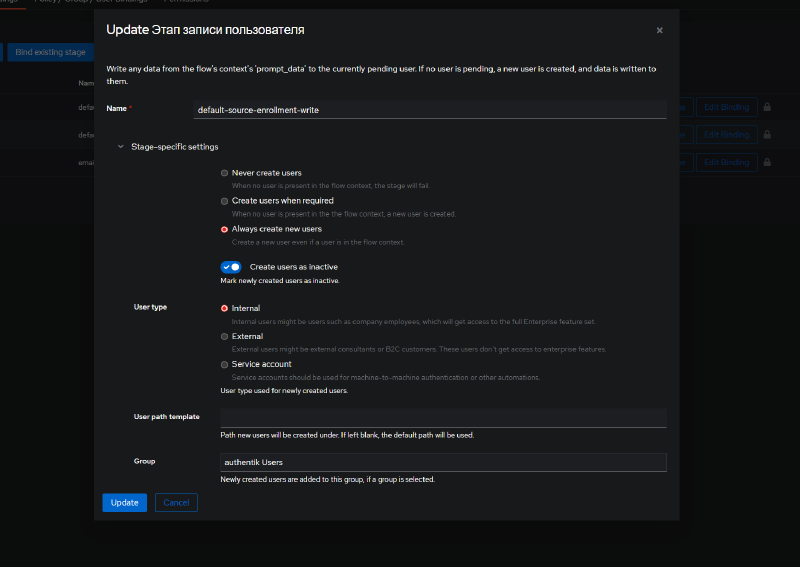
As before, let’s make changes to the created stage > Edit Stage
Enable the Create users as inactive option. This is needed so that after new users enter their data and register in the system, their account remains inactive until they confirm the action via email.
For Group, select the authentik Users group we created. Be sure to select internal in the User type section.
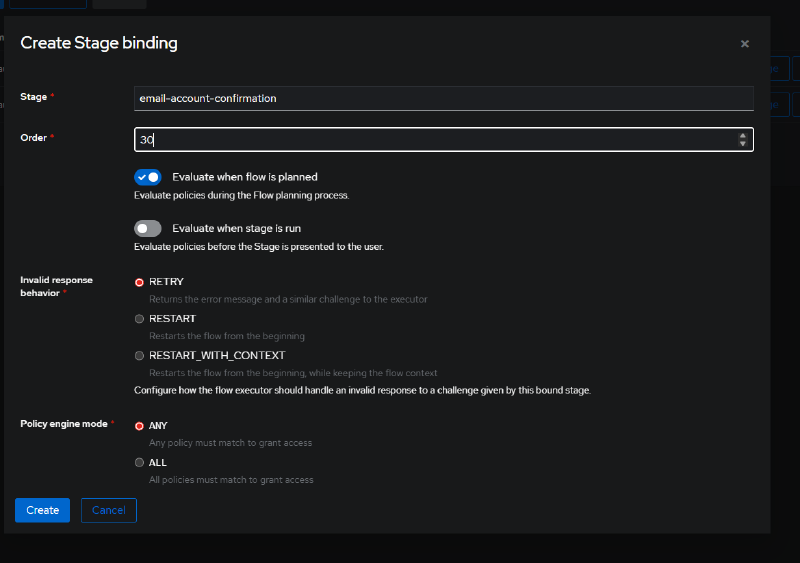
Click Bind existing stage once more, select email-account-confirmation, which we created earlier, set the processing order, click Create.
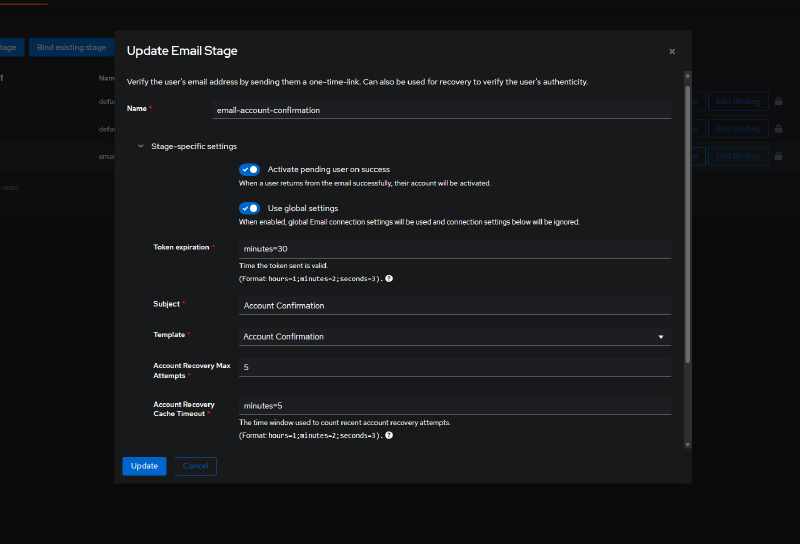
You can check the settings for this stage.
Actually there isn’t much to edit here, we just make sure that the Activate pending users on success feature is enabled.
If you haven’t configured mail via environment variables, deactivate the global settings toggle. New fields will appear that you’ll need to fill in with the corresponding values from your email provider.
Configuring default-authentication-flow#
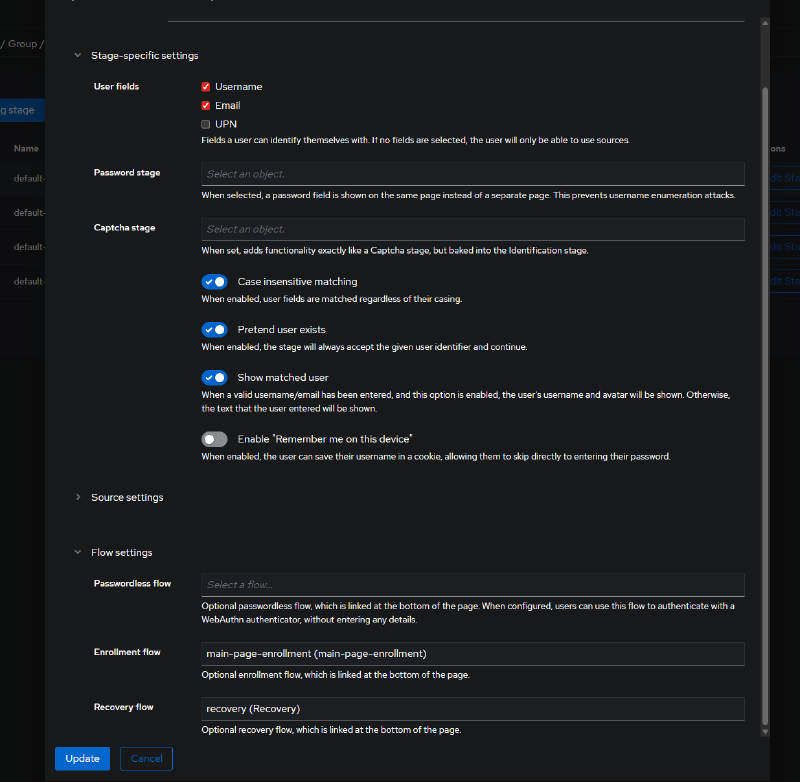
Go to Flows, select our authentication flow, in my case default-authentication-flow, go into the Stage Bindings menu, and make changes to the default-authentication-identification stage. Scroll all the way down, and in the Flow Settings menu under Enrollment Flow, select the newly created flow and click Update.
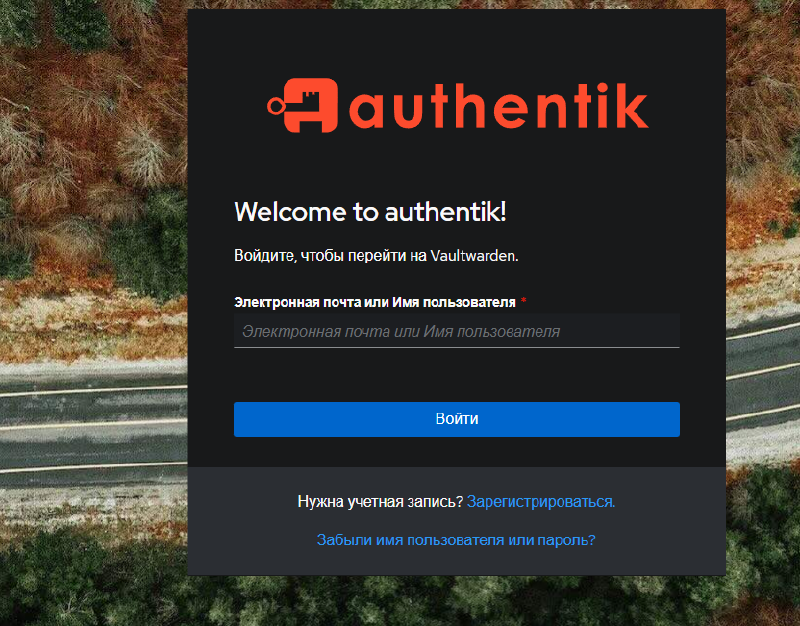
Log out of our account and check the login menu (of course, all this should be done in incognito mode, and at minimum you need to clear your browser cookies).
We see that a new registration menu for new users has appeared.
You can test the menu’s functionality: have a new (test) user (you, in this case) register, receive a confirmation email, click the link in the email, and the rest is intuitive. If you did everything right, and the article’s author didn’t mess anything up (as sometimes happens), you now have a new user who created their own account, with a password matching the parameters and policies you set, and they’re now in the regular users group.
Setting up user invitations in Authentik#
We’ve now enabled new users to register on our Authentik instance themselves. But that’s too much freedom, letting any random passerby simply visit the Authentik site and register. We don’t want that, right? We want only select users to be able to register, and only by invitation. Or we could do a mass invitation mailing, but in any case, only the person we sent an invitation to will be able to register. Let’s set that up now.
User Write Stage#
Go to Stages, create a new User Write Stage stage (due to a translation bug in application version 2025.10.3, which isn’t fully disabled, this stage is called “Этап записи пользователя” in my instance).
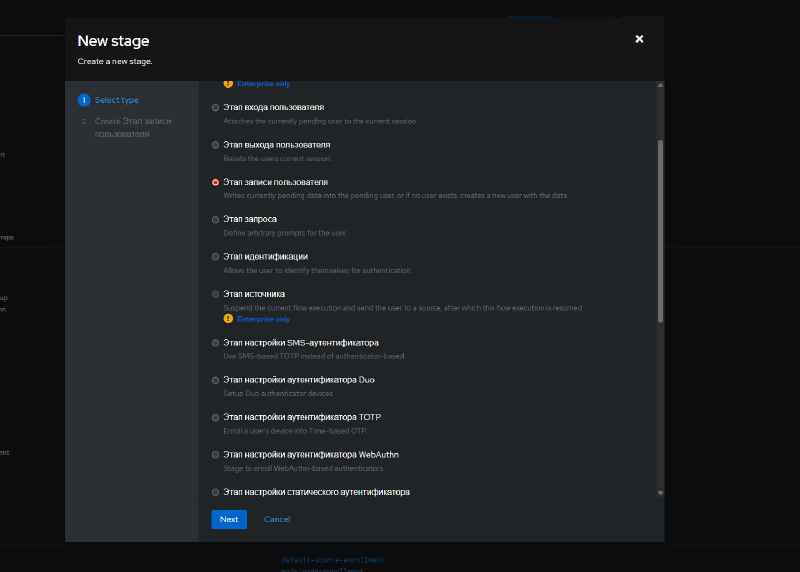
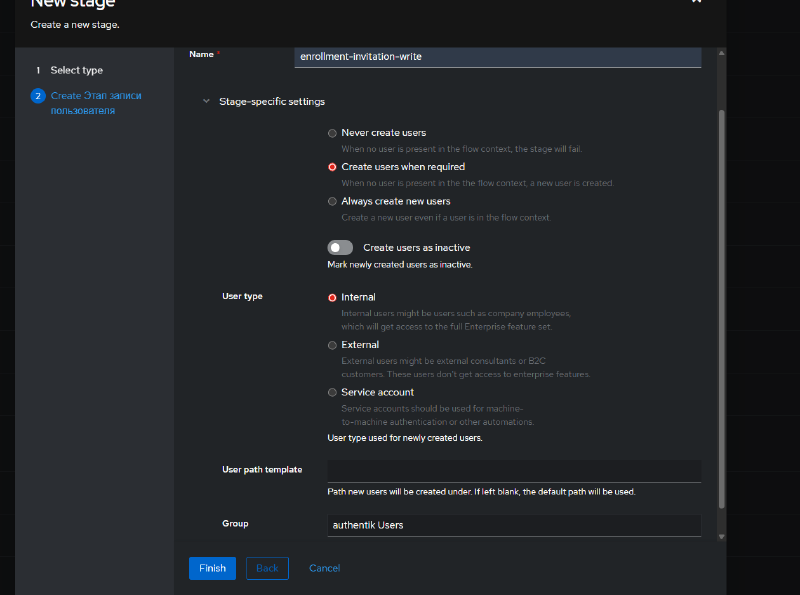
Click Next. Set the necessary parameters: the stage name and its settings, plus which group new users will be placed into. Since we’re assuming we know who is registering, we can deactivate the Create users as inactive toggle.
Invitation Stage#
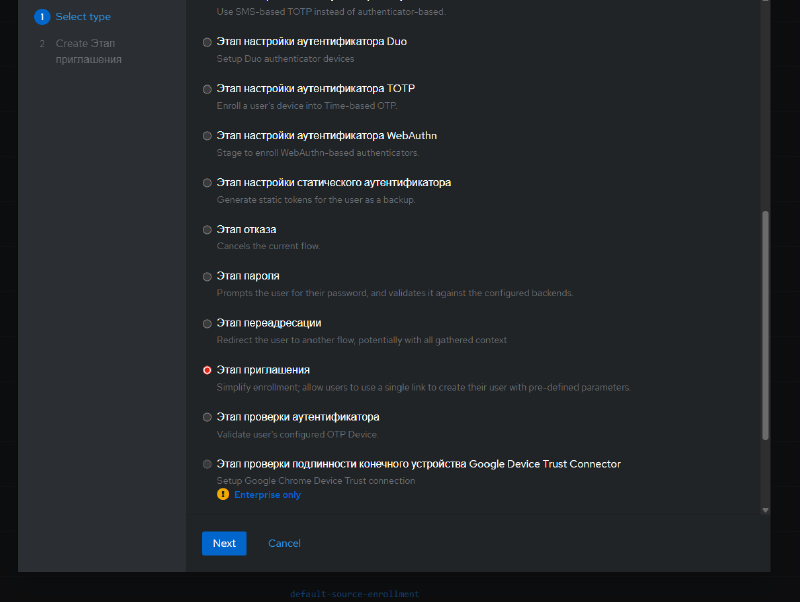
Let’s create another new stage, this time Invitation Stage (in my instance it’s called “Этап приглашения”).
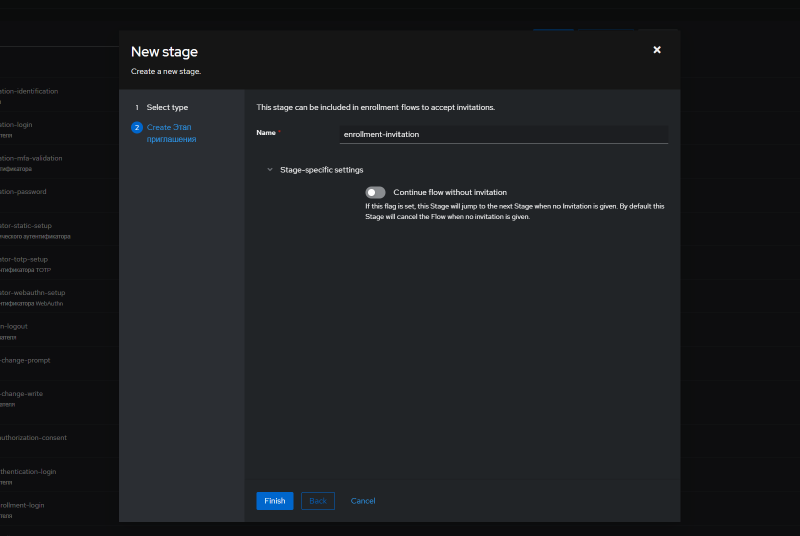
Click Next, give the stage a name. If the Continue flow without invitation toggle is enabled, disable it.
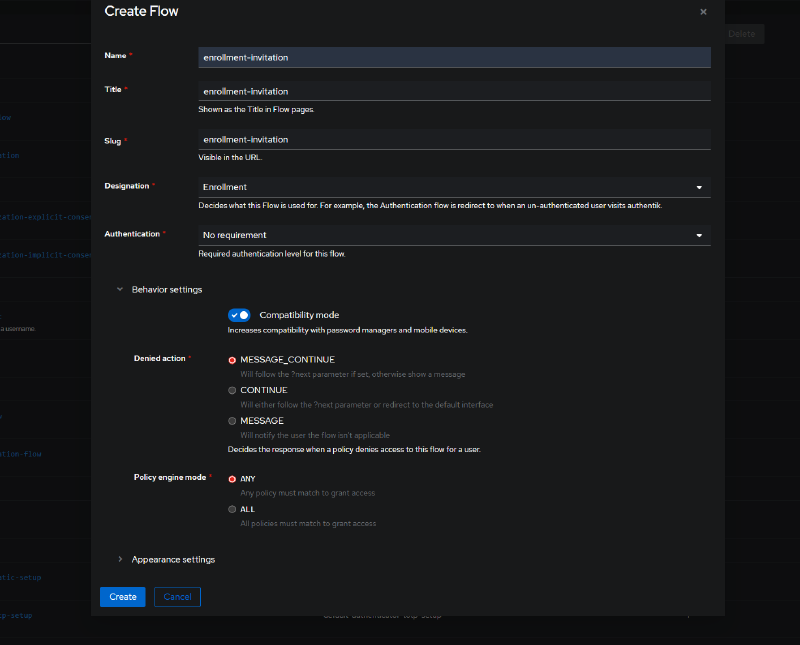
Next, go to Flows > Create and set the necessary parameters. As before, I enable compatibility mode for password managers.
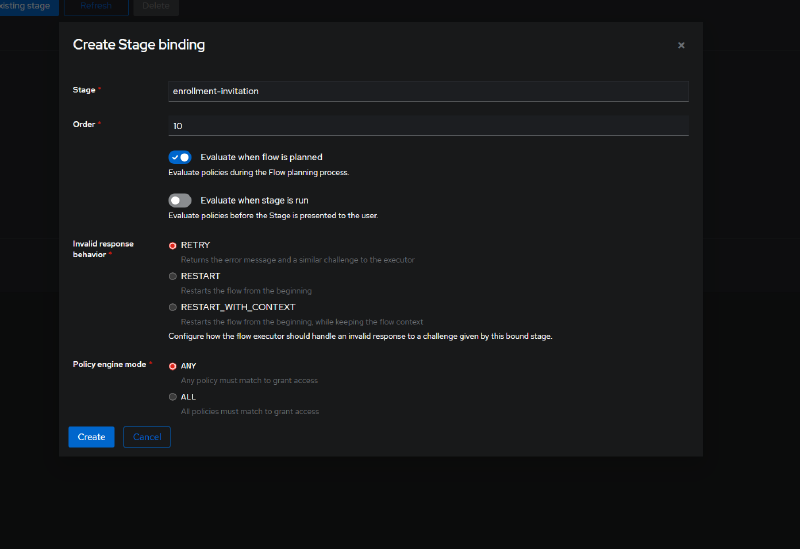
Now go to the enrollment invitation flow we just created, and click Bind existing stage.
Here we select the stage we created, set its processing order, and choose Evaluate when flow is planned instead of Evaluate when stage is run.
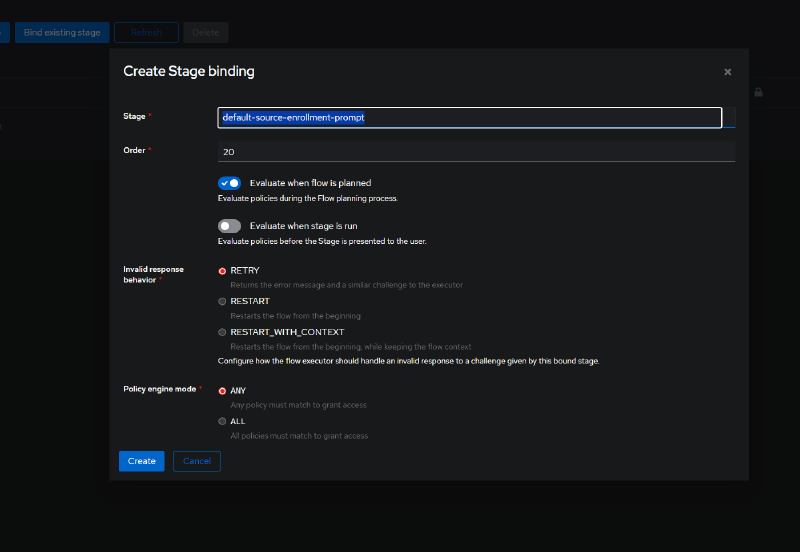
Click Bind existing stage again and select default-source-enrollment-prompt, set its processing order, and choose Evaluate when flow is planned instead of Evaluate when stage is run.
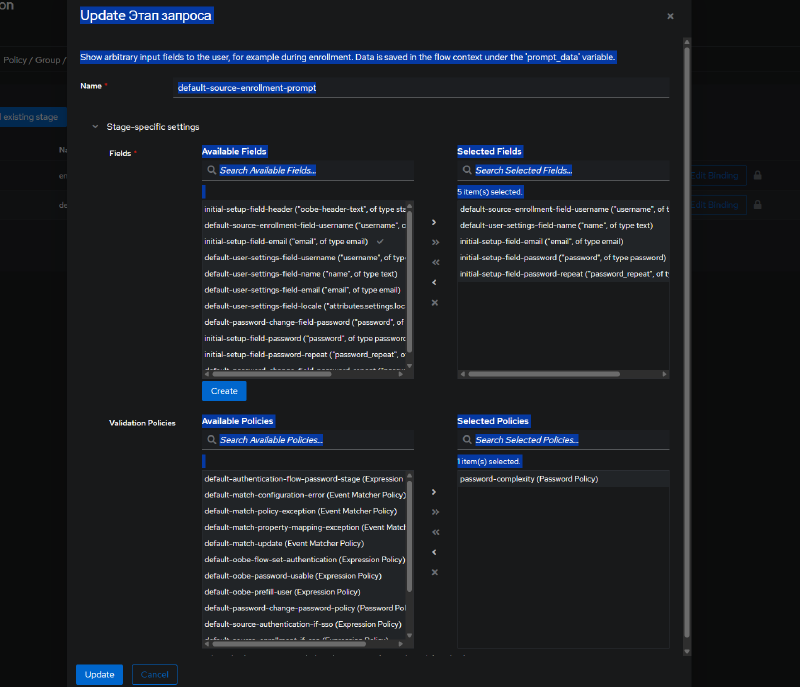
Now edit the default-source-enrollment-prompt stage and check that everything matches the screenshot. Basically, everything here is similar to the settings described at the beginning of this article.
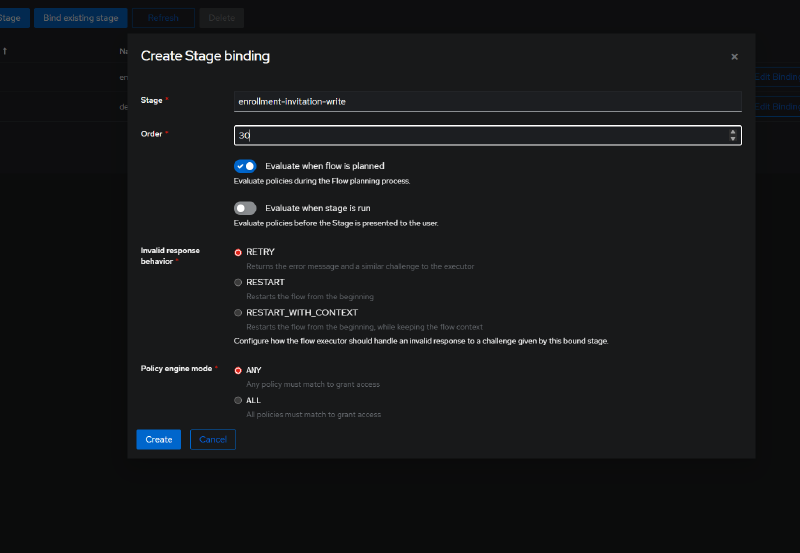
Click Bind existing stage again and select enrollment-invitation-write, set its processing order, and choose Evaluate when flow is planned instead of Evaluate when stage is run.
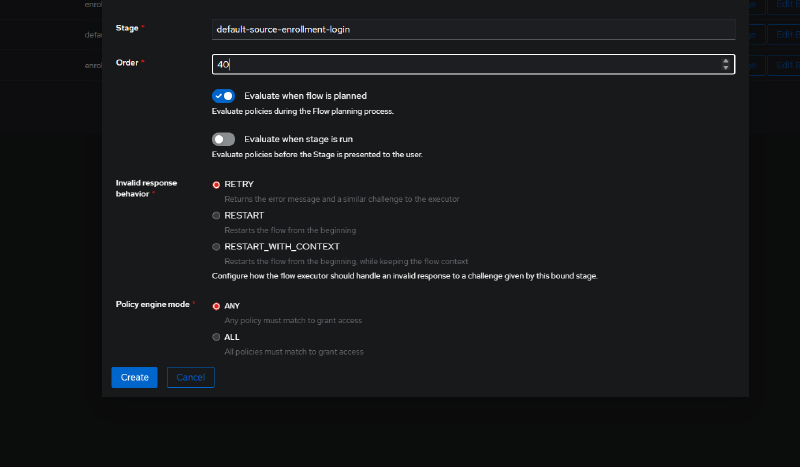
One last time, click Bind existing stage and select default-source-enrollment-login, set its processing order, and choose Evaluate when flow is planned instead of Evaluate when stage is run.
Creating invitations#
Now go to Directory > Invitations > Create
In the window that appears, give the invitation a name, specify how long it will be valid (you can effectively make it permanent), and decide whether it’s single use or reusable multiple times.
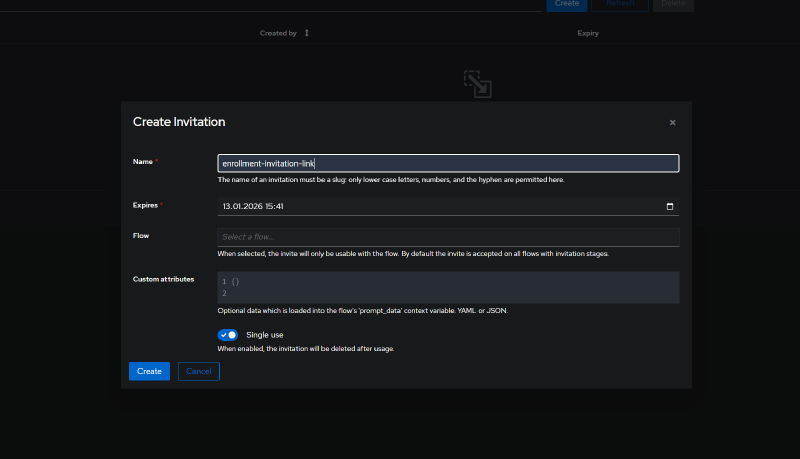
Click Create.
Now, to get the invitation link, just click the corresponding item in the dropdown menu, and we get our invitation link, which we can send to our users.
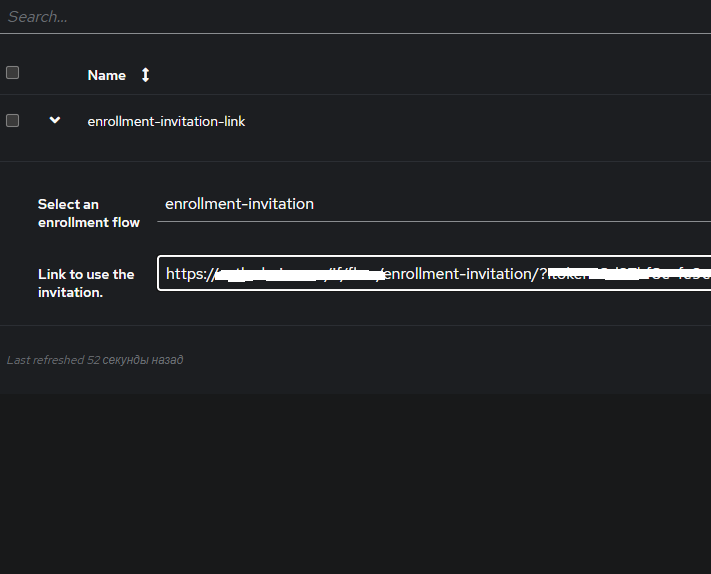
Now anyone who receives such an invitation link, upon following it, will land on the new user registration menu, just like in the previous section.
Shutting the door on self-registration#
Freedom is good, but in moderation. Let’s say we’ve registered everyone we need and aren’t expecting anyone else. Now we’ll strictly forbid new users from registering without our explicit control.
Go to Stages > Create and create a new Deny Stage.
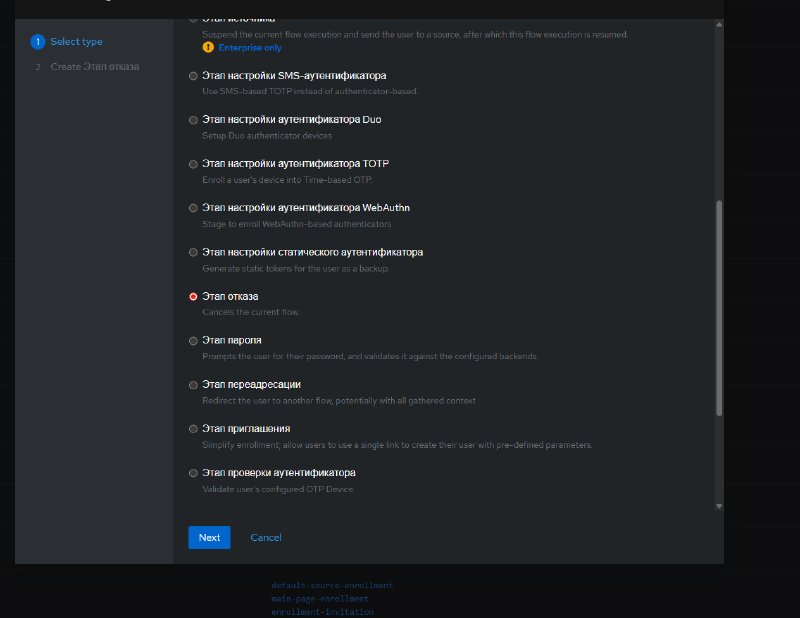
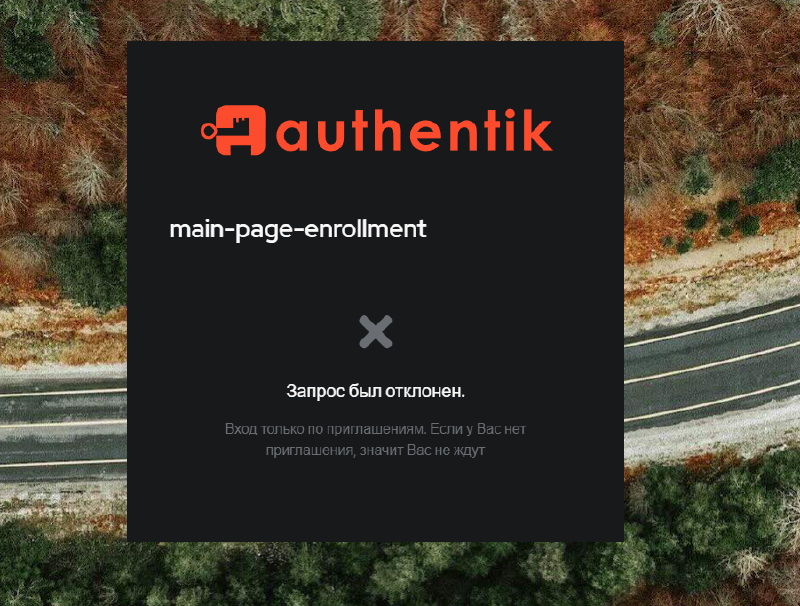
Click Next, give our stage a name, and write the message that an uninvited guest will see if the wild idea strikes them to try registering on our Authentik instance.
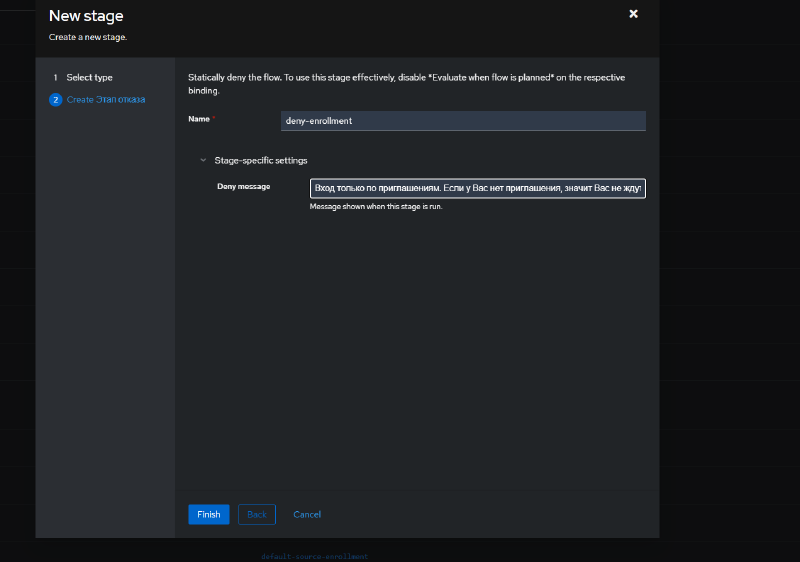
Go to Flows > main-page-enrollment, go to Bind existing stage.
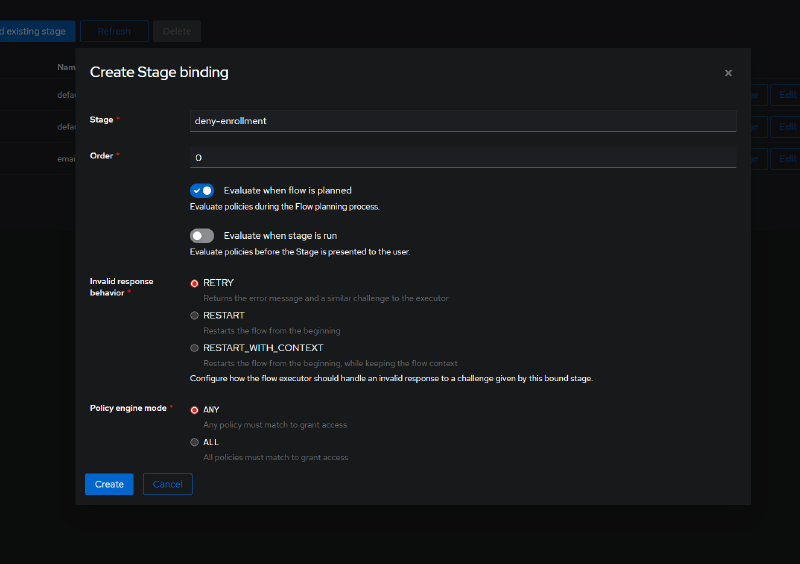
Select our Deny Stage. For the order number, choose any value, but with the mandatory condition that this stage is processed first - in my case that’s 0 - and choose Evaluate when flow is planned instead of Evaluate when stage is run, then click Create.
Now, in incognito mode, let’s try registering on our Authentik instance, and if we did everything right, the user (whom we weren’t expecting) will get a rather unpleasant message.
With that, this article, which is essentially just a bunch of fun screenshots, can come to a close.