
ProHomelab: automating article publishing - a detailed, field-tested walkthrough#
This note describes how to set up article auto-publishing: you write in Obsidian → the article automatically goes to Forgejo → this triggers a Hugo build (Blowfish theme) → the finished site automatically uploads to your hosting. Manual hugo -D and FileZilla are no longer needed.
When I started writing this, it genuinely was my day-to-day workflow. These days I don’t actually publish this way anymore. What’s described here still works perfectly well - it’s just not the most optimal setup out there, and this article is really more a record of how I got there than a recommendation for how you specifically should do it.
This guide was written after actually going through the entire process from start to finish - including every mistake I ran into, and the ready-made fixes for them. If you follow it step by step from scratch, you shouldn’t have to rediscover these same headaches.
Written for beginners. The examples use my own repository names, server, and login - yours will be different, but the command structure stays the same.
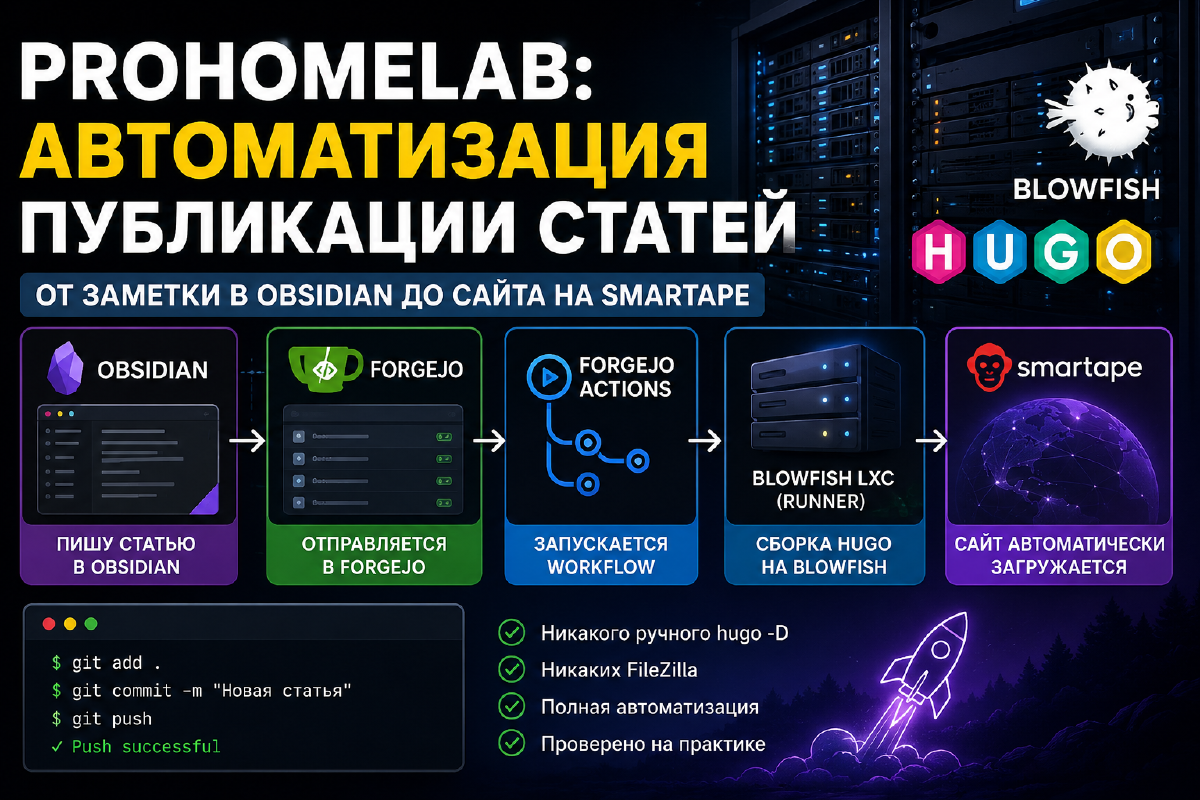
What this looks like on a diagram#
Before diving into the steps, here’s the big picture of what we’re going to build. Later in the guide we’ll break down each block separately, but first - where things move from and to.

In short, in plain words:
- You save a note in Obsidian.
- It automatically flies off to the article repository on Forgejo (this is just plain-text storage, nothing more).
- This repository “wakes up” the site repository - telling it “something new has appeared, time to rebuild the site.”
- A runner (a background program on your server) sees this signal, grabs the fresh articles, runs Hugo, and builds finished HTML pages from them.
- The finished site is automatically uploaded to the hosting - exactly what visitors see.
Everything that happens between “saved in Obsidian” and “article is on the site” is the automation we’re about to set up step by step.
0. Terms you’ll run into below#
- git - a version control system. Tracks file changes and can send them to a server.
- repository (repo) - a folder that git tracks.
- remote - the address of a remote server (in our case, Forgejo) that the repository sends changes to.
- commit - a “snapshot” of changes with a comment, saved in git’s history.
- push - sending commits to the remote server.
- pull / clone - downloading a repository (or its changes) from the server to yourself.
- submodule - a repository inside a repository (this is how the Blowfish theme is attached in your setup).
- CI/CD, Forgejo Actions - a mechanism that means “if something changed in the repository, automatically run a set of commands” (called GitHub Actions on GitHub, and Forgejo Actions on Forgejo).
- runner - the program that physically executes these automated commands.
- workflow - a YAML file describing which steps to run and when.
- YAML - a text-based configuration file format (indentation matters, tabs aren’t allowed, only spaces).
- secrets - encrypted variables (passwords, tokens) that Forgejo Actions substitutes into a script without showing them in the logs.
- access token (Personal Access Token) - a long password-like string for programmatic access to Forgejo instead of your regular account password.
- SSH - a protocol for connecting to a server via a terminal.
- systemd service - a way on Linux to run a program in the background and keep it always on, even after a reboot.
1. Architecture#
Two repositories on Forgejo:
- prohomelab-content - articles only (for me this is the
01-Projects\Prohomelabfolder in Obsidian). No Hugo theme files, no Obsidian service files. - prohomelab-site - the entire Hugo project: the Blowfish theme, configs, layouts, build scripts.
Why two repos instead of one: Obsidian Git can only version a single specific subfolder, and there’s no reason to drag Hugo-specific files into it. Maybe I’m wrong about this being the ideal setup - but it’s what’s working for me right now.
The sequence of events when publishing an article:
- You save a note in Obsidian.
- The Obsidian Git plugin automatically commits and pushes the change to prohomelab-content.
- The push to prohomelab-content triggers its own workflow, which “wakes up” the second repository via the Forgejo API.
- On the server, the runner: downloads the fresh content → fixes Obsidian’s image syntax → drops the articles into the Hugo project →
hugo -D --minify→ uploadspublic/to the hosting via FTPS.
An important difference from how GitHub does it: in Forgejo (at least in the version used here, v13), there is no repository_dispatch API event with an arbitrary event name, unlike GitHub Actions. There’s only workflow_dispatch - triggering a specific, already-known workflow file by name via POST /repos/{owner}/{repo}/actions/workflows/{filename}.yml/dispatches. The whole scheme below is built around that from the start. I didn’t get this at first and kept slamming into a 404 - pulled out what little hair I have left and nearly launched the monitor across the room. Got it sorted eventually; the Troubleshooting section at the end of the article walks through how to spot this exact error and fix it.
Phase 1. Getting the Hugo repository on the server in order#
Step 1.1. Connect to the server via SSH#
ssh root@IP_ВАШЕГО_СЕРВЕРАFrom here on, every command in this section runs inside this SSH session.
Step 1.2. Go to the project folder#
cd /home/prohomelab
pwd
This should print /home/prohomelab (or your own path, if your Hugo project lives somewhere else).
Step 1.3. Tell git who you are#
git config user.name "Ваше имя"
git config user.email "you@example.com"
Without --global - this setting applies only to this repository.
Step 1.4. Create a .gitignore file#
cat > .gitignore <<'EOF'
public/
resources/_gen/
.hugo_build.lock
EOF
cat .gitignore
public/ (the Hugo build output) and resources/_gen (cache) are rebuilt from scratch every time, so we exclude them from version control.
Step 1.5. Remove public/ and resources/ from git if they already ended up in the repository#
git rm -r --cached public resources 2>/dev/null || trueStep 1.6. First commit#
git add .
git status
Check the list - public/ and resources/ shouldn’t be in the commit; everything else (content/, themes/, hugo.toml, .gitmodules, etc.) should be marked green.
git commit -m "Initial commit: Hugo + Blowfish site"Step 1.7. Create an empty repository on Forgejo#
In your browser, open your Forgejo instance (mine is https://forgejo.ваш-домен.ru) → “+” → New Repository → name it prohomelab-site → DO NOT check any initialization boxes (README/.gitignore/license - the repository must stay empty) → Create Repository.
Step 1.8. An access token instead of a password (set it up now, so it doesn’t trip you up at push time)#
Pushing over HTTPS to Forgejo requires not your regular account password, but a Personal Access Token. Create one universal token right away for all tasks in this project:
Settings → Applications → Generate New Token → give it a name, for example prohomelab-ci → permissions: write:repository (repository access - All) → Generate. Save the token value - it’s shown only once.
Step 1.9. Attach a remote (the remote repository) with the token embedded in the URL#
git remote add origin https://ваш-логин:ВАШ_ТОКЕН@forgejo.ваш-домен.ru/ваш-логин/prohomelab-site.git
git branch -M main
git push -u origin main
Replace ваш-логин with your Forgejo login, forgejo.ваш-домен.ru with your Forgejo instance’s address, and ВАШ_ТОКЕН with the token from Step 1.8. This way the push will go through right away without any interactive password prompts.
Step 1.10. Check the result#
Open https://forgejo.ваш-домен.ru/ваш-логин/prohomelab-site - you should see hugo.toml, content/, themes/, etc.
So, here’s what we just accomplished: the Hugo site repository now lives in Forgejo and is fully version-controlled.
Phase 2. Setting up Obsidian so articles push to Forgejo automatically#
Step 2.1. Create a second empty repository on Forgejo#
Same as in Step 1.7, but named prohomelab-content.
Step 2.2. Initialize git right inside the article folder (not the whole vault!)#
On Windows, in PowerShell:
cd "C:\Users\ваш-пользователь\Documents\Obsidian\ваш-vault\01-Projects\Prohomelab"
git init
git config user.name "Ваше имя"
git config user.email "you@example.com"
If PowerShell doesn’t recognize the git command, that means you haven’t installed it yet - grab Git for Windows (https://git-scm.com/download/win), keep the default settings, and restart PowerShell.
Step 2.3. Exclude Obsidian service files#
@"
Prohomelab.base
_Prohomelab-Index.md
"@ | Out-File -Encoding utf8 .gitignore
Get-Content .gitignore
Add any other drafts or service notes here that shouldn’t be published. The example above reflects my own setup - your vault structure might be different, so don’t copy the command mindlessly.
Step 2.4. First commit and push#
git add .
git status
git commit -m "Initial content"
git remote add origin https://ваш-логин:ВАШ_ТОКЕН@forgejo.ваш-домен.ru/ваш-логин/prohomelab-content.git
git branch -M main
git push -u origin main
The same token from Step 1.8 works here - it was issued with rights over every repository on your account, in case you already forgot.
Step 2.5. Configure the Obsidian Git plugin for this specific folder#
The plugin gets updated fairly often, so field names may have shifted by the time you read this - if something doesn’t match exactly, search by meaning rather than by the literal label.
Open Obsidian → Settings → Git → the Advanced section → the Custom base path field:
01-Projects/Prohomelab(with a / slash, even on Windows). This is the key setting - without it, the plugin operates on the entire vault root.
After saving, the plugin might ask you to reload Obsidian - go ahead and agree, it’s not like you have much of a choice anyway.
After reloading, in the same Git settings (field names may differ between versions - newer versions have this as a combined phrasing):
- Auto commit and sync interval (minutes) - for example
10. Every N minutes: if there are unsaved changes, commit and immediately push. (In older versions of the plugin, this might have been two separate fields - Vault backup interval and Auto push interval - in that case, set both to the same value, if you’re for some reason still running such an ancient version.) - Commit message on auto commit and sync - you can leave this at the default.
- Pull on startup - enable this to pull in changes when Obsidian opens (useful if you work from more than one device).
Just don’t confuse this with the Automatically refresh Source Control View on file changes setting - that’s purely a UI window refresh and has nothing to do with auto-commit/auto-push.
Step 2.6. Verify auto-commit#
Open any article, add a test character (I usually write something like “stilicho, you absolute donkey” - it’d be a little concerning if you wrote the exact same thing), save. Through the command palette (Ctrl+P), manually run the commit/sync command without waiting for the timer, then check https://forgejo.ваш-домен.ru/ваш-логин/prohomelab-content - a new commit should appear.
So, to sum up everything in this phase: saving a note in Obsidian reaches Forgejo without your involvement.
Phase 3. Setting up a runner on the server#
A runner is a background program that waits for a signal from Forgejo: “something changed in the repository, run these commands, and make it quick.”
Step 3.1. Check that Forgejo Actions is enabled#
Since Forgejo v1.21, Actions is enabled by default - you almost certainly won’t need to turn anything on. Easiest way to check is straight in the browser: open any repository (prohomelab-site) - there should be an Actions tab up top. If it’s already there, skip straight to Step 3.2, no need to touch app.ini.
If the tab is missing, then it’s fixable through [actions] in app.ini - the same way as in the GitOps article.
If your Forgejo runs in Docker Compose (the most common case in a homelab): find the data folder on the host where docker-compose.yml lives - it’s usually specified under volumes: as ./forgejo:/data. In that case, the config lives at:
<folder-with-docker-compose.yml>/forgejo/gitea/conf/app.iniEdit it directly on the host (without going inside the container):
nano ./forgejo/gitea/conf/app.iniAdd this to the end of the file:
[actions]
ENABLED = true
Save (Ctrl+O, Enter, Ctrl+X) and restart the container:
docker restart forgejo(check the container name in your docker-compose.yml, the container_name field).
Verify the setting took effect:
docker exec forgejo cat /data/gitea/conf/app.ini | grep -A2 "\[actions\]"It should show ENABLED = true, and the Actions tab will appear on the repository.
Step 3.2. Download and verify the runner binary#
Unlike GitHub, code.forgejo.org doesn’t have a /latest/download/... alias - but it does have an API that hands you the current release number in one command, no trip to the browser and no manually copying links:
export ARCH=$(uname -m | sed 's/x86_64/amd64/;s/aarch64/arm64/')
export RUNNER_VERSION=$(curl -s https://data.forgejo.org/api/v1/repos/forgejo/runner/releases/latest | jq -r .name | cut -c2-)
export FORGEJO_URL="https://code.forgejo.org/forgejo/runner/releases/download/v${RUNNER_VERSION}/forgejo-runner-${RUNNER_VERSION}-linux-${ARCH}"

wget -O forgejo-runner "${FORGEJO_URL}"
wget -O forgejo-runner.asc "${FORGEJO_URL}.asc"
Forgejo binaries are signed with the project’s GPG key - worth checking the signature before running anything as a system user with access to your server:
gpg --keyserver hkps://keys.openpgp.org --recv EB114F5E6C0DC2BCDD183550A4B61A2DC5923710
gpg --verify forgejo-runner.asc forgejo-runner
The output should include Good signature from "Forgejo <contact@forgejo.org>". If you get BAD signature instead - the file got corrupted or swapped during download; delete it and download again, don’t proceed until this checks out.
The line WARNING: This key is not certified with a trusted signature! below that is normal and has nothing to do with the file’s integrity. It just means you personally haven’t signed this key in your own GPG web of trust (nobody does that for a one-off binary check) - not that anything’s wrong with the signature itself. What matters is the Good signature from line and the fingerprint matching what you requested from the keyserver (EB11 4F5E ... C592 3710).
Step 3.3. Install the binary and create a dedicated user#
chmod +x forgejo-runner
sudo mv forgejo-runner /usr/local/bin/forgejo-runner
forgejo-runner -v

sudo useradd --create-home runner
The runner for building the site runs in host mode - it executes jobs directly on the system, no Docker involved. So unlike runners that need access to the Docker socket, there’s no need to add the runner user to the docker group here.
Step 3.4. Register the runner#
Articles and videos about Forgejo Actions often show the command forgejo-runner register --instance ... --token ... --name ... - interactive registration with a one-time token from the web UI. That command is officially marked deprecated in Forgejo’s own docs - it still works, but it’s no longer the recommended path. The current approach is declarative, with no interactive prompt, and happens in two steps on two different machines.
You can get the UUID + secret pair two equally valid ways - pick whichever’s more convenient.
Option A: via CLI on the Forgejo side. Log into the host where Forgejo itself runs (if it’s in Docker Compose - via docker exec into its container):
docker exec -it forgejo forgejo forgejo-cli actions register \
  --name site-runner \
  --scope ваш-логин \
--secret $(openssl rand -hex 20)Unlike the setup in the Renovate article (where the runner only had to serve a single repository, and --scope was set to owner/repo), here the same host-labeled runner needs to be visible to both of your repositories - prohomelab-content (which needs it for notify.yml) and prohomelab-site (for deploy.yml). So --scope isn’t set to a specific repository, but to the owner level - just your Forgejo login, no slash, no repo name. That way every one of your repositories can see the runner, not just one.
The command prints a UUID - copy it along with the secret for the next step.
Option B: through the web UI, no console at all. For our case (a runner shared across several repositories) this is actually the more convenient path - open the personal account page:
https://forgejo.ваш-домен.ru/user/settings/actions/runners- Log in as your regular account.
- Click Create new runner, and give it a sensible name in the name field, e.g.
site-runner. - Click Create - Forgejo immediately shows you the page with a ready-made UUID and secret (auto-generated for you).
- Copy both values - they go into
config.yamlin the next step.
The secret is shown exactly once and isn’t stored anywhere in plaintext after that - if you close the page without copying it, you’ll have to delete this runner registration and create a fresh one.
Step 3.5. Generate and fill in config.yaml#
sudo -u runner forgejo-runner generate-config | sudo -u runner tee /home/runner/config.yaml > /dev/nullrunner is the dedicated system user we created in Step 3.3, and its home directory /home/runner isn’t just openly readable by your regular login - only root and runner itself have access. Try nano /home/runner/config.yaml under your own login and you’ll get Permission denied. So from here on, use sudo for reading or editing anything inside /home/runner.
The file you get out of this isn’t some bare-bones template - it’s a full example config running several hundred lines, with every section documented right there in the comments. No need to understand it end to end - we’re touching exactly two specific spots, everything else stays as generated:
sudo nano /home/runner/config.yamlFirst spot - the runner: section, labels field. It’s empty by default:
runner:
  ...
  labels: []
Replace it with a list containing one label - this is exactly what both workflows (deploy.yml and notify.yml, both using runs-on: host in the examples below) will use to find this runner:
runner:
  ...
  labels:
    - "host:host"
Second spot - the server: section, connections field. In the generated file it sits at the very end of the server: section and is empty by default - everything above it (# example:, # codeberg:) is commented out and there purely as an example, leave it alone:
server:
  connections:
Right below that line, indented two spaces deeper than connections:, add your own block - forgejo here is just a key for this connection (name it whatever you like), followed by the three values from the previous step:
server:
  connections:
    forgejo:
      url: https://forgejo.ваш-домен.ru/
      uuid: <UUID_FROM_STEP_3.4>
token: <THE_SAME_SECRET_FROM___SECRET_ABOVE>Unlike the runner set up for Renovate, you don’t need to touch the container: section or the docker_host field here - that field controls passing the Docker socket into the job’s container, and our host-type runner never runs jobs inside containers at all, so there’s nothing to pass through.
Save (Ctrl+O, Enter) and exit (Ctrl+X).
Step 3.6. Create a systemd service#
The current unit file is already sitting in the runner’s official repository - no need to write it by hand, just download it and fix the path to your config:
sudo wget -O /etc/systemd/system/forgejo-runner.service \
  https://code.forgejo.org/forgejo/runner/raw/branch/main/contrib/forgejo-runner.service
sudo sed -i 's|/home/runner/runner-config.yml|/home/runner/config.yaml|' /etc/systemd/system/forgejo-runner.service
By default the unit points at /home/runner/runner-config.yml - the sed above swaps that for the file we generated in Step 3.5 (config.yaml). From here it’s like any other new unit file - reload systemd’s config and enable the service:
sudo systemctl daemon-reload
sudo systemctl enable --now forgejo-runner
sudo systemctl status forgejo-runner
Should say active (running).
Check the logs to confirm the runner actually started up and connected to Forgejo:
journalctl -u forgejo-runner -fAnd in the web UI (wherever you registered it in Step 3.4) - the runner should show up with status Idle (might take a minute).
Step 3.7. Install the build and deploy dependencies#
apt update
apt install -y git lftp locales
locale-gen en_US.UTF-8
update-locale LANG=en_US.UTF-8
The locales package and generating en_US.UTF-8 are needed so lftp (and a few other utilities) handle strings correctly - without this you’ll run into hard-to-explain errors like “could not convert string to UTF-8”.
Hugo should already be installed if you went through the previous article on setting up Hugo + Blowfish - check just in case:
hugo versionHere’s what this phase gets you: Forgejo now has a workhorse sitting on your server, ready to run the build.
Phase 4. Build and deploy script#
Step 4.1. Token for reading the content repository#
The same method as in Step 1.8 - you can reuse the same prohomelab-ci token (if you gave it write:repository across all repositories, that’s enough, it covers reading too). If you’re making a separate one, read:repository rights are sufficient for this task.
Step 4.2. Content sync script#
On the server:
cd /home/prohomelab
mkdir -p scripts
cat > scripts/sync-content.sh <<'EOF'
#!/usr/bin/env bash
set -euo pipefail
export GIT_TERMINAL_PROMPT=0
CONTENT_REPO_HOST="forgejo.ваш-домен.ru/ваш-логин/prohomelab-content.git"
CONTENT_DIR="/tmp/prohomelab-content"
TARGET_DIR="content/posts"
if [ -n "${CONTENT_REPO_TOKEN:-}" ]; then
CONTENT_REPO_URL="https://ваш-логин:${CONTENT_REPO_TOKEN}@${CONTENT_REPO_HOST}"
else
echo "ERROR: CONTENT_REPO_TOKEN is not set" >&2
exit 1
fi
rm -rf "$CONTENT_DIR"
git clone --depth 1 "$CONTENT_REPO_URL" "$CONTENT_DIR"
rsync -a --delete \
--exclude='.git' \
--exclude='Prohomelab.base' \
--exclude='_Prohomelab-Index.md' \
"$CONTENT_DIR/" "$TARGET_DIR/"
find "$TARGET_DIR" -type f -name '*.md' -print0 | xargs -0 sed -i -E 's/!\[\[([^]]+)\]\]//g'
echo "Content synced and converted."
EOF
chmod +x scripts/sync-content.sh(In the CONTENT_REPO_HOST line, substitute your own Forgejo domain and login for forgejo.ваш-домен.ru/ваш-логин.)
Breakdown of the key parts:
export GIT_TERMINAL_PROMPT=0- stops git from trying to interactively ask for a login/password. Without this line, if the token doesn’t arrive for whatever reason, git can hang indefinitely on theclonecommand, waiting for input from a terminal that isn’t there, instead of just throwing an error right away. We learned this one the hard way - it hung for many minutes before we manually killed it.- The explicit check
if [ -n "${CONTENT_REPO_TOKEN:-}" ]- if the secret never showed up, the script immediately fails with a clearERROR: CONTENT_REPO_TOKEN is not set, instead of wasting time trying to connect without authorization. git clone --depth 1- downloads only the latest state with no history, faster.rsync -a --delete- syncs the content, removing on the site side anything that no longer exists in the content (otherwise articles deleted in Obsidian would just keep sitting on the site forever).- The
sedat the end converts Obsidian’s image embed syntaxinto regular markdown, which Hugo understands. If you later run into other Hugo-unfriendly constructs (callouts> [!note], internal wiki links[[Note]]between articles), add anothersedline here following the same pattern.
Test the script manually before trusting it to automation:
export CONTENT_REPO_TOKEN=ВАШ_ТОКЕН
bash scripts/sync-content.sh
unset CONTENT_REPO_TOKEN
ls content/posts
It should run through without asking about a password and show the folder structure with your articles.
Commit the script right away, don’t put it off - this is a common cause of a “No such file or directory” error on the first run through Actions: the runner always works off a clean checkout from git, not whatever’s physically sitting on disk:
git add scripts/sync-content.sh
git commit -m "Add content sync script"
git push
Step 4.3. The build-and-deploy workflow file#
mkdir -p .forgejo/workflows
cat > .forgejo/workflows/deploy.yml <<'EOF'
name: Build and Deploy

on:
  push:
    branches: [main]
  workflow_dispatch:

jobs:
  deploy:
    runs-on: host
    steps:
      - name: Checkout site repo
        uses: actions/checkout@v4
        with:
          submodules: recursive

      - name: Sync content from Obsidian repo
        env:
          CONTENT_REPO_TOKEN: ${{ secrets.CONTENT_REPO_TOKEN }}
        run: bash scripts/sync-content.sh

      - name: Build with Hugo
        run: hugo -D --minify

      - name: Deploy via FTP
        env:
          FTP_HOST: ${{ secrets.FTP_HOST }}
          FTP_USER: ${{ secrets.FTP_USER }}
          FTP_PASS: ${{ secrets.FTP_PASS }}
        run: |
          lftp -u "$FTP_USER,$FTP_PASS" "$FTP_HOST" <<'INNEREOF'
          set ssl:verify-certificate no
          mirror -R --delete --verbose public/ /www/ВАШ_ДОМЕН
          bye
          INNEREOF
EOF
Breakdown:
on:- justpush(for your own pushes to the site, e.g. a theme tweak) andworkflow_dispatch(can be triggered manually from the UI, which is exactly how the second repository will trigger it - see Step 4.5). We deliberately avoidrepository_dispatch- that API event doesn’t exist in Forgejo, and trying to use it gets you a404 page not found.runs-on: host- run on the runner taggedhost(the left-hand part of the label from Step 3.5).submodules: recursive- pulls in the Blowfish theme during checkout.hugo -D --minify--Dincludes drafts (drop this flag once you’re ready to go fully live and stop publishing drafts by accident),--minifycompresses the output.set ssl:verify-certificate no- a lot of shared hosting providers use an FTPS certificate that fails strict trust validation even though the connection is genuinely encrypted. Without this line,lftpfails withCertificate verification: The certificate is NOT trusted. If your host’s certificate is legit, you can drop this line.- The
/www/ВАШ_ДОМЕНpath - don’t guess it, verify it manually (Step 4.4) before putting it in the workflow - it decides where--deletegoes to remove files.
Step 4.4. Verify the real path on your hosting before running --delete blindly#
Go to your hosting control panel and check the “Root directory” field for the site in question - it often looks like www/ваш-домен.ru, not just ваш-домен.ru or a bare project name without the domain. Don’t rely on memory from your FileZilla days - check it again; a wrong path with --delete can wipe the wrong thing.
Connect manually right from the server:
lftp -u ВАШ_FTP_ЛОГИН ftp://АДРЕС_FTP_СЕРВЕРАIf the very first command (ls) gets you:
Fatal error: Certificate verification: The certificate is NOT trusted.- run this in the same session:
set ssl:verify-certificate noand try ls again.
If after that you get 530 Login incorrect - double-check your password (easy to fat-finger when it’s hidden), log out (exit) and log back in.
Once you’re in, browse the structure and confirm you’re seeing actual Hugo site files (index.html, posts/, sitemap.xml):
ls
cd www
ls
cd ВАШ_ДОМЕН
ls
Note the exact path (say, /www/prohomelab.com) and drop it into mirror -R --delete --verbose public/ ЭТОТ_ПУТЬ in Step 4.3, replacing the placeholder. Exit: exit.
Commit deploy.yml:
cd /home/prohomelab
git add .forgejo/workflows/deploy.yml
git commit -m "Add deploy workflow"
git push
Step 4.5. The second workflow - the “alarm clock” in the content repository#
A push to prohomelab-content on its own doesn’t trigger a workflow in prohomelab-site - these are two independent repositories. You need a small workflow that calls the Forgejo API to trigger a specific workflow file (deploy.yml) in the second repository.
On Windows, in PowerShell, in the content folder:
cd "C:\Users\ваш-пользователь\Documents\Obsidian\ваш-vault\01-Projects\Prohomelab"
mkdir .forgejo\workflows -Force

@"
name: Notify site repo

on:
  push:
    branches: [main]

jobs:
  notify:
    runs-on: host
    steps:
      - name: Trigger site build
        env:
          TOKEN: `${{ secrets.FORGEJO_DISPATCH_TOKEN }}
        run: |
          curl -X POST \
            -H "Authorization: token `$TOKEN" \
            -H "Content-Type: application/json" \
            "https://forgejo.ваш-домен.ru/api/v1/repos/ваш-логин/prohomelab-site/actions/workflows/deploy.yml/dispatches" \
            -d '{"ref":"main"}'
"@ | Out-File -Encoding utf8 .forgejo\workflows\notify.yml

Get-Content .forgejo\workflows\notify.yml
Notice the backticks ` before ${{ and $TOKEN - in PowerShell that’s an escape character, so those characters land in the file literally instead of getting substituted by PowerShell itself. Check the Get-Content output - it should show exactly ${{ secrets.FORGEJO_DISPATCH_TOKEN }} and $TOKEN, with nothing mangled.
Important about the endpoint itself: it uses /actions/workflows/deploy.yml/dispatches (triggering a specific workflow by file name) with the body {"ref":"main"} - that’s the correct, working way to do this in Forgejo. The path /repos/{owner}/{repo}/dispatches with a body of {"event_type": "..."} (the equivalent of GitHub’s repository_dispatch) doesn’t exist in Forgejo and will get you a 404 - don’t use it, even if you see it in examples written for GitHub Actions.
Commit and push:
git add .forgejo/workflows/notify.yml
git commit -m "Add dispatch workflow"
git push
Step 4.6. Secrets#
In prohomelab-content (Settings → Actions → Secrets):
FORGEJO_DISPATCH_TOKEN- the token from Step 1.8/4.1 (needs at least permission to trigger a workflow in the target repository - a token withwrite:repositoryon all repositories works).
In prohomelab-site:
CONTENT_REPO_TOKEN- the same token, for reading the content repository.FTP_HOST- your hosting’s FTP server address.FTP_USER- your FTP login.FTP_PASS- your FTP password.
Phase 4 checkpoint: both workflow files, the script, and all secrets are in place. ✅
Phase 5. End-to-end verification#
Step 5.1. Test change#
In Obsidian, edit an article, save it, run commit/sync manually (command palette, Ctrl+P), without waiting for the timer.
Step 5.2. Check notify.yml#
https://forgejo.ваш-домен.ru/ваш-логин/prohomelab-content/actions → there should be a new notify.yml run with status Success.
Step 5.3. Check deploy.yml#
https://forgejo.ваш-домен.ru/ваш-логин/prohomelab-site/actions → a new deploy.yml run should appear, triggered via workflow_dispatch (not via push - check the trigger label). Expand every step:
- Checkout site repo - just completes.
- Sync content from Obsidian repo - should take seconds (not minutes - if it hangs a while, check the Troubleshooting section below).
- Build with Hugo - Hugo’s output, how many pages got built.
- Deploy via FTP - the list of files
lftpis uploading.
Overall job status should be Success.
Step 5.4. Live check#
Open your site in the browser and confirm the edit is actually there.
The “why isn’t this working” section (from real experience)#
git pushasks for a password and rejects the regular account password. Use a Personal Access Token instead of a password (Step 1.8), or embed it directly in the remote URL right away:git remote set-url origin https://ваш-логин:ВАШ_ТОКЕН@forgejo.ваш-домен.ru/....docker exec forgejo cat /data/gitea/conf/app.inidoesn’t show your[actions]edit. That means you edited the wrong file on the host - check thevolumes:path indocker-compose.yml; the config lives at<volume-host-path>/gitea/conf/app.ini.export RUNNER_VERSION=$(...)in Step 3.2 comes back empty, or you getjq: command not found. On a fresh serverjqoften isn’t installed by default - install it (apt install -y jq) and run the command again. Ifjqis there and the string is still empty, manually check whethercurl -s https://data.forgejo.org/api/v1/repos/forgejo/runner/releases/latesteven responds (maybe outbound access is blocked by a firewall).gpg --recv EB114F5E...hangs or fails with a connection error. Thehkps://keys.openpgp.orgkeyserver is occasionally unreachable from certain networks - try again in a minute, or point--keyserverat a different one. Don’t skip the signature check itself - it’s exactly what protects you from a tampered binary.The runner is registered, but jobs in the workflow are stuck forever on “Waiting for a runner with the following label: host”. Open
/home/runner/config.yaml(sudo cat /home/runner/config.yaml | grep -A3 "labels") - in therunner:section,labelsshould be a list containing"host:host"(with the colon), not an empty[]and not a bare"host". Fixed it? Restart the service:sudo systemctl restart forgejo-runner.The runner shows offline in the web UI, even though
systemctl status forgejo-runnersaysactive (running). Almost always a typo or stale value in theserver: connections:section of/home/runner/config.yaml-uuid/tokenneed to match exactly what Forgejo showed you when you registered it in Step 3.4 (not some secret you typed in yourself, like the old--tokenflow used to work - here the secret is generated automatically or viaopenssl, not something you make up on the spot).git clonein the sync script hangs for many minutes instead of seconds. Addexport GIT_TERMINAL_PROMPT=0to the script and an explicit token check before the clone (see Step 4.2) - then instead of hanging, you get an instant, clear error if something’s wrong with the token.bash: scripts/sync-content.sh: No such file or directoryon the first run through Actions, even though the script is definitely on disk. The runner does a clean checkout from git every single time - if the script wasn’t committed and pushed, it physically doesn’t exist in the fresh copy. Commit and push the script right after creating it, don’t put it off.curlin notify.yml returns404 page not found. Most likely you’re hitting the nonexistent Forgejo endpoint/repos/{owner}/{repo}/dispatcheswith anevent_type(the equivalent of GitHub’srepository_dispatch). On Forgejo, use/repos/{owner}/{repo}/actions/workflows/{name}.yml/dispatcheswith the body{"ref":"main"}(see Step 4.5), and strip the non-functionalrepository_dispatchtrigger out ofdeploy.yml, keeping justpushandworkflow_dispatch.lftp: command not foundat the deploy step. You forgot to installlftpon the server -apt install -y lftp(Step 3.7).lftpthrowscould not convert string to UTF-8. The locale isn’t generated on the system, even thoughLANGpoints at it. Runapt install -y locales && locale-gen en_US.UTF-8 && update-locale LANG=en_US.UTF-8.lftp: Certificate verification: The certificate is NOT trusted. Common on shared hosting with a self-signed or untrusted FTPS certificate. Addset ssl:verify-certificate noas the first line in thelftpcommand block - both in the workflow and when testing manually.530 Login incorrectin lftp. Usually just a typo in the password when typing it by hand (it’s not shown on screen). Log out (exit) and back in, typing carefully, or paste the password straight from a password manager.Deployment succeeded, but files landed in the wrong folder on the hosting / overwrote something they shouldn’t have. Before trusting
--deleteto automation, always manually verify the real path vialftp(Step 4.4) and cross-check it against the “Root directory” in the hosting control panel - it can differ from what you remember from your FileZilla days.Hugo fails with
ERROR the "published" front matter field is not a parsable date. A specific article’s front matter has something other than a date in thepublishedfield -true/false, for example (if your site config treatspublishedas an alias for the publish date rather than a draft flag). Fix it to an actual date like2026-08-09, no quotes. Separately, the warning “has both draft and published settings… Using draft” isn’t an error - it’s just a notice thatdrafttakes priority overpublishedwhen both are set at once.Images aren’t showing up on the site. Almost certainly unprocessed Obsidian image embed syntax. Check the article’s markdown - maybe the image got inserted some other way than
(that pattern is already covered by the script) - if so, add anothersedrule toscripts/sync-content.shfollowing the same logic.The runner only runs one job at a time, and you cancelled the wrong run. The runner’s
config.yamldefaults tocapacity: 1- jobs run strictly one after another. Trigger a few runs back to back (say, while testing) and the extras just sit in the “Waiting” queue - that’s expected, don’t try to force them to run in parallel, either wait for the current one to finish or explicitly cancel it (the Cancel button on the run’s page).
What to do next, once everything’s set up#
The normal workflow from here: open Obsidian → write or edit an article → save → (optionally) run commit-and-sync right away if you don’t feel like waiting for the auto-push timer. Everything after that happens on its own: Forgejo → runner → build → upload to hosting. FileZilla and manual hugo -D are completely out of the picture.
If an article isn’t ready to publish yet but you want to commit your progress anyway, keep draft: true in the front matter; with hugo -D it’ll still end up on the site (handy for previewing, but keep that in mind - if you only want finished work going live, drop the -D flag from the hugo command in deploy.yml, and drafts won’t get built at all).