
Introduction#
If you enjoyed this article, you can support the author by becoming a sponsor on Boosty (link in the contacts section).
DNS is an essential protocol for internet communications. However, the security of this crucial - possibly the most important - protocol can be significantly improved. By default DNS has no encryption, and although authentication systems for DNS do exist, they have faced criticism and have not seen significant adoption. The DNSCrypt protocol was developed specifically to improve DNS security. DNSCrypt is a protocol that encrypts, authenticates, and can anonymize messages between a DNS client and a DNS resolver. It is an open standard with free and open-source reference implementations. It is not tied to any particular company or organization. DNSCrypt version 2 was developed and introduced in 2013 and is perhaps the most widely used encrypted DNS protocol today.
DNSCrypt helps repel DNS-spoofing attacks. It uses cryptographic signatures to authenticate that responses come from an authorized DNS resolver and remain unmodified.
In this article we’ll look at installing and configuring the DNSCrypt-proxy plugin on the OPNsense firewall. In addition, I’ll provide a list of public DNSCrypt servers and explain the features of the DNSCrypt service.
If DNSCrypt-proxy feels like overkill and you just want encrypted DNS through Unbound itself, without an extra plugin, check out my article on setting up DNS over TLS in OPNsense - a simpler alternative aimed at the same basic goal.
Installing the DNS-proxy plugin#
The DNSCrypt-proxy plugin is very easy to install.
Go to System > Firmware > Plugins. Type “dnscrypt” into the search box.
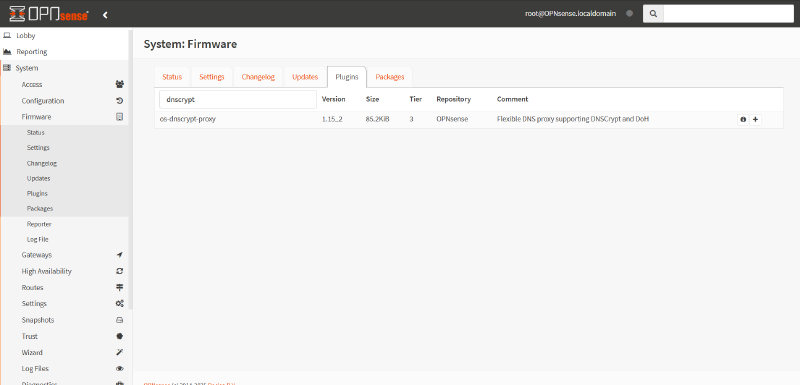
Click the + icon next to the plugin named os-dnscrypt-proxy to install it. You’ll then be redirected to the installation menu.
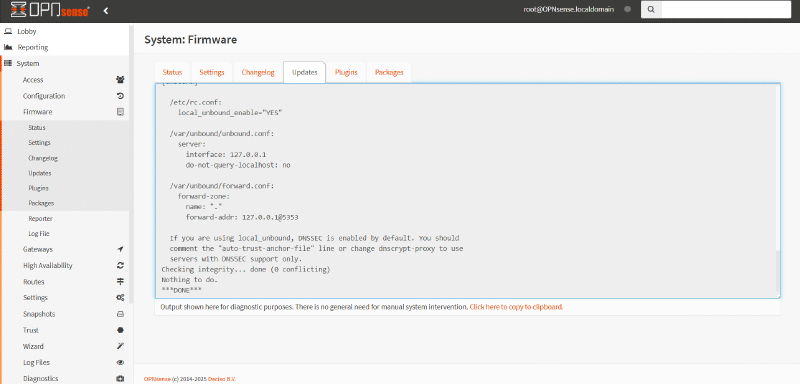
After refreshing the Opnsense menu with F5, a new DNSCrypt-Proxy menu will appear under Services.
Configuring the DNSCrypt-proxy plugin#
You can enable and configure DNSCrypt-proxy in OPNsense under Services > DNSCrypt-proxy > Configuration. When the daemon initializes, it will look up the list of public DNS servers at https://dnscrypt.info/public-servers. You can view that same list at that link.
Depending on the settings below, the list can be narrowed down based on your preferences - for example, you can disable logging or restrict logging to IPv4 addresses only. DNS queries will be handled by the two servers that process them fastest. The following settings are available on the DNSCrypt-proxy configuration page.
Enable DNSCrypt-Proxy: Check this to activate the service
Listen Address: You can configure the addresses and ports to listen on. The default settings are localhost and port 5353. To allow listening on port 53, you must enable Allow Privileged Ports, especially when the system is meant to act as a resolver.
Allow Privileged Ports: This option lets the service listen on ports below 1024, such as 53
Max Client Connections: You can set the maximum number of simultaneous client connections you want to accept.
Use IPv4 Servers: You can allow DNSCrypt-Proxy to use servers with IPv4 support
Use IPv6 Servers: You can allow DNSCrypt-Proxy to use servers with IPv6 support
Use DNSCrypt Servers: You can allow DNSCrypt-Proxy to use servers that support the DNSCrypt protocol.
Use DNS-over-HTTPS Servers: You can allow DNSCrypt-Proxy to use servers that support the DNSCrypt-over-HTTPS protocol.
Require DNSSEC: You can allow only DNS resolvers with DNSSEC enabled.
Require NoLog: You can allow only DNS resolvers with logging disabled.
Require NoFilter: You can allow only DNS resolvers without filtering.
Force TCP: You can consistently use TCP to connect to upstream servers. This is useful if you need to route all traffic through Tor; otherwise, don’t enable this feature.
Proxy: You can use this option to route all TCP connections through a local Tor node. The format should be 127.0.0.1:9050.
Timeout: You can specify how long, in milliseconds, a DNS query will wait for a response; the default is 2500.
Keepalive: I think this one’s self-explanatory; the default value is set to 30 seconds.
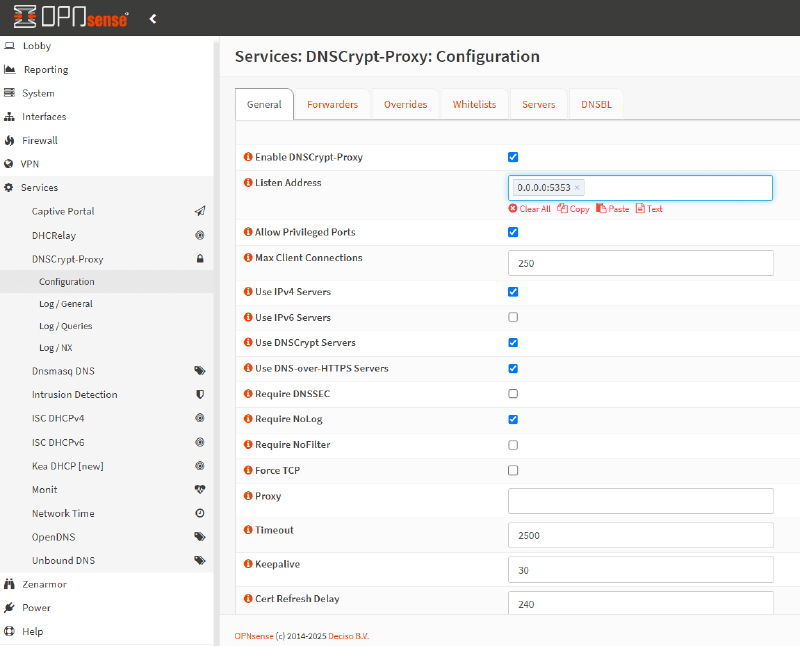
Cert Refresh Delay: You can specify the delay, in minutes, after which certificates will be reloaded; the default value is 240.
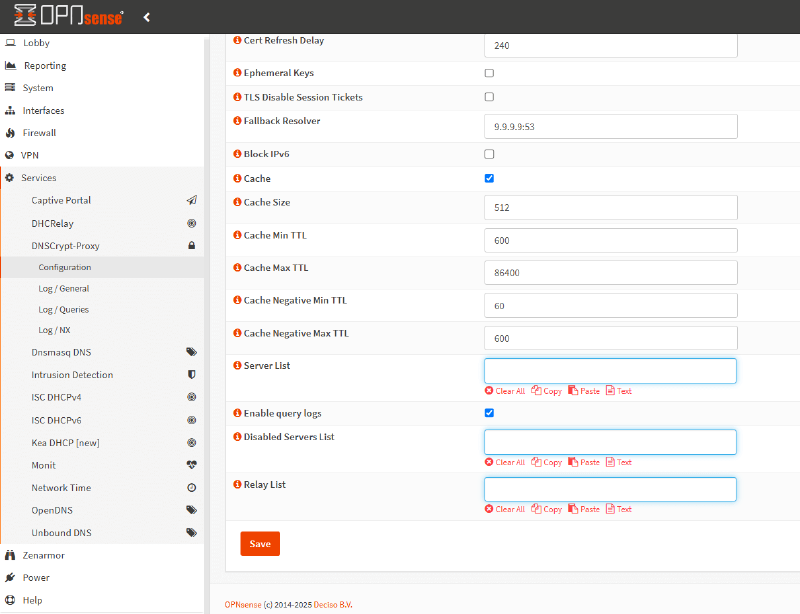
Ephemeral Keys: You can generate a separate key for each DNS query. This can improve privacy but may significantly affect CPU load.
TLS Disable Session Tickets: You can disable TLS session tickets. This improves privacy but also increases latency.
Fallback Resolver: This is the standard unencrypted DNS resolver, intended only for one-off queries to get the initial list of resolvers, and only in case of a failure in the system’s DNS configuration. The default value is 9.9.9.9:53, which corresponds to the Quad9 DNS service. You can change it to 1.1.1.1:53 to use Cloudflare.
Block IPv6: If you don’t use IPv6, you can disable this.
Cache: You can enable the cache if you want to reduce latency.
Cache Size: Specify the desired cache size
Cache Min TTL: Minimum TTL for cached records.
Cache Max TTL: Maximum TTL for cached records.
Cache Negative Min TTL: You can specify the minimum TTL for negatively cached records
Cache Negative Max TTL: You can specify the maximum TTL for negatively cached records
Server List: You can compile a list of known servers. You can also add your own servers manually. You can find the list of available servers in the section below. If this field is left empty, DNS servers are chosen at random.
Enable query logs: This option enables/disables local logs.
Disabled Servers List: You can exclude servers from automatic selection by adding any specific server names here, if you don’t want to use them for any reason.
Relay List: You can set a list of relay servers to be used for relaying to all configured servers.
Manually adding public DNSCrypt servers#
The DNSCrypt-proxy plugin lets you add specific public DNSCrypt servers of your choosing. To identify the public DNSCrypt servers you want to use in your OPNSense, you can follow these steps.
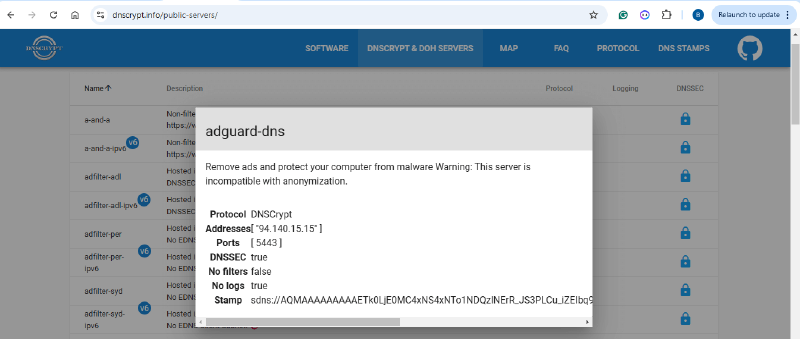
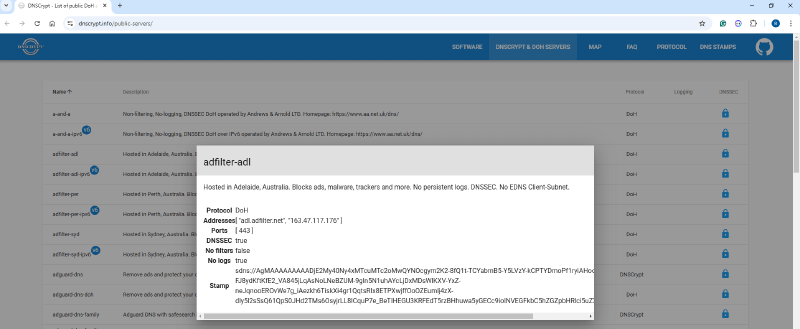
First, you need to find the SDNS stamp information for the DNS server. To do this, you can visit https://dnscrypt.info/public-servers/.
Click on a DNS server, for example adguard-dns, which can be used to remove ads and protect your computer from malware. Copy the value from the SDNS stamp field.
Go to Services > DNSCrypt-proxy > Configuration in the Opnsense web interface Click on the Servers menu
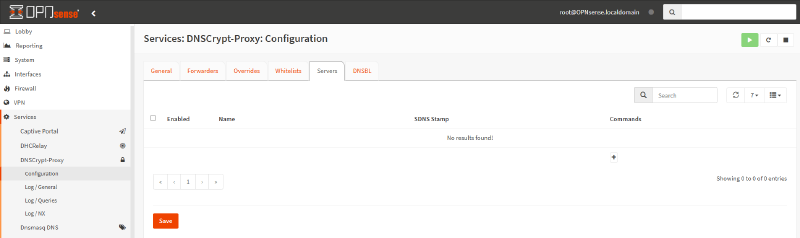
Click the Add button with the + icon in the bottom-right corner of the page.
Make sure the service is activated.
Enter a name for the DNS resolver, adguard-dns in our case.
Paste the SDNS stamp you copied in step 3, but without the sdns:// prefix.
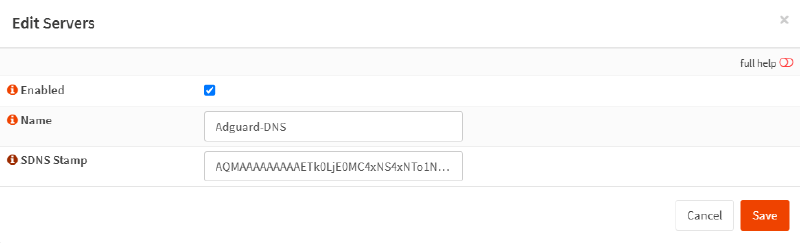
You can add as many DNS servers as you want. Click Save. This will automatically add the new server configuration, and it will be listed on the Servers page.
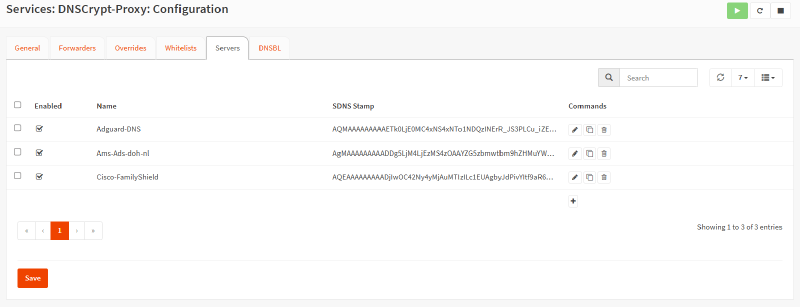
You can easily edit DNS server settings by clicking the “Edit” button with the pencil icon at the end of the row.
You can delete a DNS server configuration by clicking the Delete button with the trash icon at the end of the row.
The plugin itself has all the capabilities needed for ad blocking, building whitelists, and essentially replacing Unbound DNS altogether, but personally I’m not a big fan of that option. I use Unbound DNS to the fullest for that part.
So I redirect all DNS queries to the built-in Opnsense Unbound DNS.
Forwarding DNS queries from Unbound DNS to DNSCrypt-proxy#
You can easily integrate the Unbound DNS server with DNSCrypt-proxy on the OPNSense firewall. In older versions this wasn’t as easy. To let Unbound DNS send all DNS queries to DNSCrypt-proxy, you must perform the following steps.
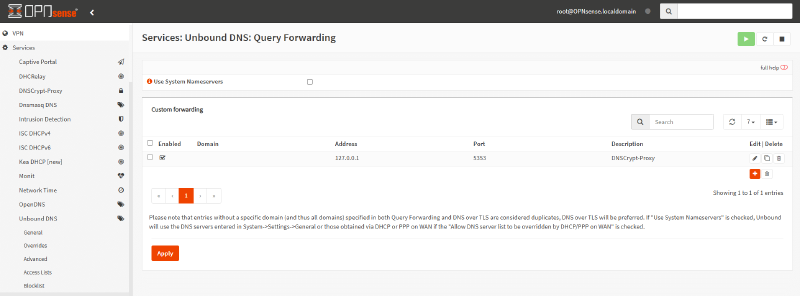
Go to Services > Unbound DNS > Query Forwarding
Click the Add button with the + icon in the bottom-right corner of the Custom Forwarding panel
Make sure the Enabled option is turned on
Leave the Domain field empty to forward all queries to the DNSCrypt-proxy service.
Enter 127.0.0.1 in the Server IP field.
Specify the port on which the DNSCrypt-proxy service will listen in the Server Port field, for example 5353
You can enter a description for your entry, for example DNSCrypt-proxy
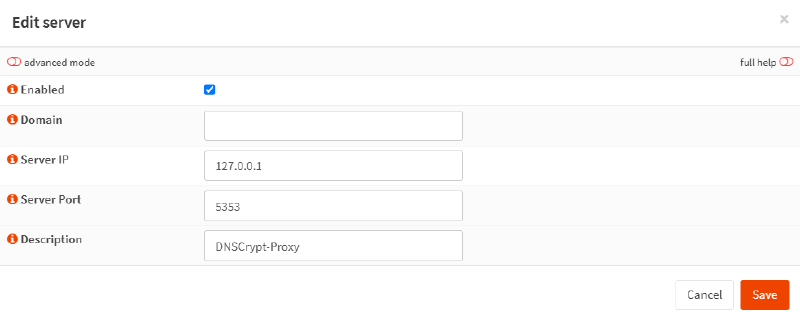
Click the Save button.
Click the Apply button to activate query forwarding.
Running DNSCrypt-proxy as a standalone DNS server#
I’ll be honest, I haven’t personally done this, because Unbound DNS has much more functionality, but there are people who don’t want to run a lot of services and want to keep things minimalist. I’ll now explain how to do this.
DNSCrypt-Proxy can function as a comprehensive, independent DNS alternative to Unbound or Dnsmasq. This configuration removes the need for query forwarding in order to encrypt DNS queries or use DNSBL. To run DNSCrypt-Proxy as a standalone DNS server, you may need to perform the following steps.
Disable Unbound DNS by going to Services > Unbound DNS > General, then unchecking Enable Unbound.
Disable Dnsmasq the same way as Unbound DNS, if you’re using Dnsmasq.
Now you can proceed to configuring options such as server selection, building a privacy policy, or configuring caching. Cloaking or DNSBL can be used without any additional configuration.
Verifying the DNSCrypt-proxy configuration#
After installing the DNSCrypt-proxy plugin on the OPNsense firewall, you can verify the configuration in several ways.
Viewing DNSCrypt-proxy logs#
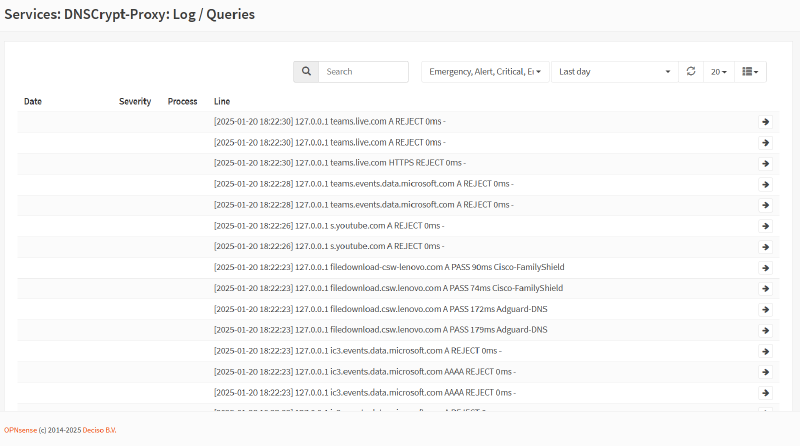
After enabling the DNSCrypt-proxy server and enabling the query logging option on your OPNsense, you should see both rejected and forwarded DNS queries from your network on the Log/Queries page, by going to Services > DNSCrypt-proxy > Log/Queries. Below is a sample log file.
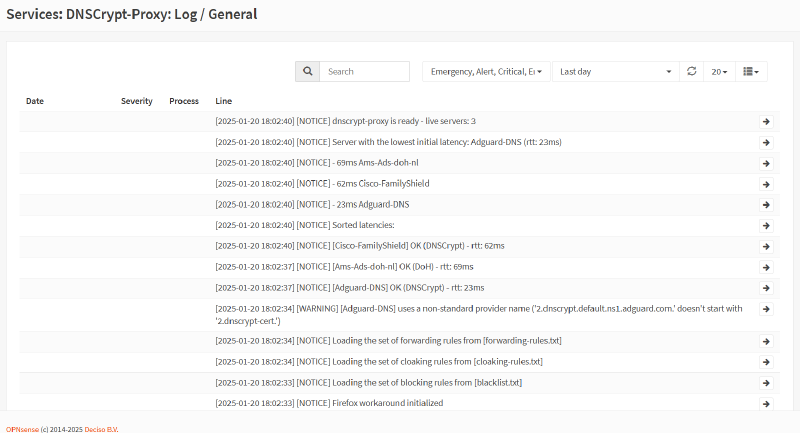
You can view the available DNS servers your OPNsense has already accessed, along with their response times, on the Log/General page, by going to Services > DNSCrypt-proxy > Log/General.
Using the DNS Leak Test site#
To verify the service is working, you can use the DNS Leak Test site
DNSleaktest.com is a widely used website that can be used to determine the DNS resolver in use.
You can test your DNSCrypt-proxy settings by performing the following steps.
Go to dnsleaktest.com.
Click the Extended test button and wait until the test finishes completely.
You should see a list of your DNSCrypt servers, similar to the one in the image below.
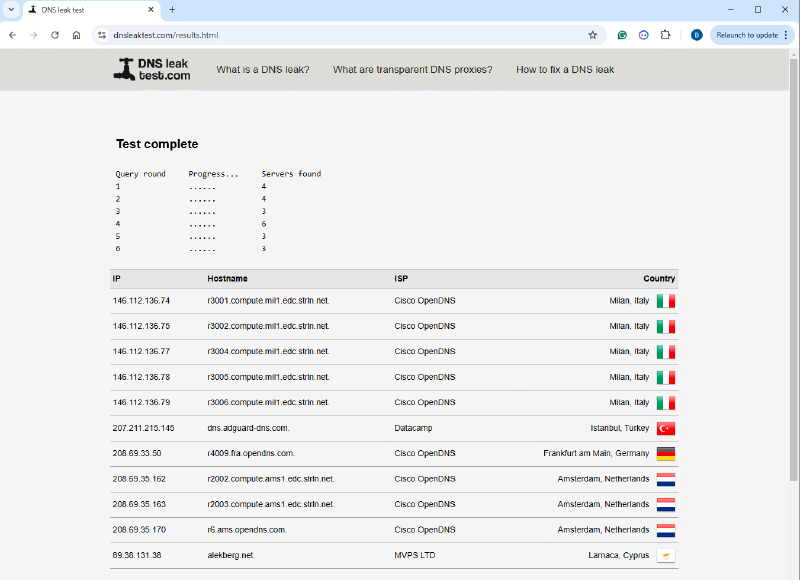
Please keep in mind that the test only checks your web browser’s configuration. Other software may be using a separate DNS configuration. Incorrect results can also be caused by an HTTP proxy.
Ad blocking#
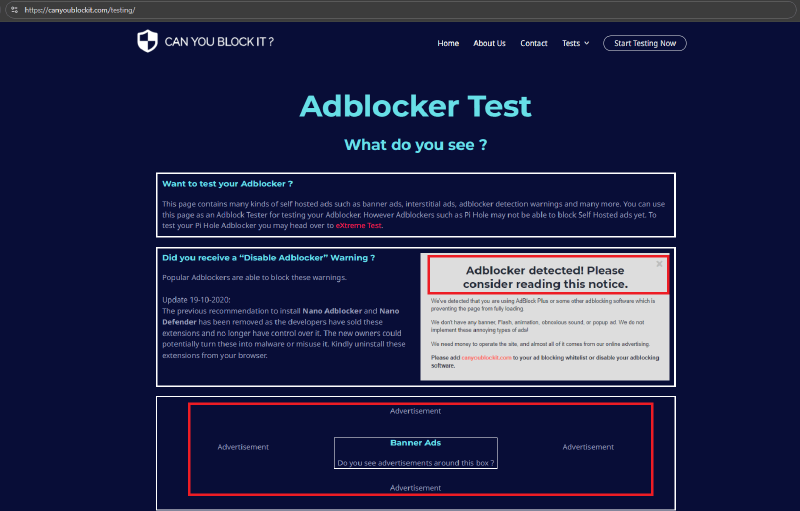
You can add various DNSBLs (DNS blocklists), such as AdAway List, AdGuard List, and Simple Adlist, to block ads, and then visit https://canyoublockit.com/testing/. You should see the Adblocker Test page, similar to the one below.
What are public DNSCrypt servers?#
Free resolvers with DNSCrypt support are available worldwide. You can find an interactive list of public DNS servers at https://dnscrypt.info/public-servers
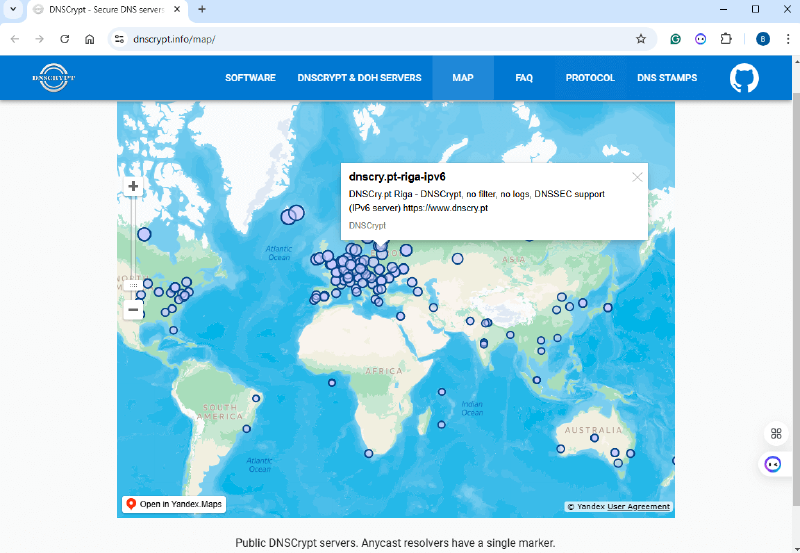
An interactive map of public DNS servers is available at https://dnscrypt.info/map
Servers with DNSCrypt OpenNIC support are listed at https://download.dnscrypt.info/dnscrypt-resolvers/v3/opennic.md.
DNSCrypt servers used for parental control are available at: https://download.dnscrypt.info/dnscrypt-resolvers/v3/parental-control.md.
An extensive list of public DNS resolvers supporting the DNSCrypt and DNS-over-HTTP2 protocols is available at: https://download.dnscrypt.info/dnscrypt-resolvers/v3/public-resolvers.md
DNSCrypt-proxy features#
DNSCrypt-proxy is a powerful DNS proxy. It runs on your computer or router, providing local blocking of unwanted content, hiding the destination of your devices’ traffic, improving application performance through DNS response caching, and enhancing security and privacy by using secure routes for communicating with upstream DNS servers. DNSCrypt-proxy has the following capabilities.
Filtering: blocks ads, malware, and additional unwanted content. Compatible with all DNS providers.
Encryption and authentication of DNS communication. Facilitates DNS-over-HTTPS (DoH) using TLS 1.3 and QUIC, DNSCrypt, Anonymized DNS, and ODoH. Client IP addresses can be hidden via Tor, SOCKS, or anonymized DNS relays.
Cloaking, which can be used to provide secure search results for Google, Yahoo, DuckDuckGo, and Bing.
Filtering with a universal weekly schedule.
Load balancing, which lets administrators pick a group of resolvers. In such cases DNSCrypt-proxy will automatically evaluate and monitor their performance, distributing traffic among the fastest available options.
DNS query monitoring, using various log files for standard and non-standard queries
DNS caching to reduce latency and improve privacy.
Clear routing of specific domains to specific resolvers
Local deprioritization of IPv6 queries to reduce latency on IPv4-only networks
Automatic updating of resolver lists
Compatibility with DNS Security Extensions
Includes a local DoH server to facilitate ECH (ESNI).