
Why switch to Kea DHCP in OPNsense?#
OPNsense ships with the ISC DHCP server by default, and it’s rock-solid - but it’s also dated, and worse, the ISC DHCP project itself has officially reached end of life and isn’t being developed anymore. Its replacement is Kea DHCP - a modular, high-performance, flexible successor built by the same people.
If you get something out of this article, feel free to support the author by becoming a sponsor on Boosty (link in the contacts section).
Kea DHCP is a genuinely strong upgrade over the aging ISC DHCP, bringing a modern take on IP address management with proper centralized control. If you’re running OPNsense in production or just in a home lab, now’s as good a time as any to move to something more flexible that’s still actively maintained.
What Kea DHCP gets you#
- Hot-reloadable lease list - change the config without a restart.
- Modular architecture - load only the pieces you actually need.
- Lease storage in a real database (MySQL/PostgreSQL).
- A REST API for automation and external management.
- Extended logic through hooks and scripts.
- Active development, backed by both the community and ISC.
Where it falls short#
Heavier resource use on weak hardware. Kea is modern and modular, but pair it with a REST API or a database backend and it’ll eat more resources than you’d expect. On something like a Raspberry Pi or an LXC container, it can noticeably underperform compared to the featherweight ISC DHCP.
Failover is still catching up. ISC DHCP has a proper, classic failover peer protocol. Kea doesn’t have a fully baked HA story out of the box yet - there are workarounds, but expect some rough edges when you try to set it up.
Links#
Kea DHCP has actually shipped out of the box in OPNsense for quite a while now. What I’m about to walk through works whether you’re starting from a blank install or migrating an existing OPNsense box that’s currently running ISC DHCP.
I’ll be honest - I dragged my feet on this migration for a long time. I kept putting it off because I was worried something would break in the process. On top of that, Kea is still pretty young as networking projects go, and OPNsense users have voiced real complaints about it - it’s not quite as bulletproof as you’d want, and some people find the feature set thin in places. That’s part of why the OPNsense team started rolling out Dnsmasq DHCP & DNS as a lighter alternative to Kea. So now OPNsense users actually get to pick their DHCP server. The devs’ own recommendation is basically: Dnsmasq for home and small-office setups, Kea for anything business-grade. Except Dnsmasq is also brand new territory for OPNsense, and it shows - there’s a steady trickle of fixes needed, which, fair enough, is par for the course with anything this fresh. Here’s where things landed: as of version 26.1 in January 2026, ISC DHCP got dropped from the default package set on fresh installs and now only exists as a plugin for anyone nostalgic for the old ways - existing systems still pull it in automatically on upgrade. You’re free to pick whichever DHCP server suits you, but the new default is DNSMasq. The good news is that switching between Kea and Dnsmasq later isn’t painful, since both support .csv import - just spin up the server, do the bare minimum of setup, and feed it a CSV of your static leases. ISC, being the old guard, doesn’t play along with that format, so migrating away from it on a system with a big pile of static leases takes real time. Look on the bright side, though - you’ll only ever need to do it once.
Setting up the Kea DHCP server#
Let’s say you’re coming from an existing ISC setup. If you’re starting fresh instead, you’ll go through pretty much the same steps, just without the hassle of migrating old leases. Here’s how I did it: with Kea DHCP still off (and ISC still handling things), I configured everything I needed first - interfaces, static addresses, the works - then flipped Kea on and immediately switched ISC off. The static leases picked up instantly, and the dynamic ones showed up in Kea’s lease table one by one as ISC’s old lease timers expired, even though ISC itself was already dead. It went off without a single hitch, honestly - smoother than I expected.
Head to Services and select Kea DHCP
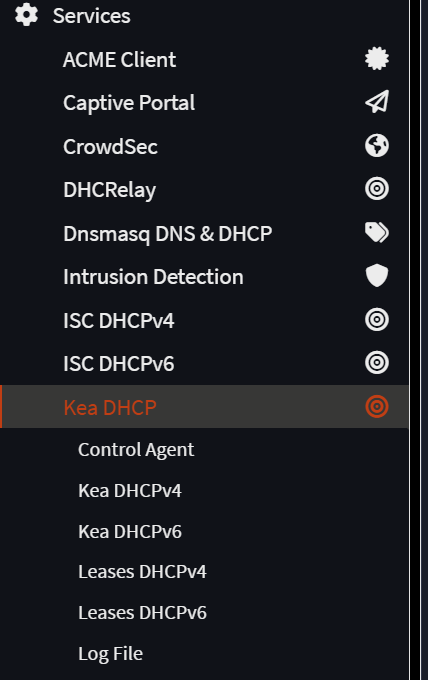
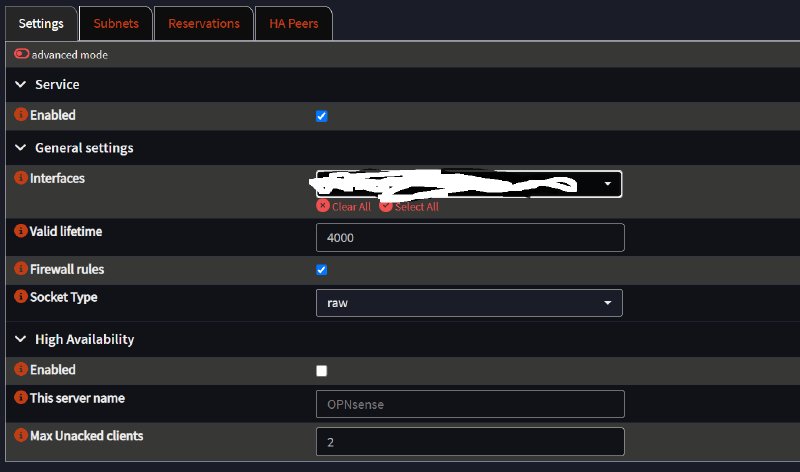
Ignore the Control Agent - that’s an enterprise thing. You’re not running HA failover for your home router. Right? …Right? I’ll assume you’re on plain old IPv4 like most people, so that’s what I’m showing here. Go into Kea DHCPv4. We’re not turning the service on yet - first, in the interfaces dropdown, pick every interface you want the new DHCP server to serve. Got just WAN and LAN? Pick LAN. If you’re as unhinged as me and you’ve got a WAN, a LAN, and at least one VLAN kicking around, select everything except WAN. Once you’ve picked your interfaces, make sure to tick the firewall rules checkbox. The valid lifetime field lets you set your own DHCP lease duration, but the defaults are fine for almost everyone. Leave HA mode alone, obviously. Here’s what mine looks like when it’s all set.
Now jump into the subnets section, hit the red plus icon, and enter your subnet info by hand. In the subnet field, type in your subnet - for the default LAN network that’s something like 192.168.1.1/24. The description field is optional; skip it if you don’t have many subnets or you just trust your memory. In the pool field, manually enter the range of IPs the DHCP server should hand out automatically. Let’s mirror what ISC was doing and use 192.168.1.100 - 192.168.1.199. Uncheck match client-id. I won’t tell you it’s mandatory, but if you ever want to register leases by MAC address - and trust me, you do - this box needs to be off. Under DHCP option data, tick Auto collect option data, and leave everything else as-is.
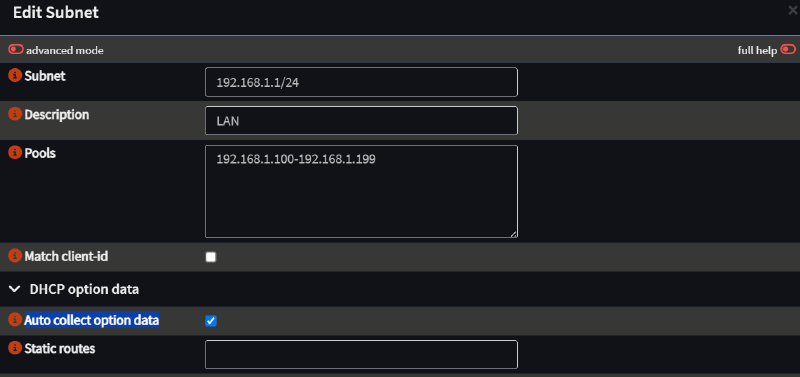
Now for the fun part: moving your existing static leases over from ISC DHCPv4 to Kea DHCPv4. There’s no shortcut here - it’s all manual. If you were starting from zero, that wouldn’t matter, but on a live setup with a pile of leases already configured, it’s genuinely tedious - there’s just no automation for it. Go to the reservation section and hit plus. Pick the subnet you want the device registered under from the dropdown. From there it’s pretty self-explanatory: set the IP you want, enter the device’s MAC address, give it a hostname, and add a description if you feel like it. That’s the whole process - honestly, writing this paragraph took longer than actually doing it will. Head back to settings, flip the switch to activate Kea DHCP, then go turn ISC off. And that’s it, you’re done. From here you can just watch the logs as ISC’s existing leases expire one by one and the same devices reappear over in Kea.