
If this article was useful to you, you can support the author by becoming a sponsor on Boosty.
If you think NetBird is just another VPN app that meshes your devices together, well… you’re not wrong, exactly. But in practice it does a lot more than that - private networking, resource access, and now, publishing services to the outside world too.
Preface#
Every homelab story goes roughly the same way:
You spin up some services locally - everything’s great. Then you want to reach them from outside your house. And that’s where the fun starts: port forwarding, NAT, firewalls, dynamic DNS, domains, HTTPS, and a nagging feeling that you’ve forgotten to lock something down. So naturally you add a VPN next (not for dodging censorship, before anyone asks - purely for security). Except a VPN brings its own baggage: a server to run, clients to configure, routing to untangle, and mobile-network access that never quite works right the first time. At some point you realize you’ve stopped managing services and started managing a network instead. Enter NetBird.
What NetBird Actually Is#
NetBird builds a private mesh network across all your devices. Put simply:
Every server, laptop, phone, and container you own becomes part of one virtual network.
And it does this:
- with no port forwarding
- with no manual WireGuard configuration
- with none of the usual networking headaches
How It’s Different From Pangolin#
The short version:
- Pangolin publishes services outward (with varying levels of access, naturally)
- NetBird connects your devices to each other
Except that line’s gotten blurry lately. NetBird can now do all three: build a private network (its bread and butter), grant access to resources, and publish services externally through a built-in proxy. That last bit is a genuinely new feature, and it changes how you should think about the whole app. It’s turning into a general-purpose access tool.
The Core Idea: a Mesh Network#
Instead of the usual VPN model (client talks to server), NetBird runs a mesh:
- devices connect to each other directly whenever possible
- if that fails, a relay steps in
- routes get built automatically, no manual routing tables
Under the hood it’s all WireGuard, but you’ll rarely touch it directly.
Why It’s Actually Nice to Use#
1. No open ports, anywhere#
Your server reaches out first - the connection always originates from the inside. Which means: no router configuration, no ports to open, and a lot less surface area for something to go wrong if a service gets popped.
2. Everything’s encrypted by default#
Traffic rides over WireGuard, so you get modern crypto, solid throughput, and barely-there latency, basically for free.
3. It’s Zero Trust by design#
NetBird doesn’t trust the network itself - only the user and the device do the talking. You decide exactly who connects, and which resources they can reach under which rules (roles, really, since it’s got RBAC built in, even if that part’s still fairly early days).
4. It’s just simple#
No hand-written configs, no key generation, no debugging iptables at 1am. Install the agent, log in, and you’ve got a network.
That’s obviously not everything the app can do, but I’d rather not just retype NetBird’s own docs page here - I trust you’ll forgive me.
NetBird’s New Trick: Publishing Services#
NetBird used to be strictly about building a private network and getting access to it. Now it can also act as a reverse proxy. Practically speaking:
- you can publish services to the outside world;
- without opening a single port on your home server;
- with full access control on top.
So an internal service becomes reachable through a domain, traffic routes through NetBird, and access gets fine-tuned through policies. Which puts it in the same conversation as:
- Pangolin
- Cloudflare Tunnel
With one big difference from Cloudflare Tunnel, though:
it all stays under your control
How It Actually Works#
The Big Picture#
- You’ve got a management server (in our case, self-hosted on a VPS)
- Devices connect to it
- A mesh network forms between them
- A relay spins up if needed, or devices just connect directly
The Pieces#
Management Server#
Your central control point:
- users
- devices
- access policies
Agents#
The clients you install on:
- servers
- PCs
- laptops
- containers
Relay (when needed)#
Kicks in whenever a direct connection isn’t possible - NAT, CGNAT, that kind of thing.
Built-in Proxy#
Handles:
- publishing services
- routing traffic
- external access
Where This Actually Comes in Handy#
1. Reaching your homelab from anywhere#
Just connect, and you can:
- open Proxmox
- hit the NAS
- SSH in
Feels exactly like being on your home network.
2. Tying multiple locations together#
Home, VPS, office - whatever you’ve got. They all just become one network.
3. Publishing services#
Now you can expose a web app under a domain name, hand access to specific people, and never expose your IP.
4. Giving your team secure access#
You can grant access to developers, friends, colleagues - assuming you have any of those. Or go the other way and lock everything down to just the services and ports that are actually needed.
What You’ll Need to Deploy This#
The Bare Minimum#
- A server (VPS or local)
- A domain
- Clients with internet access
Pangolin and NetBird want basically the same things here.
Your Deployment Options#
Cloud (the easy button)#
Just use NetBird’s hosted version.
Pros:
- fast
- zero setup required
Cons:
- less control
- as of this writing, access from Russia is a pain
Self-Hosted (what I’d recommend for a homelab in 2026)#
You spin up:
- a management server, using the install script from the developer’s site - answer a couple of prompts and it installs itself.
And from there, you own the whole stack.
Prepping the Server#
The basics:
- create a non-root user
- lock down SSH
- turn on the firewall
- open only the ports you need
(nothing out of the ordinary for any VPS, really)
Here’s a rough checklist of what to do on the VPS before deploying NetBird.
Getting the VPS Ready#
Basic Hardening#
The moment you get a fresh VPS, your first job is basic hardening to cut down the risk of someone getting in uninvited. Step one: stop working as root, and create a separate sudo-capable user instead.
Root is a bad place to live day-to-day, so let’s make a new user and drop them into the sudo group:
adduser youruser
usermod -aG sudo youruser
Quick sanity check:
su - youruser
sudo whoami
SSH: New Port, No Root#
Open up the SSH config:
sudo nano /etc/ssh/sshd_configFind and change these:
Port 2222  (using this exact port is a big mistake)
PermitRootLogin no
This does two things:
- moves SSH off the default port 22 onto whatever free non-standard port you pick
- shuts root login off completely
Killing Password Login (do this)#
For extra safety, restrict SSH to key-based login only:
Only flip this on if you’ve already got SSH keys set up - otherwise you’ll lock yourself out of the server.
PasswordAuthentication noSetting Up the Firewall (UFW)#
Install and enable UFW:
sudo apt update
sudo apt install -y ufw
Then open only the ports we actually need for this to work:
sudo ufw allow yourSSHportIfYouHaventEnabledKeyOnlyAccess/tcp
sudo ufw allow 80/tcp
sudo ufw allow 443/tcp
sudo ufw allow 51820/udp
Turn it on:
sudo ufw enable
sudo ufw status
Applying the SSH Changes#
Restart SSH so the changes take effect:
sudo systemctl restart sshDon’t Skip This: Verify the Connection#
Before you close your current SSH session, open a brand new one and make sure it still works:
ssh youruser@your_ip -p yourSSHportIfYouHaventEnabledKeyOnlyAccessOnly kill the old session once you’ve confirmed the new one connects fine.
Setting Up DNS#
The basics: DNS records
You’ll need A records (or AAAA for IPv6) pointing at your VPS’s IP.
1. Create a Wildcard Record#

2. Wait for It to Propagate#
DNS changes can take anywhere from 5 minutes to 48 hours to fully roll out worldwide.
Reverse Proxy#
NetBird’s Reverse Proxy publishes internal services - running on peers or behind network resources - straight out to the public internet. NetBird handles TLS termination, applies whatever authentication and access restrictions you’ve set, and proxies incoming traffic through NetBird’s mesh network to the target service - no ports to open, no firewall rules to write on the internal machines.
Availability: it’s currently in beta.
Self-hosted requirement: if you’re self-hosting, you’ll need Traefik as your external reverse proxy - it’s the only one that supports the TLS passthrough this feature depends on.
How It Works#
When you create a reverse proxy service, NetBird hands you a public domain with a TLS cert already attached. Traffic hitting that domain lands in NetBird’s proxy cluster, then gets forwarded over NetBird’s encrypted tunnel to whichever peer or network resource is actually running your app.
The target service just needs to be reachable inside the NetBird network - no public IP, no open ports required.
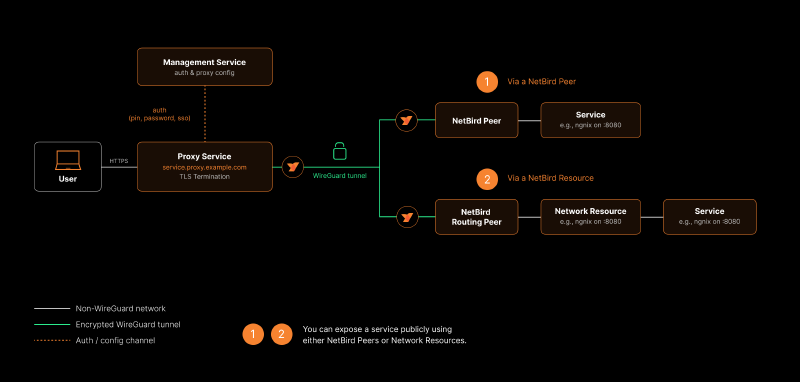
NetBird handles two kinds of services:
- HTTP services (Layer 7)
TLS gets terminated right at the proxy, then HTTP requests get forwarded to the backend.
Supports:
- path-based routing
- Host header forwarding
- redirect rewriting
- browser-based auth (SSO, password, PIN)
- L4 services (TCP, UDP, TLS) Live at the transport layer instead. The proxy just forwards connections or datagrams - it never looks inside them. TLS mode uses SNI-based routing without terminating TLS at all.
You can layer on authentication, or restrict access by IP or country.
Key Concepts#
Services#
A service is the basic unit you’re configuring in the reverse proxy.
Each one bundles together:
- Service mode - HTTP (L7) or TCP/UDP/TLS (L4)
- Domain - the public URL
- Targets - backend targets
- Authentication - SSO / password / PIN / headers
- Access restrictions - IP, country, CrowdSec
- Settings
- Enable/disable
Service modes#
| Mode | Layer | Description |
|---|---|---|
| HTTP | L7 | TLS termination + HTTP proxy |
| TCP | L4 | Direct TCP relay |
| UDP | L4 | UDP relay with session tracking |
| TLS | L4 | TLS passthrough with SNI |
A few L4 quirks:
- gets its own dedicated port
- no HTTP-level auth available
- access restrictions are all you’ve got
Targets#
A target is simply where traffic ends up inside the NetBird network.
Types:
- Peer - a node with the NetBird agent
- Host - an IP address
- Domain - a domain name
- Subnet - a subnet (CIDR)
For HTTP:#
- Path (optional)
- Protocol: HTTP / HTTPS
- Port (default 80/443)
For L4:#
- just a type and a port
Domains#
Cloud#
Format:
{subdomain}.{nonce}.{cluster}.proxy.netbird.io
Example:
myapp.abc123.eu.proxy.netbird.io
Self-hosted#
{subdomain}.{proxy-domain}
Example:
myapp.proxy.mycompany.com
DNS (Self-Hosted)#
You’ll need:
- an A record pointing to the NetBird server
- CNAMEs for:
proxy*.proxy
Custom Domains#
Bring your own domain via CNAME if you’d rather.
Every domain gets a TLS certificate automatically.
Authentication#
| Method | HTTP | L4 |
|---|---|---|
| SSO | Yes | No |
| Password | Yes | No |
| PIN | Yes | No |
| Header | Yes | No |
| Access restrictions | Yes | Yes |
Skip setting any of these, and the service is wide open to the public.
Service Statuses#
| Status | Meaning |
|---|---|
| pending | being created |
| certificate_pending | TLS certificate is being issued |
| active | active |
| tunnel_not_created | tunnel not created |
| certificate_failed | TLS error |
| error | general error |
Prerequisites#
Before you create a service, make sure you’ve got:
- a peer or network
- a domain
- (self-hosted) a proxy instance
- the right access permissions
Quick Start#
Step 1#
Dashboard → Reverse Proxy → Services → Add Service
Step 2#
Set up:
- mode (HTTP / L4)
- subdomain
- base domain
- port (for L4)
- target
Step 3 (HTTP Only)#
Authentication:
- SSO
- password
- PIN
- header
Step 3b#
Access control:
- IP
- country
- CrowdSec
Step 4#
Extra settings:
HTTP:#
- Pass Host Header
- Rewrite Redirects
L4:#
- PROXY Protocol
- Session timeout (UDP)
⚠️ Your backend needs to actually trust the proxy (trusted proxies setting)
Step 5#
Create the service, then wait for it to hit active status.
Managing Services#
- edit them
- turn them on/off
- delete them
- manage their targets
L4 Ports#
- one port per service
- pick the port automatically or set it yourself
- no overlapping ports allowed
A couple of quirks:
- HTTP and TLS can actually share a port through SNI
- falls back to plain TCP when there’s no SNI to work with
⚠️ You can’t reuse the same hostname for both HTTP and TLS
Path-Based Routing#
For example:
| Path | Target |
|---|---|
| / | app |
| /api | API |
| /docs | docs |
I go into the actual install process in a lot more detail in the video - and this is genuinely one of those cases where watching it once beats reading about it a hundred times.