
Introduction#
In this article we’ll walk through setting up the widely known OPNsense 26.1 gateway.
This article on configuring OPNsense is unique within the Russian-speaking part of the internet. Writing it took the author a great deal of time and effort, so if you find it useful and would like to thank the author, you can do so via the corresponding Boosty link.
I already have quite a lot of material on my site covering various OPNsense features, but for beginners it’s scattered and can be hard to piece together. So, gathering my courage and what remaining energy I had, I decided to take on this Sisyphean task.
What Is OPNsense#
OPNsense is a free, open-source firewall and router distribution built on FreeBSD. It lets you turn an ordinary computer, mini-PC, or virtual machine into a full-fledged, enterprise-grade network appliance.
Although OPNsense is often referred to simply as a “firewall,” its capabilities go well beyond that. In addition to filtering network traffic, the system can act as a router, VPN gateway, DHCP and DNS server, load balancer, reverse proxy, IDS/IPS, and a centralized platform for managing network security.
Some features, such as the reverse proxy, are configured via plugins.
One of OPNsense’s biggest advantages is the combination of extensive functionality, a convenient web interface, and regular updates. Most tasks can be performed through the GUI, so configuring the system doesn’t require command-line knowledge.
How OPNsense Differs from Other Solutions#
The best-known alternatives to OPNsense are pfSense, MikroTik RouterOS, OpenWrt, and various manually configured Linux distributions used as routers.
The main difference with OPNsense is that the project is focused on ease of administration, development transparency, and steady ongoing improvement. The project started as a fork of pfSense (which is itself a fork) and from the very beginning emphasized an open development model, a modern management interface, and a predictable release cycle.
Compared to MikroTik RouterOS, OPNsense offers broader security capabilities and easier integration of additional services - and no offense to MikroTik fans, but those are genuinely easier to configure. Unlike OpenWrt, which is primarily aimed at home routers and is essentially just an operating system for older routers, OPNsense is designed to run both on dedicated network hardware and on regular x86 machines and virtual machines.
Compared to a manually configured Linux-based router, OPNsense spares the administrator from having to assemble individual components - firewall, DHCP, DNS, VPN, and monitoring - by hand. All the core functions are already integrated into a single platform and accessible through the web interface.
What Problems OPNsense Solves#
OPNsense can be used both in home networks and in small and medium business infrastructure. The most common use cases include:
providing internet access for multiple networks and VLANs;
creating firewall rules and network segmentation;
deploying VPN servers and VPN clients (WireGuard, OpenVPN, IPsec);
configuring DHCP and DNS services;
publishing internal services through a reverse proxy;
protecting the network with IDS/IPS, GeoIP filtering, and other security mechanisms;
monitoring network activity and analyzing event logs;
providing high availability (HA) and network infrastructure redundancy.
OPNsense in a Home Lab#
For homelab owners, OPNsense can become one of the central pieces of the network, since it lets you build and configure a network that closely resembles a corporate one, without expensive hardware or specialized expertise.
In a home lab, OPNsense is typically used to create separate VLANs for servers, workstations, IoT, and a guest network, to set up secure remote access via VPN, to publish services to the internet (there’s a Caddy reverse proxy plugin), to configure a firewall between network segments, and to centrally manage network security.
Thanks to virtualization support, OPNsense runs great in Proxmox VE and other hypervisors. So OPNsense can be used as a virtual router without dedicating a separate physical device to it, although for maximum performance and reliability many people prefer to install it on a compact mini-PC with multiple network interfaces.
In the video linked at the start of this article, I installed everything on a mini-PC with two physical network interfaces, so the article follows the installation and initial setup steps for exactly that configuration. The rest of the system’s configuration doesn’t depend on the installation method - virtualized or installed directly on a PC.
Installing Opnsense#
Choosing an Installation Image#
The first step is to download the OPNsense installation image from the project’s official website. Despite the number of options available, choosing the right one is straightforward - it all depends on where the system will be installed.
If OPNsense will run on a physical computer or mini-PC with a monitor and keyboard attached, choose the VGA image. That’s the one used in this article.
The DVD image is intended primarily for virtual machines and works for installing in Proxmox VE, VMware, Hyper-V, and other hypervisors.
If your device has a serial console and is managed via a COM port, use the Serial image. This option is more common on industrial hardware and certain networking devices.
There’s also a Nano image available on the download page, but in most cases you won’t need it. The developers recommend a regular installation using the VGA, DVD, or Serial images.
Creating a Bootable USB Drive#
Once downloaded, the image needs to be written to a USB drive. You can use Rufus, balenaEtcher, or any other tool that supports writing bootable images.
After writing finishes, plug the USB drive into the computer where OPNsense will be installed and select it as the boot device in the BIOS or UEFI.
Running the Installer#
To keep this article a bit more compact, I won’t include screenshots in this section.
- Don’t press any key when the Configuration Importer prompt appears.
- When prompted for Manual Interface Assignment, press any key. I prefer to configure interfaces manually rather than use automatic configuration.
- Press Enter to skip LAGG configuration.
- Press Enter to skip VLAN creation (we’ll configure them later through the web interface).
- Enter igc0 as the WAN interface name.
- Enter igc1 as the LAN interface name.
- When prompted for an Optional Interface Name, press Enter to skip this step (we’ll configure additional interfaces later).
- Press Y, then Enter to continue.
- At the login prompt, enter the username installer and password opnsense to begin the installation.
- Press Enter to use the default keyboard layout (if you’re using a US keyboard; otherwise select the appropriate option).
Next, the installer will ask you to choose a file system - ZFS or UFS.
UFS is the classic FreeBSD file system. It uses fewer resources and is fine for most home routers, but it’s more “fragile” compared to ZFS.
ZFS offers additional features such as data integrity checking, snapshots, and more flexible storage management. However, it has higher requirements for RAM and compute resources.
For a home lab and most modern mini-PCs, I recommend choosing ZFS, especially if the system will be installed on an SSD with at least 8 GB of RAM. If you’re installing Opnsense as a virtual router, keep in mind that installing ZFS on top of ZFS isn’t the best idea - but in any case, the choice of file system depends on your specific installation method.
Cheap, no-name SSD or NVMe drives are not a good fit for OPNsense, especially combined with ZFS. OPNsense, as a firewall, writes a lot of logs, and so does ZFS. Cheap drives under that kind of constant load tend to fail fairly often.
After choosing the file system, you’ll need to select the drive OPNsense will be installed on. Before confirming, double-check the selected disk carefully, since all data on it will be erased during installation.
Once the file copy finishes, the installer will prompt you to set a password for the root user. I recommend doing this right away, so you don’t end up using the default password after the first boot.
Initial Configuration#
Friends, the initial configuration is fairly simple and straightforward, so I suggest watching the video linked at the top of this article. But as time allows, I’ll fill in this section. For now, let’s focus on more important and complex topics.
Configuring Unbound DNS#
Unbound DNS is a validating, recursive, and caching DNS resolver designed for high performance and security. Unbound DNS is open-source software released under the BSD license, created by NLnet Labs, and widely used on various platforms to resolve domain names into IP addresses. System administrators, ISPs, and privacy-conscious users frequently rely on Unbound. It’s compatible with OPNsense, pfSense, FreeBSD, Linux, macOS, and other Unix-like operating systems.
In this article I’ll describe only the core Unbound DNS features in Opnsense.
Unbound DNS Features#
Unbound supports DNSSEC (Domain Name System Security Extensions), which guarantees the authenticity and integrity of DNS data, protecting users from threats such as DNS spoofing or cache poisoning. It can be configured to perform recursive queries and cache DNS results to improve performance and reduce latency on subsequent lookups.
Unbound DNS has the following features:
- Efficiency and lightness: designed to use minimal resources.
- Configuration flexibility: supports a wide range of configuration options for complex, advanced setups.
- DNS-over-TLS/HTTPS: encrypts DNS queries to improve privacy.
- IPv6 support: fully compatible with modern internet protocols.
- Access control: lets you configure which clients are allowed to make DNS queries to the server.
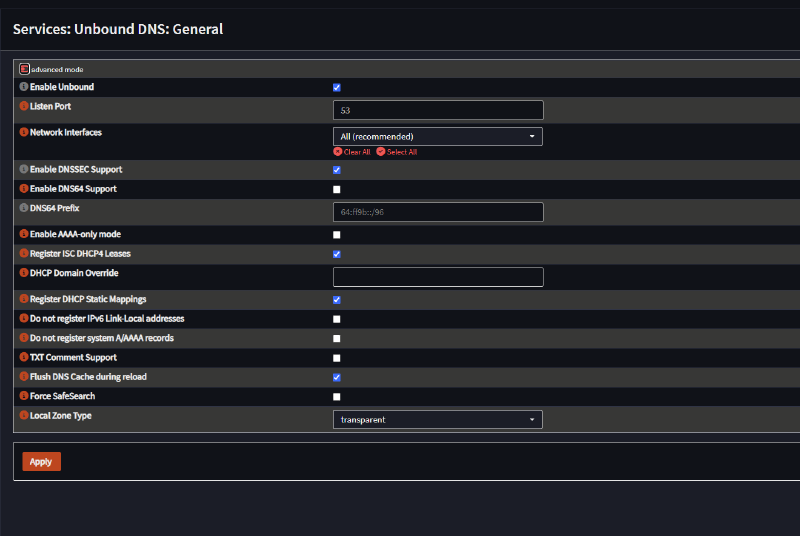
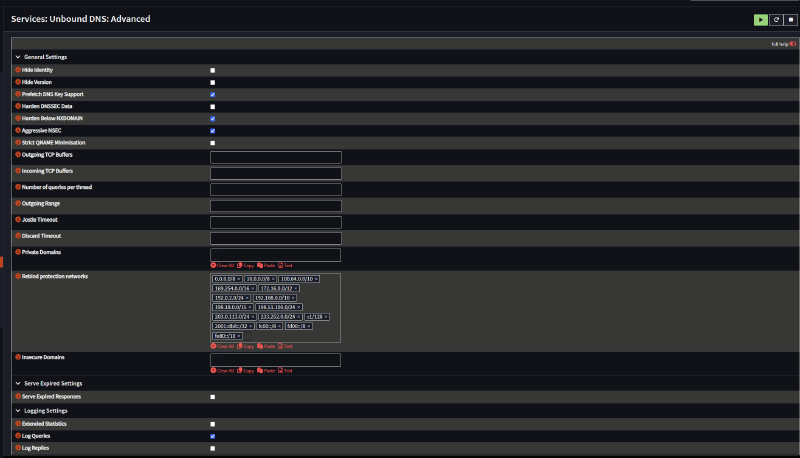
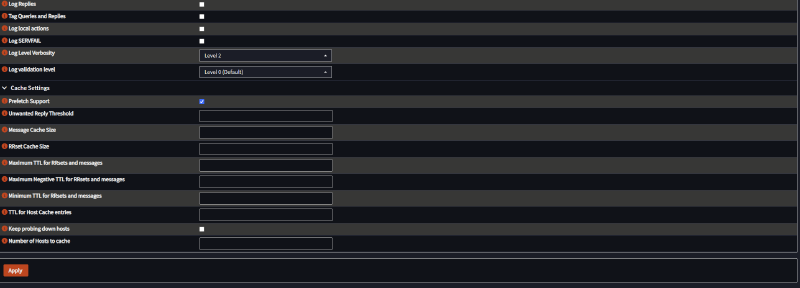
Unfortunately, the list of Unbound DNS settings is so extensive that describing each one would take several articles, so here I’ll just use screenshots showing how I configured it in the video.
Below is a screenshot of the settings in the General section.
Next, the settings in the Advanced section.
Configuring DNS over TLS#
DNS over TLS (DoT) is a way of encrypting DNS queries that improves privacy and protects against interception by attackers. In OPNsense you can enable DoT using the built-in Unbound DNS server.
Setup Procedure#
By default, all DNS queries are routed in plain text. Your ISP or an attacker can intercept UDP and TCP traffic on port 53 in plain text to compromise DNS queries and responses for a given site. For that reason, we should encrypt our DNS queries for security purposes. DNS over TLS (DoT) is a security protocol that uses Transport Layer Security (TLS) to encrypt DNS traffic and is one of the most widely used DNS security solutions. Its main goal is to improve your security and privacy. Here are a few advantages of DNS over TLS:
- Prevents DNS tampering by an attacker.
- Eliminates man-in-the-middle attacks. This is when your request is intercepted and redirected to some phishing site.
- Prevents eavesdropping. Well, for home use that’s admittedly a bit of a fantasy.
Enabling DoT in Opnsense#
To configure and enable DoT on the OPNsense firewall, follow these steps:
- Go to “Services” → “Unbound DNS” → “DNS over TLS” in the OPNsense web interface.
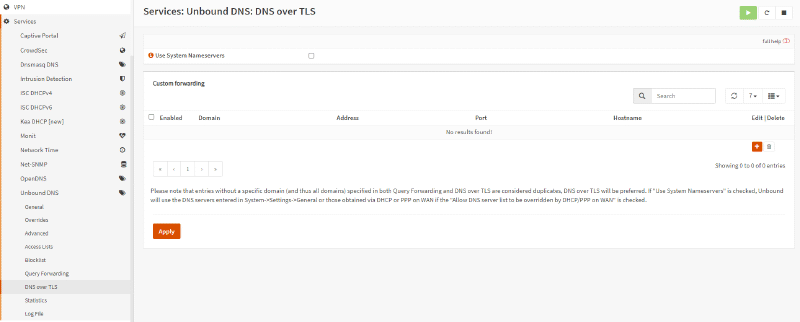
- Click the “+” Add button in the bottom-right corner of the panel.
- Make sure the “Enabled” option is checked.
- You can leave the Domain field empty. By default, if this field is left empty, all queries will be sent to the specified server. Entering a domain name in this field will cause queries for that specific domain to be routed to the selected server.
- Enter the IP address of the DNS server to forward all queries to, for example 8.8.8.8.
- Set the server port for DoT to 853.
- Enter the DNS server’s common name (for example, dns.google.com) in the Verify CN field to validate its TLS certificate. DNS-over-TLS is vulnerable to man-in-the-middle attacks if certificate authenticity can’t be verified. You can leave this field empty to accept self-signed certificates, but that completely defeats the purpose of what we’re doing in this article.
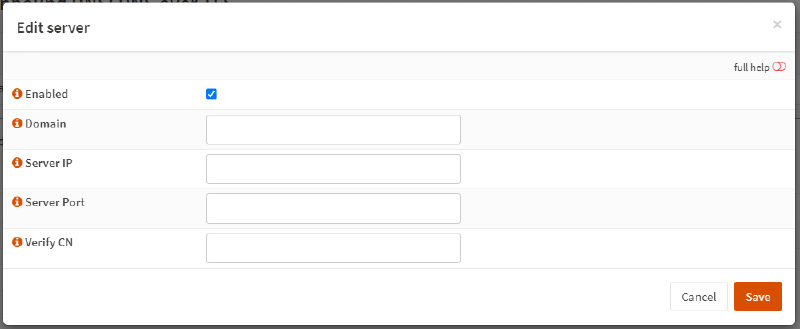
- Click “Save”.
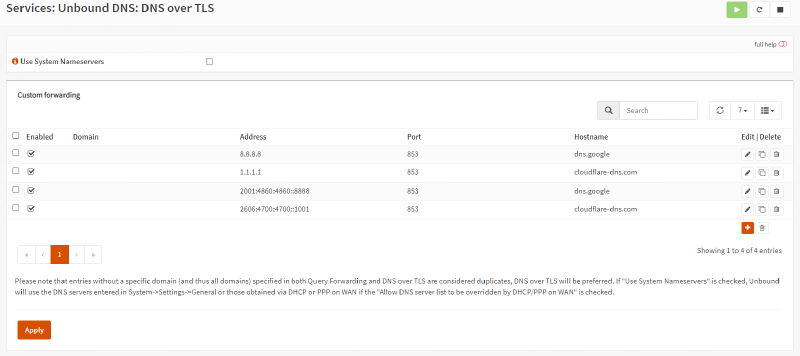
- You can add an IPv6 DNS server as a secondary resolver.
- Click “Apply” to activate the settings.
In the end you’ll get something like this.
Configuring DNS and DHCP Servers#
To force all clients on your network to use the DoT servers you defined above, you need to properly configure your DNS and DHCP servers. You can configure DNS and DHCP services in OPNsense by following these steps:
- Go to System → Settings → General in the left-hand menu.
- Make sure all the DNS server fields are empty. This ensures DNS traffic is routed back to the router.
- Uncheck “Allow DNS server list to be overridden by DHCP/PPP on WAN” for the DNS server settings. If this option is enabled, the DNS servers provided by the DHCP/PPP server on the WAN (in other words, your ISP’s DNS servers) will be used for their intended functions, such as providing DNS services. Accordingly, they will take priority.
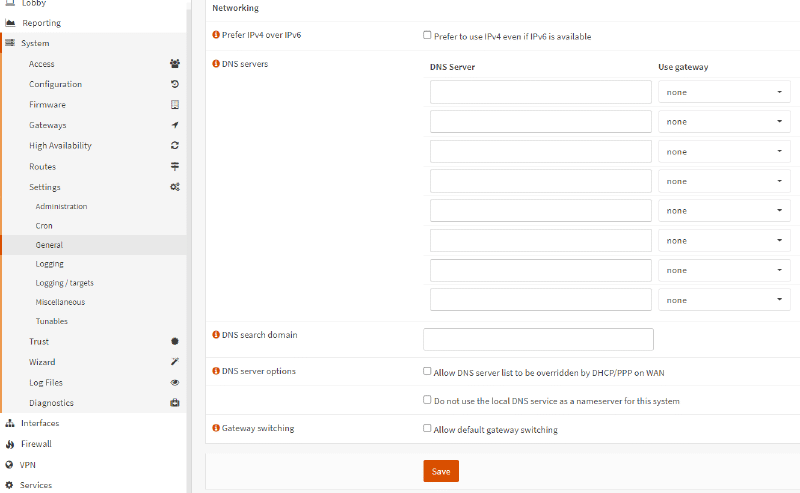
To maintain a secure and trusted environment, it’s recommended to use a firewall rule that blocks any outgoing DNS traffic on port 53 when using DNS over TLS, since DoT itself uses port 53 for regular purposes as well. If clients decide to directly query other name servers on their own, you can use a NAT redirect rule to send those queries to 127.0.0.1:53, which is the local Unbound service. This ensures those queries are guaranteed to be sent over TLS.
You’ll need to look up the list of CN domains used for DoT for your particular provider.
For Quad9 it’s dns.quad9.net.
Viewing Unbound DNS Logs#
You can also check the Unbound DNS logs to confirm that DNS queries are indeed being transmitted over DNS over TLS (DoT) on port 853.
To do this, follow these steps:
Go to Services → Unbound DNS → Advanced.
Scroll down to the Logging Settings section.
Enable the Log Queries option.
After this, Unbound will log every DNS query it processes. Each entry will include the time, client IP address, the requested domain name, and the query type and class.
Note. Enabling logging for all DNS queries can noticeably reduce DNS server performance, so it’s recommended to use this option only for diagnostics and disable it once you’re done checking.
For Log Level Verbosity, select Level 2. This level provides enough detail to diagnose how DNS over TLS is working.
Click Apply to save the changes.
Then open Services → Unbound DNS → Log File.
In the search field, type 853.
If DNS over TLS is configured correctly, you’ll see log entries confirming that Unbound is communicating with the configured DNS resolver over port 853. This means DNS queries are being sent in encrypted form, rather than over the regular DNS protocol on port 53.
Creating a VLAN Interface and Configuring DHCP in OPNsense#
Below is an example of setting up a WIFI VLAN, including creating the interface, assigning an IP address, and enabling the DHCP server.
1. Creating a VLAN#
Go to:
Interfaces → Devices → VLAN
Click Add and specify:
| Parameter | Value | |
|---|---|---|
| Name | skip | |
| Parent Interface | LAN | |
| Tag | 10 | |
| Description | WIFI |
Then save the settings.
2. Assigning the Interface#
Go to:
Interfaces → Assignments
- In the list of available interfaces, select the VLAN (virtual device) you created**
- Click Add
After adding it:
- open the newly created interface (for example, OPT1)
- rename it to WIFI
3. Configuring the Interface#
| Parameter | Value |
| Enable Interface | enable |
| IPv4 Configuration Type | Static IPv4 |
| IPv4 Address | 192.168.10.1/24 |
This address will act as the gateway for devices on the WIFI network.
Save the changes.
4. Repeat for Other VLANs#
Additional VLAN networks can be created the same way.
For each network you’ll need to:
- choose a unique VLAN Tag
- assign a separate subnet (for example,
10.0.X.1/24) - create a separate DHCP server
- configure the corresponding firewall rules
This approach makes it easy to segment the network and control access between devices on different VLANs.
Configuring the DHCP Server#
ISC (Internet Systems Consortium) is the organization that developed and, for many years, maintained the open-source ISC DHCP server. Active development stopped in October 2022.
The official successor to ISC DHCP is Kea DHCP, which is also developed and maintained by ISC.
Up through OPNsense 25.7, the ISC DHCP server was used as the default DHCP server. But starting with version 25.7, that default role was taken over by Dnsmasq DNS and DHCP, since it’s a lightweight solution well suited to small networks. OPNsense also still ships with Kea DHCP, so users can choose whichever DHCP server best fits their infrastructure.
I have an article on my site about migrating from ISC to KEA, but in this article I’ll only be showing the Dnsmasq setup.
Some parts of the video, and correspondingly of this article, are optional. Not every user needs features like static DHCP reservations or domain/host overrides.
Which DHCP Server Should You Choose?#
The choice between them depends less on performance and more on what you’re trying to accomplish.
Dnsmasq DHCP#
For most home users and small homelabs, I recommend using Dnsmasq. That’s exactly why it became the default DHCP server.
Dnsmasq is a good fit if:
your home network or homelab consists of several VLANs and doesn’t need complex DHCP infrastructure;
you want to use Dnsmasq not just as a DHCP server, but also as a DNS forwarder instead of Unbound DNS;
you need device names obtained via DHCP to automatically register in the local DNS server;
you plan to use OPNsense’s special DNS aliases to block access to certain domains.
Kea DHCP#
Kea DHCP is the modern successor to ISC DHCP, geared toward more complex use cases.
It’s worth choosing if:
you need DHCP server high availability;
your network uses advanced routers that require IPv6 prefix delegation.
Which DNS Server Should You Choose?#
Besides the DHCP server, you also need to decide on a DNS service. OPNsense offers two options: Dnsmasq DNS and Unbound DNS.
Despite Dnsmasq becoming the default DHCP server, Unbound DNS remains the primary DNS server. Each option has its own advantages.
Dnsmasq DNS#
Dnsmasq is worth choosing in the following cases:
you want to use DHCP and DNS within a single service;
you need support for OPNsense DNS aliases, which automatically resolve domain names to IP addresses for use in firewall rules;
you need the simplest possible DNS configuration without a lot of extra settings.
That said, keep in mind that Dnsmasq’s capabilities are noticeably more limited than Unbound’s. It offers fewer configuration options and has more limited logging and diagnostic tools for DNS queries.
Unbound DNS#
Unbound DNS is the default DNS server in OPNsense, and it’s the one I recommend for most users.
Its main advantages:
it’s a full recursive DNS resolver that can query the root DNS servers directly, without relying on public DNS providers;
it supports DNS Block Lists (DNSBL), letting you block ads, trackers, and malicious domains, similar to Pi-hole;
it supports DNS over TLS (DoT), so DNS queries can be sent encrypted through trusted DNS servers such as Cloudflare or Quad9;
it provides detailed statistics and reports on DNS activity in the Reporting section, which significantly simplifies diagnostics and query analysis.
Keep in mind that when using DNS over TLS, Unbound stops functioning as a recursive resolver. In this mode, it forwards queries to the chosen external DNS server over a secure TLS connection.
Using Dnsmasq and Unbound Together#
In some cases it makes sense to run both DNS services at the same time.
For example, if Dnsmasq is used as the DHCP server while Unbound remains the primary DNS server, network clients continue sending DNS queries to Unbound. Queries for local hostnames are then automatically forwarded to Dnsmasq, which knows about all devices that received an address via DHCP.
This setup lets you combine the benefits of both solutions: the advanced capabilities of Unbound, while still keeping automatic name resolution for devices on the local network.
General Settings#
Go to:
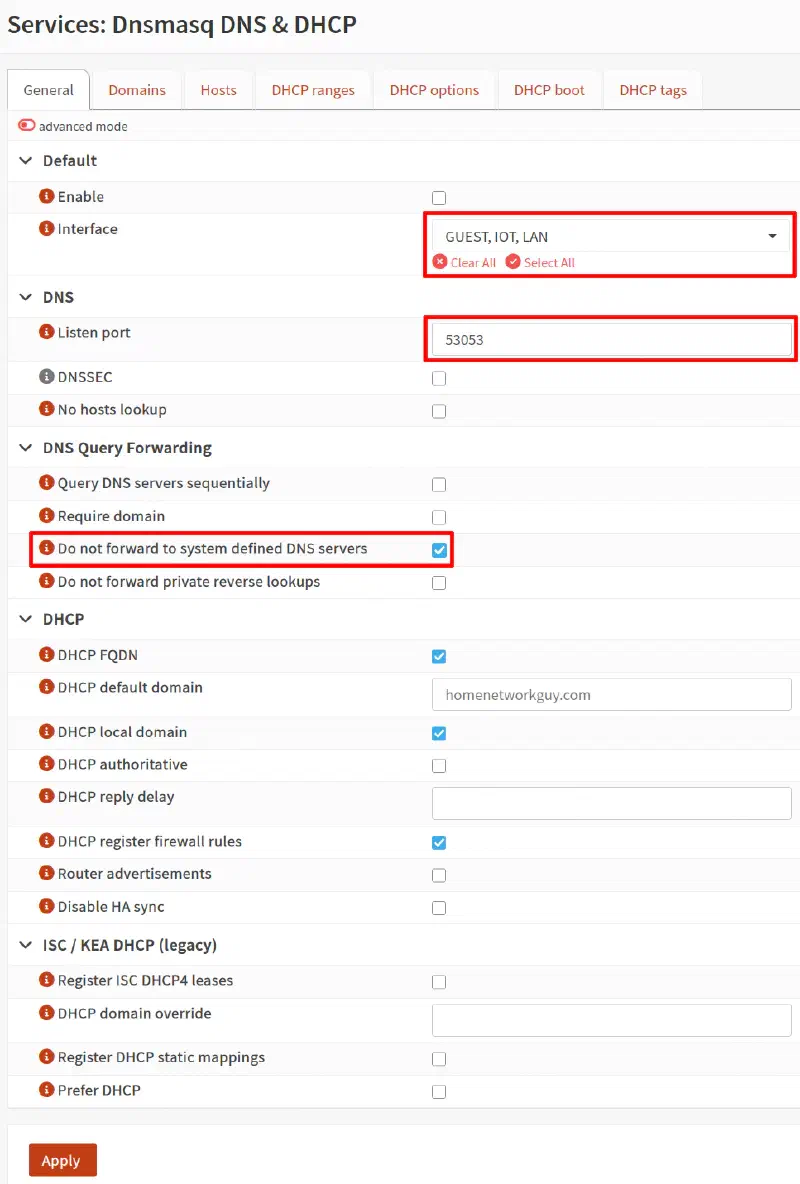
Services → Dnsmasq DNS & DHCP → General
This is where the core Dnsmasq settings live.
Enabling the Service#
The first parameter is Enable.
Choosing Interfaces#
In the Interface field, select all the interfaces on which Dnsmasq will serve DHCP clients.
One of Dnsmasq’s advantages is that you can select multiple interfaces in one place.
Using Dnsmasq as DNS#
If you plan to use Dnsmasq not just as a DHCP server but also to resolve names for devices on the local network, you need to enable its DNS functionality.
To do this, in the DNS section, change the Listen port setting.
| Parameter | Value |
|---|---|
| Listen port | 53053 |
Configuring DNS Query Forwarding#
In the DNS Query Forwarding section, it’s recommended to enable the following option:
| Parameter | Value |
| Do not forward to system defined DNS servers | Enabled |
In this case, Dnsmasq won’t use the DNS servers specified in System → General, and will only be responsible for resolving local hostnames. This prevents queries for unknown local names from being sent to external DNS servers.
DHCP Options#
In the DHCP section, three recommended options are enabled by default. You can leave them unchanged.
| Parameter | Value |
| DHCP FQDN | Enabled |
| DHCP local domain | Enabled |
| DHCP register firewall rules | Enabled |
Local Domain#
If the DHCP default domain field is left empty, Dnsmasq will automatically use the domain name specified in System → General. This behavior matches what ISC DHCP does.
If needed, you can set a different default domain here, or specify a separate domain for each DHCP pool.
For your local network, it’s best to use a dedicated internal domain, such as .internal. It’s officially reserved by ICANN for use in private networks. An alternative is the .home.arpa domain, but .internal is generally easier to understand and remember.
The ISC/KEA DHCP (Legacy) Section#
At the bottom of the page you’ll find the ISC/KEA DHCP (Legacy) section.
If you’re setting up Dnsmasq the way it’s described in this article, you don’t need to enable anything in this section. Local name resolution will work fine without relying on ISC DHCP or Kea DHCP compatibility mechanisms.
Configuring DHCP Ranges#
After configuring the core Dnsmasq settings, you need to create DHCP pools for each interface that the server will hand out IP addresses on.
Go to:
Services → Dnsmasq DNS & DHCP → DHCP Ranges
You’ll need to create a separate address range for each LAN or VLAN interface.
Unlike ISC DHCP and Kea DHCP, for Dnsmasq the OPNsense developers recommend placing static DHCP reservations inside the DHCP pool, rather than outside of it.
Creating a New DHCP Pool#
Click the + button in the bottom-right corner of the page and fill in the parameters.
| Parameter | Value |
|---|---|
| Interface | The interface the DHCP pool is being created for |
| Start address | The starting IP address of the range |
| End address | The ending IP address of the range |
| Description | Optional. |
For example, for the 192.168.1.0/24 network, the range might look like this:
| Parameter | Value |
| Start address | 192.168.1.2 |
| End address | 192.168.1.254 |
You don’t need to fill in the Subnet mask field. Since the range is created for an existing OPNsense interface, the system will automatically determine the subnet mask based on its configuration.
After filling in the parameters, click Save.
If your infrastructure uses several networks (for example, LAN, WIFI, Guest, or Management), create DHCP pools for each corresponding interface the same way.
Forwarding Local Domains from Unbound DNS to Dnsmasq#
If, like most OPNsense users, you use Unbound DNS as your primary DNS server and Dnsmasq only for DHCP and local device name resolution, you need to set up forwarding of local DNS queries.
This setup essentially mirrors the behavior of the classic ISC DHCP + Unbound DNS combination.
We assume Unbound DNS is already configured and in use as the primary DNS server. We’ll only cover the settings needed to integrate it with Dnsmasq.
Configuring Query Forwarding#
Go to:
Services → Unbound DNS → Query Forwarding
In the Custom forwarding table, click the + button and create a new rule.
| Parameter | Value |
|---|---|
| Domain | .internal (or your local domain) |
| Server IP | 127.0.0.1 |
| Server Port | 53053 |
| Description | Optional |
Here we use the address 127.0.0.1 because Dnsmasq runs on the same device as Unbound, and port 53053 was set when enabling Dnsmasq’s DNS service.
If different segments of your network use different domains (for example, .lan, .iot, .guest), you’ll need to create a similar rule for each domain.
Configuring Reverse DNS#
In addition to regular name resolution, it’s recommended to configure Reverse DNS.
Reverse DNS lets you look up a device’s name from its IP address. This is especially useful when analyzing OPNsense logs, where only the client’s IP address is known.
The setup is done the same way as the previous step.
Click + and create another rule.
For the Domain parameter, use the special in-addr.arpa zone.
For example, if you need to handle reverse lookups for the entire 192.168.0.0/16 range, the parameters would be:
| Parameter | Value |
| Domain | 168.192.in-addr.arpa |
| Server IP | 127.0.0.1 |
| Server Port | 53053 |
| Description | Optional |
This rule enables reverse name resolution for all subnets of the form 192.168.x.x.
If your infrastructure uses other address ranges, or you need more precise configuration, you can create separate Reverse DNS records for each local network.
After saving the changes, Unbound will automatically forward queries for local domains to Dnsmasq, while retaining all the benefits of Unbound as the primary DNS resolver.
Configuring Domain Overrides (optional)#
If you’re using Dnsmasq DNS, you can optionally configure Domain Overrides - rules that route queries for specific domains to a different DNS server.
This can be useful, for example, if certain domains need to bypass DNS filtering or use a different resolver.
Domain Override and Firewall Alias#
One of the interesting features of Dnsmasq in OPNsense is the ability to link a Domain Override to a special firewall alias.
Unlike a regular alias created from a domain name, this type of alias automatically adds not just the IP addresses of the domain itself, but also all successfully resolved subdomains.
This significantly simplifies creating firewall rules when you need to allow or deny access to an entire domain at once.
Creating a Firewall Alias#
Before creating a Domain Override, you need to create a special alias.
Go to:
Firewall → Aliases
Create a new alias with the following parameters:
| Parameter | Value |
|---|---|
| Type | External (advanced) |
After saving, click Apply.
You can now select this alias when creating a Domain Override.
Creating a Domain Override#
Go to:
Services → Dnsmasq DNS & DHCP → Domains
Create a new rule and specify the local Dnsmasq address as the DNS server.
| Parameter | Value |
|---|---|
| Server IP | 127.0.0.1 |
| Server Port | 53053 |
| Firewall Alias | the alias created earlier |
After this, OPNsense will automatically populate the selected alias with the IP addresses of the domain and its subdomains.
Important
This feature is very convenient, but should be used carefully. If a domain is served by a large number of servers or uses a CDN, the alias could end up containing hundreds of IP addresses. Using such an alias in firewall rules can lead to unexpected results - for example, allowing or blocking access to third-party services that happen to share the same IP addresses. For this reason, the OPNsense developers recommend using aliases like this primarily for allow lists, rather than for blocking.
Also keep in mind that OPNsense doesn’t track the TTL of DNS records for such an alias. If the domain’s IP addresses change, they won’t be updated automatically until the alias is cleared and repopulated. As a result, firewall rules may continue using stale addresses for some time.
Configuring Hosts (optional)#
The Hosts tab is used not only to store static DHCP reservations, but also to create DNS name overrides (Host Overrides) when Dnsmasq’s DNS service is enabled.
When you open the Edit Host Override window, you’ll notice it combines both DHCP and DNS parameters.
Creating a New Static Reservation#
To add a new device, click the + button and fill in the required fields.
| Parameter | Value |
|---|---|
| Host | Device name |
| IP address | Static IP address |
| Hardware address | Device MAC address |
| Domain | Optional |
If the Domain field is left empty, the domain specified in the system’s general settings (System → General) will be used.
Using Alias Records#
In addition to static DHCP entries, Dnsmasq lets you create additional DNS aliases (Alias Record).
This can be useful, for example, when using a reverse proxy, where several domain names need to point to a single device.
You can also create CNAME records, which is especially handy for devices with dynamic IPv4 addresses.
Dnsmasq or Unbound for Host Overrides?#
If Unbound DNS is configured to forward local queries to Dnsmasq, you can create name overrides in two ways:
in Dnsmasq’s Hosts section;
via Host Overrides in Unbound DNS.
Both options will work correctly.
If you’ve already been using Host Overrides in Unbound DNS, there’s no need to migrate them to Dnsmasq. You can leave the existing configuration unchanged - Unbound will keep using it, and local names for devices registered in Dnsmasq will also resolve successfully.
Configuring the Firewall#
In this part of the article I’ll briefly cover the basics of packet filtering in OPNsense and show how firewall rules are created and applied, using simple examples.
How Does the OPNsense Firewall Work?#
Below are the core principles behind how the OPNsense firewall works, along with the basic concepts needed to understand the packet filtering mechanism.
Rules#
OPNsense uses a Stateful Packet Filter. It lets you allow or deny network packets flowing between specific networks, and control how packets are forwarded through the device.
Firewall rules in OPNsense are security policies applied to network traffic and organized by interface.
Below are the core elements of a rule.
Actions#
Each rule can be assigned one of three actions.
Pass (Allow)#
Allows network traffic through.
Block#
Denies traffic without notifying the client that the packet was dropped.
This is the recommended option for untrusted networks, such as the internet.
Reject#
Denies traffic and sends the client a rejection notice.
This mode is only supported for TCP and UDP protocols:
- for TCP, an RST (Reset) packet is sent;
- for UDP, an ICMP Destination Unreachable message is returned.
Note When blocking access on internal networks, it’s often more convenient to use Reject, since the client gets an immediate rejection notice instead of waiting for a timeout. For untrusted networks (such as the internet), it’s recommended to use Block, so you don’t give a potential attacker any extra information about how your firewall is set up.
The “Allow All” Rule#
After installing OPNsense and completing the initial configuration of the LAN and WAN interfaces, the system automatically creates several rules:
- an anti-lockout rule (Web Administration Anti-Lockout Rule);
- an Allow All rule for IPv4;
- an Allow All rule for IPv6.
These rules serve two important functions:
- they prevent you from losing access to the OPNsense management web interface;
- they give devices on the local network (LAN) full access to the internet and to other networks behind the firewall.
As a result, any device connected directly to the router (or to a switch connected to it) can immediately access the network without any additional rule configuration.
If the Allow All rule is deleted or disabled, all outgoing traffic from the local network will be blocked. The only exception will be access to the OPNsense management web interface.
Why the Anti-Lockout Rule Isn’t Recommended for Corporate Networks#
While the Anti-Lockout rule is very convenient for home use, it’s considered unsafe in a corporate environment.
The reason is that it allows any device on the local network to access the firewall’s management interfaces, including:
- the Web GUI;
- the SSH console.
This poses a serious security risk and can lead to system compromise or data leaks.
For corporate networks, it’s therefore recommended to:
- disable the Anti-Lockout rule;
- create a custom rule that allows management access only to administrators or trusted devices.
How to View the Default Rules#
To view the automatically created rules:
- Go to Firewall → Rules → LAN.
- At the top of the rule list, click the dropdown icon next to Automatically generated rules.
This will display the automatically created rules, including:
- Default Anti-Lockout Rule;
- Allow LAN to Any.
Rule Processing Order in OPNsense#
When a network packet arrives, OPNsense checks the rules in the following order:
- Floating Rules;
- Interface Groups (interface group rules);
- Interface Rules (individual interface rules).
Automatically created internal system rules are usually registered first.
The Quick Option and Rule Matching Order#
By default, most rules are created with the Quick option enabled.
If Quick is enabled, the following principle applies:
First Match Wins.
As soon as a packet matches a rule:
- further checking stops;
- subsequent rules are ignored.
If Quick is disabled, a different algorithm applies:
Last Match Wins.
This mode is used much less often and is suited to implementing special filtering policies.
For example, this is exactly the mechanism used by the standard Default Deny rule: if a packet doesn’t match any rule, it gets dropped.
Why Rule Order Matters#
OPNsense rules are checked top to bottom.
So their position directly affects how traffic is handled.
As soon as a packet matches a rule -
- Pass;
- Block;
- Reject,
further processing stops.
That’s why it’s recommended to follow this principle:
- place the most specific rules at the top of the list;
- put more general ones closer to the bottom.
For example:
- allow LAN users access only to HTTP and HTTPS;
- then allow DNS;
- after that, add any other necessary rules;
- at the very end, keep a Deny All or Allow All rule to handle any traffic that didn’t match the previous rules.
This approach makes the configuration clearer and significantly improves network security.
Traffic Direction#
Rules can apply to traffic in two directions:
- Incoming (In);
- Outgoing (Out).
By default, OPNsense filters incoming traffic (In).
This means the rule needs to be created on the interface the packet enters the firewall through.
Example#
Suppose you need to allow HTTPS (port 443) connections from the internet to an internal web server. In that case, the rule should be created on the WAN interface, since that’s the interface through which packets enter OPNsense from the external network. The rule will then allow incoming connections on TCP port 443 to the specified server.
Firewall Rule Settings#
Some rule parameters exist purely for administrative convenience and have no effect on traffic handling. Using clear names and descriptions makes it much easier to find rules and analyze events in the firewall log.
Descriptive Parameters#
| Parameter | Description |
|---|---|
| Category | The category the rule belongs to. Can be used to filter rules in the list. |
| Description | A free-text description of the rule. It’s recommended to use informative comments. |
Core Parameters#
Below are the parameters used most often.
| Parameter | Description |
|---|---|
| Action | The rule’s action: Pass, Block, or Reject. |
| Disabled | Lets you temporarily disable a rule without deleting it. Useful for testing or for rarely used policies. |
| Interface | The interface the rule applies to. Rules can be copied between interfaces, changing only the target interface. |
| TCP/IP Version | Determines whether the rule applies to IPv4, IPv6, or both protocol versions. |
| Protocol | The network protocol. TCP and UDP are used most often. |
| Source | The source IP address or network. Using aliases lets you combine IPv4 and IPv6 addresses in a single rule. |
| Source / Invert | Inverts the source condition. For example, “not 172.16.0.0/24”. |
| Destination | The destination address or network. Aliases are supported. |
| Destination / Invert | Inverts the destination condition. |
| Destination Port Range | Lets you specify a service by name (HTTP, HTTPS, etc.) or by port number (including ranges). Aliases can also be used. |
| Log | When the rule triggers, an entry is logged. You can check it under Firewall → Log Files → Live View. |
Aliases#
Aliases are one of the most useful tools in OPNsense. They let you significantly reduce the number of rules and make the configuration much clearer.
An alias is a named list of:
hosts;
networks;
ports;
MAC addresses;
countries;
other objects.
Instead of listing many IP addresses or ports in every rule, you can just reference the name of the corresponding alias.
OPNsense already includes several built-in aliases, for example:
SSH
HTTP
HTTPS
LAN net
LAN address
LAN interface
DNS
Using built-in aliases makes rules significantly easier to read.
Advantages of Using Aliases#
Using aliases lets you:
write clearer rules;
make the configuration easier to maintain;
reduce the number of rules;
combine many objects into a single rule;
improve firewall performance by reducing the number of rules that need to be checked.
In other words, well-organized aliases can significantly reduce configuration complexity.
Managing Aliases#
Aliases are created, modified, and deleted via:
Firewall → Aliases
There’s no need to go to the Aliases section when just reviewing rules.
If you hover your mouse over an alias name in a rule, OPNsense will show a tooltip containing:
the alias’s contents;
its description.
This makes it much easier to analyze existing rules.
Alias Types#
OPNsense supports several kinds of aliases.
| Type | Description |
|---|---|
| Hosts | Individual IP addresses, address ranges, or domain names (FQDNs). |
| Networks | Subnets in CIDR notation, or excluded networks. |
| Ports | A single port or a range of ports. |
| MAC addresses | Full or partial MAC addresses. |
| URL (IPs) | A list of IP addresses that is loaded once. |
| URL Tables (IPs) | A list of IP addresses that is automatically refreshed at set intervals. |
| GeoIP | Countries or entire regions of the world. |
| Network Group | Combines several network aliases into one. |
| External | An external alias whose contents are managed by third-party programs or an API. |
Hosts#
Hosts-type aliases can contain:
individual IP addresses;
IP address ranges;
local hostnames;
fully qualified domain names (FQDNs).
To exclude an address, use the ! symbol.
For example:
!172.16.0.10excludes that address.
A single alias can combine different types of entries:
youtube.com,
172.16.1.1,
192.168.10.1,
web_server
Valid Examples#
An IPv4 address:
172.16.1.10or
!172.16.1.10An address range:
172.16.1.10-172.16.1.15A local hostname:
dbserveror
!dbserverA fully qualified domain name:
youtube.comor
!youtube.comIPv6 addresses are also supported.
Networks#
Network aliases use CIDR (Classless Inter-Domain Routing) notation.
For example:
/32 - a single IPv4 address;
/128 - a single IPv6 address;
/24 - a network with the mask 255.255.255.0;
/64 - a standard IPv6 subnet.
Just like with Hosts aliases, exclusions are supported:
!172.16.0.0/24Besides CIDR, you can use a Wildcard Mask, which lets you describe address ranges.
To select all routes ending in .1 on the 172.16.x.1 network, you can use a notation like 172.16.0.1/0.0.255.0
Ports#
Ports can be specified:
as a single number;
as a range using a colon.
For example:
20:25means the port range from 20 to 25.
Values from 0 to 65535 are allowed.
You can list multiple ports and ranges at once:
21,8000:8080MAC Addresses#
Aliases of this type contain MAC addresses.
Both full and partial addresses are supported.
For example:
F4:90:EAlets you select all devices from that manufacturer.
URL Tables#
A URL Table lets you automatically fetch a list of IP addresses from a remote server.
The most well-known example is the Spamhaus Don’t Route Or Peer (DROP) or FireHOL lists.
Lists like these are often used to automatically block malicious addresses.
GeoIP#
GeoIP-type aliases let you allow or deny access to:
individual countries;
entire regions or continents.
To use GeoIP you need to:
open Firewall → Aliases → GeoIP;
configure a data source;
obtain the GeoIP database.
The most common provider is MaxMind.
To use it, you’ll need to register with MaxMind and obtain a database of geographic IP address ranges.
Network Group#
A Network Group combines several network aliases into one.
Such an alias can contain:
networks;
individual hosts;
other compatible aliases.
The main advantage of this type is that OPNsense won’t let you accidentally combine incompatible alias types.
External#
External-type aliases aren’t managed by OPNsense’s built-in mechanism.
Their content is populated by external applications, APIs, or scripts.
These aliases are handy for things like:
integrating with protection systems;
dynamically blocking addresses;
automatically managing access lists.
You can view the current contents under:
Firewall → Diagnostics → pfTables
Nesting Aliases#
All alias types support nesting.
This lets you combine several existing aliases into one broader alias.
For example, if you have two aliases:
webserver
emailserver
you can create a third alias:
dmzserversthat includes both of the previous ones.
After that:
individual rules can apply only to webserver;
only to emailserver;
or to the entire dmzservers group at once.
This approach greatly simplifies maintaining large firewall configurations and helps avoid duplicating rules.
Examples of OPNsense Firewall Rules#
Below are some of the most common OPNsense rule examples, which may be useful both for home users and for small business owners setting up a firewall for the first time.
1. Allowing Only Specific DNS Servers#
One of the first steps toward improving network security is blocking the use of third-party DNS servers. This prevents users or malware from bypassing filtering policies, parental controls, or DNS-based blocking.
It’s recommended to only let clients use:
OPNsense’s built-in DNS server;
your own local DNS server;
or a trusted external DNS service with filtering features.
To do this, you need to create two rules.
Step 1. Allow Access to the Internal DNS Server#
| Parameter | Value |
|---|---|
| Action | Pass |
| Protocol | TCP/UDP |
| Source | any |
| Source Port | any |
| Destination | LAN address |
| Destination Port | DNS (53) |
| Description | Allow internal DNS |
| If you’re using OPNsense’s DNS Resolver or DNS Forwarder, the DNS service automatically runs on the LAN interface’s IP address. |
That’s why:
the gateway IP address;
the DNS server IP address
are the same in many home networks.
If you’re using a separate DNS server, specify its IP address instead of LAN address.
Step 2. Block All Other DNS Servers#
After allowing your own DNS, you need to create a block rule.
| Parameter | Value |
|---|---|
| Action | Block |
| Protocol | TCP/UDP |
| Source | any |
| Source Port | any |
| Destination | any |
| Destination Port | DNS (53) |
| Description | Block external DNS |
OPNsense checks rules top to bottom.
So:
the packet first hits the Allow Internal DNS rule;
if the DNS server doesn’t match the allowed one, the packet reaches the Block External DNS rule and is blocked.
As a result:
the internal DNS continues working;
requests to all other DNS servers are blocked.
After creating the rules, it’s recommended to move them to the top of the rule list and click Apply Changes.
2. Allowing Access to Local Services Across VLANs#
One of the core principles of information security is network segmentation.
Critical servers should be placed in separate VLANs, with access granted only to the users who genuinely need it.
For example, an HR department’s database server should only be accessible to HR staff computers.
Example: Access to a Postgres Database Server#
Let’s create the following aliases.
A Hosts-type alias containing the list of IP addresses that should have access to the database.
For example:
10.10.10.11-10.10.10.20Postgres
A Hosts-type alias containing the IP address of the database server.
For example:
192.168.1.157SQL
A Ports-type alias containing Postgres’s default port.
5432/TCPCreating the Rule#
| Parameter | Value |
|---|---|
| Action | Pass |
| Protocol | TCP |
| Source | alias name |
| Destination | Postgres |
| Destination Port | SQL |
| Description | Allow access to Postgres Database Server |
This rule will only allow the specified devices to connect to the Postgres database server.
For all other devices, it’s recommended to use a Deny All rule or a separate block rule.
After creating the rule, click Apply Changes.
Example: LAN Access to a Web Server in the DMZ#
It’s recommended to place public web servers in a separate DMZ (Demilitarized Zone) network.
Suppose the web server has the address:
192.168.10.20Let’s create an alias:
Web_serverThen create a rule.
| Parameter | Value |
|---|---|
| Action | Pass |
| Protocol | TCP |
| Source | LAN net |
| Destination | Web_server |
| Destination Port | HTTPS |
| Description | Allow access to Web Server |
After applying the changes, users on the local network will be able to connect to the web server over HTTPS.
3. Blocking Traffic Between VLANs#
Whenever possible, you should deny any unnecessary interaction between internal network segments.
By default, OPNsense doesn’t allow traffic between VLANs unless there’s an Allow All rule at the bottom of the rule list.
However, many home users prefer to use an Allow All rule that permits all traffic except what’s explicitly denied.
In that case, you’ll need to manually block access to other VLANs.
Otherwise, devices in different segments will be able to freely interact with each other, which completely negates the benefits of network segmentation.
3.1 Creating the Alias#
Create the alias Private_IP_Ranges under:
Firewall → Aliases
It should contain all the private network ranges:
10.0.0.0/8
172.16.0.0/12
192.168.0.0/16
3.2 Creating the Rule#
| Parameter | Value |
|---|---|
| Action | Block |
| Protocol | any |
| Source | LAN net |
| Destination | Private_IP_Ranges |
| Destination Port | any |
| Description | Block access to all other private networks |
4. Allowing All Remaining Traffic#
At the end of OPNsense’s rule list there’s always an implicit Deny All rule.
So administrators usually explicitly allow only the services that are needed.
However, home users often find it difficult to figure out all the ports required by modern devices:
TVs;
game consoles;
smartphones;
laptops;
IoT devices.
For that reason, home networks often follow this pattern:
block rules at the top of the list;
followed by the necessary allow rules;
an Allow All rule added at the end.
This approach makes running a home network much easier, though it’s not recommended for corporate infrastructure.
5. Full Access for the Administrator#
While troubleshooting, a system administrator often needs quick access to any device on the network.
For that reason, it’s recommended to create a separate rule that sits above all block rules.
5.1 Creating the Alias#
Create the alias:
adminsand add to it:
the administrator’s work computer;
laptop;
an administration server;
other trusted devices.
5.2 Creating the Rule#
| Parameter | Value |
|---|---|
| Action | Pass |
| Interface | LAN |
| Protocol | any |
| Source | admins |
| Destination | any |
| Destination Port | any |
| Description | Allow admin devices access to anywhere without any restriction |
On the interface where the administrator’s devices live (for example LAN):
create a Pass rule;
set admins as the source;
leave everything else set to Any.
This rule lets administrators access any device on the network regardless of other restrictions.
Since OPNsense processes rules top to bottom, it’s recommended to place this rule at the very top of the list.
Destination NAT (Port Forward)#
Port Forwarding (Destination NAT)#
When several devices on a local network share a single external IP address, all incoming connections from the internet arrive at that one address.
Without additional configuration, OPNsense has no way to determine which internal device an incoming connection should be routed to. As a result, such connections will be rejected.
This problem is solved using Destination NAT (DNAT), also known as Port Forward.
A typical use case is publishing a web server hosted on the internal network. To make the server reachable from the internet, you need to forward incoming connections on ports:
- 80/TCP (HTTP);
- 443/TCP (HTTPS).
Where Destination NAT Is Configured#
To create port forwarding rules, go to the OPNsense web interface:
Firewall → NAT → Destination NAT (Port Forward)
This section shows a list of all existing Destination NAT rules, along with options to create, edit, and delete them.
Destination NAT Rule Parameters#
When creating a new rule, the following core parameters are available.
| Parameter | Description |
|---|---|
| Disabled | Disables the rule without deleting it. While this option is enabled, the rule doesn’t apply. |
| Sequence | Determines the order in which rules are processed. OPNsense checks rules sequentially, top to bottom, based on their order. |
| Categories | Lets you assign the rule one or more categories for easier organization and filtering. |
| Description | A free-text description of the rule. It’s recommended to use a clear name so its purpose is easy to identify later. |
Interface Parameters#
When creating a Destination NAT (Port Forward) rule, you need to specify which interface and traffic type it will apply to.
| Parameter | Description |
|---|---|
| Interface | The interface (or interfaces) on which incoming traffic will be received. Usually WAN is used for publishing services. |
| Version | The IP protocol version the rule applies to: IPv4, IPv6, or both at once. |
| Protocol | The network protocol the rule must match. TCP, UDP, or a TCP/UDP combination are used most often, though other supported protocols are also available. |
Source Parameters in OPNsense Rules#
When creating filtering and NAT rules in OPNsense, it’s important to correctly define the traffic source parameters.
| Parameter | Description |
|---|---|
| Invert Source | Inverts the source condition. Instead of the specified range, the rule will match all traffic except that range. For example, “everything except 192.168.1.0/24”. |
| Source Address | Specifies the source network, IP address, or alias the traffic should come from. You can use individual hosts, entire networks, or groups. |
| Source Port | Defines the source port or port range. Less commonly used, since client ports are usually assigned dynamically. However, it can be useful for specialized filtering scenarios. |
Destination Parameters in OPNsense Rules#
When configuring filtering and NAT rules, it’s important to precisely define where traffic is heading. This is where the Destination parameters come in.
| Parameter | Description |
|---|---|
| Invert Destination | Inverts the destination condition. Instead of the specified address or network, the rule applies to all addresses except those specified. |
| Destination Address | The IP address, network, or alias traffic should be directed to. Can include individual hosts or address groups. |
| Destination Port | The destination port or port range. Used to filter specific services (for example, HTTP, HTTPS, DNS, etc.). |
Redirect / Translation Parameters#
In Destination NAT (Port Forward) rules, the redirection parameters determine exactly where incoming traffic is sent after processing.
💡 How It Works#
NAT translation converts the original external destination address (for example, the firewall’s public IP) into the internal server’s address.
For example:
external IP: 203.0.113.10:443
internal server: 192.168.1.50:443
Once the rule is applied, the connection is automatically redirected to the internal host.
Redirection Parameters#
| Parameter | Description |
|---|---|
| Redirect Target IP | The internal IP address incoming traffic will be redirected to. Usually a server on the local network (LAN or DMZ). |
| Redirect Target Port | The port on the internal host that the connection will be redirected to. It can match the external port or differ from it (for example, 80 → 8080). |
| Pool Options | Determines how traffic is distributed when using multiple internal IP addresses (load balancing or selecting the target server using a specific algorithm). |
Additional Options in Destination NAT#
When configuring Destination NAT (Port Forward) rules, OPNsense offers additional options that control the rule’s behavior, synchronization, and interaction with firewall rules.
Options Parameters#
| Parameter | Description |
|---|---|
| No XMLRPC Sync | Excludes this rule from synchronization with HA (High Availability) partners. Used in clusters where not all NAT rules should be copied to the secondary node. |
| NAT Reflection | Controls NAT reflection (hairpin NAT) mode. Lets internal clients reach services via the external IP address. Can be enabled, disabled, or inherit the global setting. |
| Set Tag | Assigns a tag to packets matching this NAT rule. Used for further processing by other firewall rules. |
| Match Tag | Lets the rule apply only to packets that already carry a specific tag. Used for complex routing and filtering scenarios. |
Firewall Rule (Generating Firewall Rules)#
OPNsense can automatically create the corresponding firewall rules based on the NAT configuration.
The available options are:
| Option | Description |
|---|---|
| Manual (recommended) | The administrator manually creates the firewall rules. This is the most flexible and recommended option. |
| Pass (auto rule) | Automatically allows traffic matching the NAT rule. These rules don’t appear on the Firewall Rules tab. |
| Generate Interface Rules | Automatically creates rules on the interface, which can then be overridden by higher-priority rules. |
Important Note#
When using automatic rule generation, keep in mind:
the NAT rule and the firewall rule must match the same target address;
automatically generated rules can be overridden by higher-priority interface rules;
for complex configurations, it’s recommended to use manual rule management to avoid conflicts and unexpected blocks.
CrowdSec (OPNsense plugin)#
CrowdSec is a behavioral protection system that analyzes logs and automatically blocks suspicious activity. Unlike a classic firewall, it doesn’t work off IP lists, but off behavior scenarios (brute-force, scanning, anomalous requests, and so on).
In OPNsense, the CrowdSec plugin is installed from the official repositories and includes three components at once:
- Log Processor (log analysis, formerly the IDS)
- LAPI (a local API for decision-making)
- Remediation Component (traffic blocking, formerly the IPS)
Installing the Plugin#
Go to:
System → Firmware → Plugins
Find and install:
os-crowdsec
After installation, the following packages will be deployed automatically:
- crowdsec
- crowdsec-firewall-bouncer
- os-crowdsec
⚠️ Important: don’t start or configure services manually via the shell. In OPNsense, CrowdSec management is done entirely through the plugin’s interface.
Verifying the Installation#
After installation, refresh the page and go to:
Services → CrowdSec → Overview
Here you can check:
- whether the Log Processor is running
- whether LAPI is active
- whether the Remediation Component is working
- whether collections and scenarios have been loaded
If everything looks correct - the basic installation is complete.
CrowdSec Settings#
Next, go to:
Services → CrowdSec → Settings
By default, three core components are enabled:
- Log Processor
- LAPI
- Remediation Component
They can be disabled only for testing or in a non-standard architecture (for example, if LAPI is hosted on a separate server).
Default Behavior#
Starting with CrowdSec 1.6.3, private IP addresses (LAN ranges) are automatically excluded from blocking.
This means addresses like:
- 192.168.x.x
- 10.x.x.x
- 172.16.x.x
won’t be blocked even if they match attack scenarios.
If you need to change this behavior and allow blocking internal addresses, you can remove the corresponding whitelist parser:
cscli parsers remove crowdsecurity/whitelistsTesting Remediation (IPS) Behavior#
You can manually add a test rule to verify that blocking works.
⚠️ Important: your SSH session may be terminated while running this command.
cscli decisions add -t ban -d 2m -i <your_ip_address>After running this:
- your current IP will be blocked for 2 minutes
- you won’t be able to reconnect from this IP
Finding Your External IP#
If you’re connected via SSH, you can get your IP like this:
echo $SSH_CLIENT | awk '{print $1}'or:
w -h | awk '{print $3}' | sort -uRemote LAPI (optional)#
By default, CrowdSec’s local API (LAPI) runs directly on OPNsense. However, in more complex setups it can be hosted on a separate server.
This makes sense if:
- OPNsense is running on weak hardware
- you already have a central CrowdSec server
- you need a single point of management
⚠️ Important: when using a remote LAPI, some information in the OPNsense interface may not display correctly (for example, the list of machines and bouncers).
Setting Up a Remote LAPI#
Suppose you already have a separate LAPI server accessible over the network.
1. Configuring the LAPI Server#
On the CrowdSec server, open the configuration file:
/usr/local/etc/crowdsec/config.yaml (FreeBSD)/etc/crowdsec/config.yaml (Linux)Change the parameter:
api.server.listen_urifor example:
192.168.122.214:8080Also update:
local_api_credentials.yamlin the format:
http://192.168.122.214:8080Then restart CrowdSec.
2. Configuring OPNsense#
In OPNsense:
- disable Enable LAPI
- enable Manual LAPI configuration
- apply the settings
3. Registering OPNsense with LAPI#
On OPNsense, run:
cscli lapi register -u http://192.168.122.214:80804. Verifying on the LAPI Server#
cscli machines listIf needed:
cscli machines validate <machine_id>5. Adding a Bouncer#
cscli bouncers add opnsenseYou’ll get an API key in response, for example:
a8605055a065fd06b86ecac84e9e9ae46. Configuring the Bouncer on OPNsense#
Open the file:
/usr/local/etc/crowdsec/bouncers/crowdsec-firewall-bouncer.yamlSpecify:
- api_key
- api_url
Then restart the CrowdSec service:
service oscrowdsec restartor through the GUI:
Services → CrowdSec → Settings → Apply
Firewall Rules for Blocking Outbound Connections#
By default, CrowdSec in OPNsense blocks incoming connections from known malicious IP addresses. However, this doesn’t cover the situation where a device inside your network itself tries to reach such an address.
For example, this could be:
- an infected host on the local network;
- malicious script or container;
- accidentally launched suspicious software.
In these cases, the connection will be allowed unless you separately block outbound traffic to known bad IPs.
For this, it’s recommended to use Floating Rules in OPNsense, which let you apply rules across multiple interfaces at once (LAN/VLAN).
Creating a Floating Rule#
Go to:
Firewall → Rules → Floating
Click Add (+) in the top-right corner.
Configure the rule as follows:
| Parameter | Value |
|---|---|
| Action | Block |
| Interface | LAN (or the relevant VLANs/interfaces) |
| Direction | In |
| Protocol | Any |
| Destination | crowdsec_blacklists |
| Log | Enabled |
| Description | Block access to CrowdSec blacklist |
IPv4 and IPv6#
If your network uses IPv6, you’ll need to create a separate rule for IPv6 traffic.
OPNsense doesn’t always automatically apply the same rules to both stacks (IPv4/IPv6), so it’s better to split them explicitly:
- one rule for IPv4
- a second rule for IPv6
Applying the Rules#
After creating the rules, click:
Apply Changes
From this point on, any attempts from inside your network to reach IP addresses in the CrowdSec blacklist will be blocked at the firewall level.
Practical Significance#
This setup closes an important gap:
- CrowdSec protects incoming traffic (internet → LAN)
- Floating rules protect outgoing traffic (LAN → internet)
Together they let you not only limit external attacks, but also reduce the risk of devices inside your network becoming compromised.
Blocking Known Malicious IP Addresses with FireHOL#
Even with a properly configured firewall, you’ll notice constant connection attempts in the OPNsense log from bots, scanners, and other potentially unwanted hosts. It’s impossible to eliminate this traffic entirely, but you can significantly reduce it using public lists of IP addresses known for various malicious activity.
One of the most popular sources for such lists is FireHOL. The project regularly aggregates data from various threat intelligence sources and publishes ready-made lists of IP addresses associated with botnets, malware, command-and-control (C&C) servers, network scanners, and other threats.
In OPNsense, such lists can be added as URL aliases, after which the system will automatically download them and use them when filtering traffic.
Creating a FireHOL Alias#
Go to Firewall → Aliases and click Add.
Fill in the fields as follows:
| Field | Value |
|---|---|
| Name | Firehol |
| Type | URL (IPs) |
In the Content field, add the links to the block lists you want to use:
https://raw.githubusercontent.com/firehol/blocklist-ipsets/master/firehol_level1.netset
https://raw.githubusercontent.com/firehol/blocklist-ipsets/master/firehol_level2.netset
https://raw.githubusercontent.com/firehol/blocklist-ipsets/master/firehol_level3.netset
https://raw.githubusercontent.com/firehol/blocklist-ipsets/master/firehol_abusers_1d.netset
After saving, click Apply so OPNsense downloads the contents of the lists.
Excluding Local Networks#
Even though FireHOL’s lists contain only public IP addresses, it’s good practice to exclude your internal network ranges from the check.
Which FireHOL level should you choose? FireHOL aggregates dozens of different threat-intelligence sources and provides several blocking levels.
- firehol_level1 - the most conservative list. It only includes IP addresses with a high threat reputation, so the risk of false positives is minimal. This is the level most users should go with.
- firehol_level2 - includes more addresses and provides more aggressive filtering, but the chance of blocking legitimate resources goes up.
- firehol_level3 - the strictest level. It combines a large number of sources and can trigger false positives, so it should only be used if you understand the potential consequences.
- firehol_abusers_1d - a list of IP addresses seen engaging in suspicious activity over the last 24 hours. It’s updated continuously and helps quickly block new attack sources.
- For a home network or small infrastructure, firehol_level1 is usually enough. If you regularly see a lot of scans or password brute-force attempts, you can additionally add firehol_abusers_1d.
- Level2 and level3 are best enabled only after evaluating the possible consequences and monitoring the firewall logs.
To do this, create an alias with the following parameters:
| Field | Value |
|---|---|
| Name | External |
| Type | Networks |
For the content, specify:
!10.0.0.0/8
!172.16.0.0/12
!192.168.0.0/16
!127.0.0.0/8
Then create one more alias:
| Field | Value |
|---|---|
| Name | Firehol_without_internal |
| Type | Network Group |
Add the External and Firehol aliases to it.
Creating a Block Rule#
All that’s left is to create a firewall rule.
Go to Firewall → Rules → WAN and add a new rule with the following parameters:
| Field | Value |
|---|---|
| Action | Block |
| Interface | WAN |
| Direction | In |
| Protocol | Any |
| Source | Firehol_without_internal |
| Destination | Any |
After saving, click Apply changes.
Now all incoming connections from IP addresses present in the FireHOL lists will be automatically blocked before any other firewall rules are processed.
Automatic List Updates#
The IP addresses used by attackers change constantly, so the block lists need to be updated regularly.
Go to System → Settings → Cron and create a new job with the following parameters:
| Field | Value |
|---|---|
| Enabled | checked |
| Minutes | 0 |
| Hours | 0 |
| Day of the month | * |
| Months | * |
| Days of the week | * |
| Command | Update and reload firewall aliases |
After this, OPNsense will download the latest versions of the FireHOL lists daily and apply the changes automatically without any action on your part.
Geoblock#
Geographic Blocking (GeoIP)#
If your services are intended only for users from certain countries, it makes sense to restrict access by geography. In OPNsense, this is done using GeoIP aliases, which let you create firewall rules based on the country an IP address belongs to.
Setting Up the GeoIP Database#
To use GeoIP, you need to connect the MaxMind GeoLite2 database.
First, register on the MaxMind website and get a personal license key. For users in Russia, this can be a problem, since MaxMind removed the option to register for users from Russia, but I’m sure you’ll find a way to work around that.
Then go to Firewall → Aliases → GeoIP settings and in the URL field enter a link like the one below, replacing your-license-key with the license key you obtained:
https://download.maxmind.com/app/geoip_download?edition_id=GeoLite2-Country-CSV&license_key=your-license-key&suffix=zipSave the changes.
MaxMind license keys have expired every 90 days since late 2023 unless confirmed by email. If a few months from now your GeoIP database auto-update suddenly stops working - first check whether your key has expired before you start looking for the problem in OPNsense’s settings.
You can read more about this here.
Creating GeoIP Aliases#
After connecting the database, go to Firewall → Aliases and create an alias with the following parameters:
| Field | Value |
|---|---|
| Name | Geoblock |
| Type | GeoIP (IPv4, IPv6) |
| Content | Select the countries whose access you want to block |
If you need to allow access from a specific country, create another GeoIP alias. For example, for Russia:
| Field | Value |
|---|---|
| Name | UK |
| Type | GeoIP (IPv4, IPv6) |
| Content | Russia |
Creating Firewall Rules#
Now you need to create the corresponding firewall rules.
Go to Firewall → Rules → WAN and create a block rule:
| Field | Value |
|---|---|
| Action | Block |
| Interface | WAN |
| Direction | In |
| TCP/IP Version | IPv4 + IPv6 |
| Protocol | Any |
| Source | Geoblock |
| Destination | Any |
| Description | Blocks specific countries |
If you need to grant access to a specific service only from a chosen country, create an allow rule:
| Field | Value |
|---|---|
| Action | Pass |
| Interface | WAN |
| Direction | In |
| TCP/IP Version | IPv4 + IPv6 |
| Protocol | TCP |
| Source | RU |
| Destination | WAN address |
| Destination port | 443 |
| Description | Whitelist RU on port 443 |
Important. OPNsense processes firewall rules top to bottom. So the Pass rule must be placed above the Block rule, otherwise the connection will be blocked before the system reaches the allow rule.
Automatic GeoIP Database Updates#
The MaxMind database is updated regularly, so it’s recommended to set up automatic updates.
Go to System → Settings → Cron and create a new job:
| Field | Value |
|---|---|
| Enabled | ✓ |
| Minutes | 0 |
| Hours | 0 |
| Day of month | * |
| Months | * |
| Day of week | * |
| Command | Update and reload firewall aliases |
After this, OPNsense will download the latest GeoIP database daily and automatically update all aliases that use geographic filtering.
Ad Blocking#
Blocking Ads and Malicious Domains#
One of the advantages of Unbound DNS is its built-in support for DNS Block Lists (DNSBL). This technology lets you block ads, trackers, malicious domains, and phishing sites at the DNS resolution stage, before clients on the network can even establish a connection.
Before you begin, make sure the Unbound DNS service is enabled.
Go to:
Services → Unbound DNS → General
and enable the Enable Unbound option.
Go to:
Services → Unbound DNS → Blocklist
Enable DNSBL and select the block lists you want.
| Parameter | Value |
| Enable | ✓ |
| Type of DNSBL | Toggle preferred lists |
To start, it’s recommended to use the following lists:
- Abuse.ch
- OISD
- AdAway
- AdGuard
- Blocklist.site
If some sites or services stop working after enabling blocking, you can add the necessary domains to the Whitelist Domains field.
You can add more lists as needed, but it’s best not to enable every available source at once. That will make it much harder to track down the cause of any false positives.
Automatically Updating DNS Block Lists#
To keep the block lists up to date, it’s recommended to set up daily updates.
Go to:
System → Settings → Cron
Create a new job with the following parameters:
| Parameter | Value |
| Minutes | 0 |
| Hours | 0 |
| Day of Month | * |
| Months | * |
| Day of Week | * |
| Command | Update Unbound DNSBLs |
| Description | Update Unbound BLs |
After this, OPNsense will automatically update the DNS block lists every day at 00:00.
NetFlow and Insight#
NetFlow in OPNsense is used to collect information about network traffic. It lets you see which devices and services are generating load, when peak usage occurs, and exactly how traffic is being routed.
The Insight module complements NetFlow with visual analytics and reports. It offers graphs, per-interface statistics, and CSV export for further analysis in spreadsheets or external tools.
Configuring NetFlow#
Go to Reporting → NetFlow and configure the settings as follows:
Core Parameters#
| Parameter | Value |
|---|---|
| Listening interfaces | LAN, WAN, and any other interfaces you want |
| WAN interfaces | WAN |
| Capture local | Enabled |
| Version | v9 |
| Destinations | 127.0.0.1:2056 |
After applying these settings, OPNsense will start collecting statistics across all specified interfaces and sending the data to the local collector.
Viewing Statistics in Insight#
Once NetFlow is enabled, the data becomes available in the analytics module.
Go to:
Reporting → Insight
Here you can:
view network load graphs;
analyze traffic distribution across interfaces;
track load peaks;
export data to CSV for further analysis.
Insight effectively turns OPNsense into a basic network analytics tool, letting you see not just “what’s broken,” but also “what exactly is being used on the network, and how.”
Reporting Settings#
OPNsense collects system and network interface statistics using its built-in graphing mechanism (RRD - Round-Robin Database). This lets you store historical load data and view it as graphs right in the web interface.
Unbound DNS Reporting#
If the system uses the Unbound DNS resolver, you can enable statistics collection for DNS queries.
| Parameter | Value |
|---|---|
| Statistics | Enabled |
Once enabled, OPNsense will start collecting data about DNS queries on the local network. This lets you analyze which domains are queried most often and how clients on the network behave.
Reporting Database (RRD)#
This next block is responsible for storing and displaying system performance graphs.
| Parameter | Value |
|---|---|
| Round-Robin-Database | Enabled |
RRD is used to build graphs of CPU load, memory usage, network interfaces, and other system metrics. Data is stored in a compact format and automatically overwritten as the database fills up.
After changing the graph settings, it may take up to 1 minute before the new data starts displaying correctly.
Split DNS#
What Is Split DNS, Briefly#
The concept is this: the same domain (for example, stilicho.ru) resolves differently depending on whether the client is on the internal network (LAN) or the external one (the internet).
Split DNS lets you give different answers to DNS queries for internal and external users, so local queries to your server don’t need to travel through the router. This has a few advantages:
- Faster, since there’s no need to go through the router.
- A reverse proxy can easily distinguish between internal and external requests and allow/deny them accordingly, since there’s no NAT involved.
- Everything keeps working even without internet access.
- The system keeps working even if the upstream DNS server (your ISP/Google/OpenDNS, etc.) is unavailable.
Requirements#
- An internal reverse proxy listening on port 80/443.
- An internal DNS resolver that supports overrides or hosting full DNS zones.
Common DNS Configurations#
In this example, we assume domain.com is your domain and 10.10.10.10 is your reverse proxy server.
Go to Services > Unbound DNS > Overrides > Host Overrides > Add:
- Host:
* - Domain:
stilicho.ru - Type:
A or AAAA - IP:
10.10.10.10
Conclusion#
At this point, the basic OPNsense setup is complete (though “basic” is a stretch, isn’t it?), and we now have a working firewall with network segmentation and above-average security settings.
From here, everything depends on your infrastructure and how far you want to take the configuration - for example, you can and should add IDS/IPS.
It’s important to understand that OPNsense isn’t a consumer-grade “plug and play” router, but a tool that reveals its full potential gradually. The deeper you integrate it into your network, the more control you gain over traffic and security.