
If this article was useful to you, you can support the author by becoming a sponsor on Boosty.
If you clicked expecting an article about the actual animal, sorry to disappoint.
But since you asked - a pangolin is a rare mammal covered in hard, armor-like scales. It eats ants and termites, hunting them down with a long, sticky tongue, and rolls itself into a tight ball when threatened to keep predators out.
Preface#
There’s one massive pain point almost everyone in homelabbing eventually runs into. At first everything’s great “locally” - services run, web UIs load, life is good, or so it seems. Then you want to reach your stuff from outside your house, and suddenly you’re neck-deep in port forwarding, NAT, static IPs, dynamic DNS, domain names, and a constant nagging feeling that you’ve left some door cracked open that the entire internet is about to come pouring through (and if you’re already paranoid about this, that feeling isn’t wrong, for what it’s worth).
Cue Pangolin, stage left.
At its core, it’s a tool that erases the most annoying part of this equation - open ports. No more digging through router settings, poking at your firewall, or lying awake wondering which port you forgot to close, whether SSH access is actually locked down, or what you’d even do if a service got popped or your IP got exposed. Pangolin just opens a secure tunnel outward and makes your services reachable as if they were already “out there,” while physically everything stays exactly where it was - at home.
And that’s the real appeal: it takes a genuine cognitive load off your shoulders. No more holding your entire network topology in your head, no more remembering the difference between DNAT and SNAT, no more worrying that some service is sitting exposed with weak or no authentication (or maybe it’s fine, but you genuinely don’t know, and there’s nobody to ask - or there is, and they just… didn’t answer). With Pangolin you just describe what you want exposed - which service, which server - and it handles the rest, carefully and safely.
Worth pointing out too: none of this feels like a pile of duct-taped hacks bolted onto something shapeless and off-putting. There’s a real interface here, logic that actually makes sense, and a sense that you’re using a cohesive, and crucially, stable tool - not “yet another enthusiast GitHub project for other enthusiasts.” It doesn’t try to do everything - it solves exactly one problem: giving you access to your stuff without the usual hassle.
Functionally, Pangolin is basically Cloudflare Tunnel minus Cloudflare - your own private version of the thing. Which, honestly, is the whole point of self-hosting anyway, isn’t it?
Worth checking out a similar tool while you’re at it: NetBird is a direct alternative that solves the same problem - publishing services without a public IP or port forwarding - but it starts from a mesh network between your devices rather than an outbound tunnel, so it’s worth comparing the two.
Of course, comfort has a price. And here’s where everyone has to make their own call: either you burn time and nerves manually wiring up the network and security yourself - learning as you go, mistakes included, since there’s no shortcut around that - or you pay for a tool that’s already done that work for you. Pangolin is squarely the second option.
To be clear, you’re not paying for the app itself - it’s free for individuals. What costs money is the infrastructure underneath it. Sure, you could run it on your own home server, but once you factor in a static IP, network quality, power reliability, and so on, renting a VPS often ends up costing about the same as doing it yourself - and as a bonus, if your server ever gets compromised, an attacker won’t get past the VPS into your home network. Your call entirely.
At the end of the day this is less a story about technology and more one about convenience - about that moment when you just want things to work, without ritual sacrifices and constant double-checking whether you’ve really only got ports 80 and 443 open (or more, depending on your stack - SIP, say). If you’re already tired of that particular flavor of stress, you’ll probably get exactly why Pangolin exists.
What Makes It Interesting#
Dig a bit deeper and what makes Pangolin interesting isn’t that it “just works” - it’s how it manages to. Under the hood is a pretty sensible stack of modern networking approaches, neatly stitched together.
The core idea is tunneling. Instead of accepting incoming connections, your server initiates an outbound one to an external endpoint. That matters because outbound connections are almost universally allowed by ordinary firewalls - so there’s nothing to open on your router. From there, traffic to your services just rides back through that same tunnel.
On top of that sits encryption, typically TLS. So it’s not just “traffic going through some channel” - it’s actually protected from interception. Functionally this looks a lot like a VPN, or Cloudflare Tunnel: a trusted channel, with your HTTP, SSH, or whatever else living inside it.
Then comes proxying. Pangolin acts as a reverse proxy - it takes requests from outside and routes them to the right service inside your network. Which means you can hang multiple services off one external entry point and sort out domains, paths, and everything else without ever touching your actual network.
There’s a proper authentication layer too, of course. Rather than betting on “nobody will find my port” (when that port is, say, 2222), Pangolin leans on access control instead - who’s allowed to connect, to what exactly, and under which conditions. Classic zero-trust thinking.
And on top of all that, this kind of setup usually runs on an agent model - a lightweight client living next to your services, and a controller that knows how to expose them. Which means centralized access management, instead of configuring every container or server one at a time.
Net result: Pangolin bundles the Traefik reverse proxy, WireGuard, CrowdSec, and integration with basically any IdP/IAM provider you’d care to name, all in one package. And the cherry on top: convenient Geo-Blocking, letting you block incoming connections from anywhere you’re not expecting them from - which, let’s be honest, is basically everywhere except your own country, and maybe one more, if you know what I mean.
I’ve already covered each of these tools individually, in articles and videos on the channel. But Pangolin’s real value is that you don’t have to assemble this Lego set yourself out of Traefik, WireGuard, CrowdSec, Authelia/Authentik, and a couple more pieces. It’s already put together, and it already works as one coherent system.
What This Actually Costs You#
There’s a nuance with Pangolin that a lot of people miss at first: it looks “simple,” right up until you try deploying it properly. It genuinely does work out of the box - but for it to run stably, securely, and without surprises, there are a few boxes you’ll need to check.
First, you need a server that’s always reachable from the internet - a VPS, or any external host with a static IP. That’s where Pangolin anchors its tunnels, and that box becomes the “front door” into your homelab. Skip this and none of the magic comes together. Renting a VPS is really the way to go here.
Next, a domain. You can technically get by without one, but proper HTTPS, clean service addresses, and a decent overall experience all start with owning a domain. You’ll also need DNS pointed at your external server.
Then certificates. Pangolin runs everything over secure connections, so TLS isn’t optional here - it’s load-bearing. Good news: this is usually automated through Let’s Encrypt, so there’s barely anything to do by hand as long as DNS is set up correctly.
On your home server’s end, it’s much simpler - just run the Pangolin agent, and it handles the outbound connection itself. This is the actual payoff: no open ports, no router changes. All your server needs is a way out to the internet.
Less obvious: the network and DNS inside your own infrastructure. If you want this to actually look clean and not feel duct-taped, it’s worth thinking through how services will resolve, how you’ll split internal vs. external access, and whether the two might step on each other.
And basic security, obviously. Pangolin closes a lot of doors on its own, but that’s no excuse to leave everything on default settings. Passwords, access scoping, restrictions - all of that still matters. Zero trust is as much about how you use the tool as the tool itself.
Bottom line: deploying Pangolin properly isn’t “spin up a container and forget it exists.” It’s the combination of an external server, a domain, real TLS, and careful, deliberate access configuration. Get all of that in place, and it genuinely starts to feel like a super-app quietly removing most of your usual headaches.
How Pangolin Works#
The Basic Flow#
The Building Blocks#
Pangolin leans on several components working together to make secure remote access happen. Each one has its own job, so that only the right people ever reach the right resources.
The Pangolin Server#
This is the central brain of your network - it stores config, manages access policies, and coordinates connections between clients and sites.
Sites#
Sites hook remote networks up to the Pangolin Server through secure tunnels.
Resources#
Resources are whatever you’re exposing - apps, hosts, or entire network ranges.
Clients#
Clients are how users actually connect to resources, over a secure tunnel.
Remote Nodes#
Remote Nodes are your own Pangolin servers - fully yours to manage, with full control over the data.
How Pangolin Is Put Together#
A handful of key components interact behind the scenes to give you secure remote access without ever opening a port.
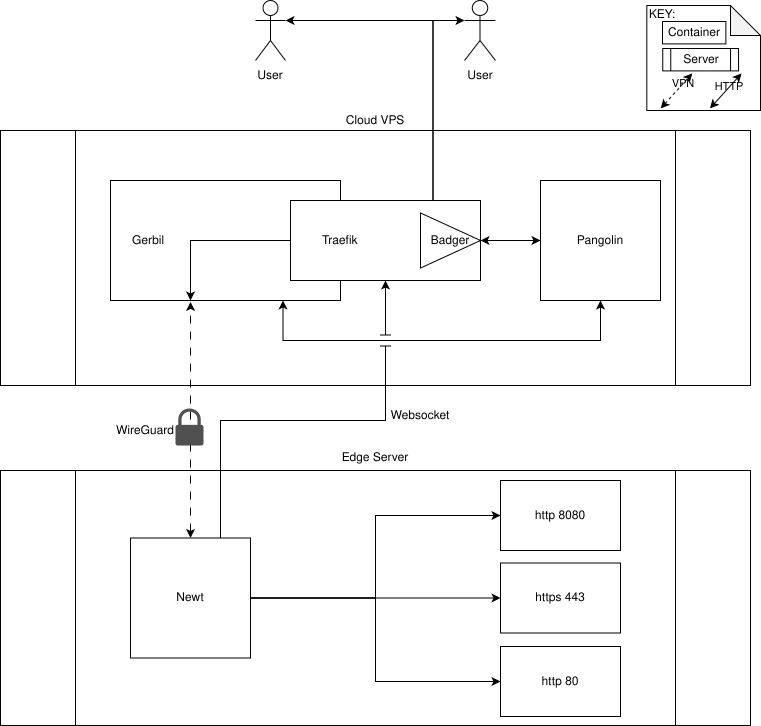
Control Plane#
The actual brain here, coordinating every other component.
Gerbil#
Handles the WireGuard tunnels.
Newt#
A lightweight client for hooking up remote nodes.
Traefik (the reverse proxy)#
Routes incoming requests to where they need to go. If you want to understand how Traefik works on its own, outside of Pangolin’s wrapper, I’ve got a separate article on setting up Traefik in an LXC container.
Badger#
Handles authentication and access control.
Installing Pangolin: What You’ll Need#
Prerequisites#
- A Linux server with root access and a public IP
- A domain
- An email for SSL
- Open ports: 80, 443, 51820, 21820
Getting the VPS Ready#
Basic Hardening#
The moment you get a fresh VPS, your first job is basic hardening to cut down the risk of someone getting in uninvited. Step one: stop working as root, and create a separate sudo-capable user instead.
Root is a bad place to live day-to-day, so let’s make a new user and drop them into the sudo group:
adduser youruser
usermod -aG sudo youruser
Quick sanity check:
su - youruser
sudo whoami
SSH: New Port, No Root#
Open up the SSH config:
sudo nano /etc/ssh/sshd_configFind and change these:
Port 2222  (ставить такой порт это большая ошибка)
PermitRootLogin no
This does two things:
- moves SSH off the default port 22 onto whatever free non-standard port you pick
- shuts root login off completely
Killing Password Login (do this)#
For extra safety, restrict SSH to key-based login only:
Only flip this on if you’ve already got SSH keys set up - otherwise you’ll lock yourself out of the server.
PasswordAuthentication noSetting Up the Firewall (UFW)#
Install and enable UFW:
sudo apt update
sudo apt install -y ufw
Then open only the ports Pangolin actually needs:
sudo ufw allow номерпортадляssh,еслитыневключилдоступтолькопоключам/tcp
sudo ufw allow 80/tcp
sudo ufw allow 443/tcp
sudo ufw allow 51820/udp
sudo ufw allow 21820/udp
Turn it on:
sudo ufw enable
sudo ufw status
Applying the SSH Changes#
Restart SSH so the changes take effect:
sudo systemctl restart sshDon’t Skip This: Verify the Connection#
Before you close your current SSH session, open a brand new one and make sure it still works:
ssh youruser@your_ip -p номерпортадляssh,еслитыневключилдоступтолькопоключамOnly kill the old session once you’ve confirmed the new one connects fine.
Setting Up DNS#
The basics: DNS records
You’ll need A records (or AAAA for IPv6) pointing at your VPS’s IP.#
1. Create a Wildcard Record#
Set up a wildcard subdomain record for your domain:
- Type: A
- Name: *
- Value: your VPS’s IP address
- TTL: 300 (or whatever the default is)
This lets any subdomain (app.example.com, api.example.com, etc.) point at your VPS.#
2. A Record for the Root Domain (Optional)#
If you also want to expose the root domain itself as a resource:
- Type: A
- Name: @ (or leave it blank)
- Value: your VPS’s IP address
- TTL: 300 (or default)
You only need this if you want example.com itself to work, not just subdomains.#
3. Wait for It to Propagate#
DNS changes can take anywhere from 5 minutes to 48 hours to fully roll out worldwide.
Installing Pangolin#
Using the Official Install Script#
- Grab the installer. Easily the simplest path here. Sure, you could do this all by hand, but that turns into a lot of manual labor for an uncertain outcome, and demands a lot more understanding of the problem than most people want to invest.
- SSH into the server and run:
curl -fsSL https://static.pangolin.net/get-installer.sh | bash- Run it
With root privileges:
sudo ./installerIt drops all its files into the current directory, so feel free to move it into whichever folder you actually want to install from first.
The Basic Setup Prompts#
- The installer will walk you through a few key settings:
- Edition: Community Edition or Enterprise Edition
- Base Domain: your root domain, no subdomains (example.com, say)
- Dashboard Domain: hit Enter for the default (pangolin.example.com), or type your own
- Let’s Encrypt Email: used for SSL and admin login
- Tunneling: install Gerbil for tunnels (default: yes) - you can skip tunnels entirely and run it as a plain reverse proxy instead
Email (optional) You can always wire this up later. Default: No (a sensible choice for a first install) If you do enable it: you’ll need an SMTP server (host, port, username, password)
Kicking off the install Confirm, and:
- the installer pulls the Docker images (pangolin, gerbil, traefik)
- containers start automatically
- takes roughly 2-3 minutes depending on your connection
- CrowdSec (optional) The installer will offer to bolt on CrowdSec for extra protection:
- Default: No (again, fine for a first install)
- Enable it, and you’ll be managing CrowdSec’s config by hand from here on
You can always add CrowdSec later - the base install is already reasonably secure on its own.
After the Install Finishes#
Once it’s done, you’ll see:
Installation complete!
To finish the initial setup, go to:

`https://pangolin.твойдомен.com/auth/initial-setup`
Open the Dashboard
Head to the URL the installer gave you:
https://pangolin.твойдомен.com/auth/initial-setupThe SSL cert configures itself automatically - initial validation can take a couple of minutes, so don’t be surprised by a browser security warning in the meantime.
Create Your Admin Account
Enter the admin’s email Pick a strong password Confirm the email (if you set that up)
Use something genuinely unique and complex here - this account has the keys to everything.
Create Your First Organization
Once you’re logged in: Give it a name and description Click “Create Organization”
And that’s it - you’re ready to start adding applications and configuring the reverse proxy.
I go into the actual install process in a lot more detail in the video - and this is genuinely one of those cases where watching it once beats reading about it a hundred times.