

Configuring the Firewall in Proxmox#
Proxmox VE is a powerful virtualization platform that combines the capabilities of KVM and LXC, along with tools for clustering and storage management. One of the key security tools in Proxmox is the built-in firewall.
In this article we’ll cover:
- what a firewall is and why you need it in Proxmox,
- its pros and cons,
- how to configure basic rules to protect the node and virtual machines.
What Is the Firewall in Proxmox#
A firewall is a network traffic filtering system that lets you control incoming and outgoing connections. Proxmox uses iptables/nftables as the backend, and rules are managed through the web interface or CLI.
The Proxmox firewall can operate at three levels:
- Datacenter - global rules for the entire cluster.
- Node - rules applied to a specific server.
- VM/CT (virtual machine or container) - individual rules for each virtual machine.
If the firewall is not enabled at the Datacenter level, then it won’t work at the other levels (node or VM/LXC) either. So there’s no need to uncheck the corresponding checkbox in the settings of newly created virtual machines.
Why You Need a Firewall in Proxmox#
Honestly, for a home setup I don’t really see the point of using Proxmox’s built-in firewall, because at home you’re most likely configuring rules at the global level (at the router level). At home - unless you happen to live in a datacenter - there’s no real need to configure a firewall at the Proxmox level. But since we’ve already gone down the SDN rabbit hole in Proxmox, let’s take a look at what the Proxmox firewall can do - including how its rules help segment traffic between those SDN zones.
Using the built-in firewall lets you:
- restrict access to the Proxmox management interface,
- protect virtual machines and containers from unwanted traffic,
- segment the network and control interaction between services,
- reduce the risk of attacks (DDoS, brute-force, port scanning, etc.).
Pros and Cons of Using the Firewall in Proxmox#
Pros#
- Centralized rule management through the web interface.
- Ability to set rules at the cluster, node, and VM level.
- Support for rule groups (Firewall Groups), which simplifies scaling.
- Integration with Proxmox - no need to configure separate firewall rules inside each VM.
Cons#
- Requires understanding of iptables/nftables logic.
- Limited monitoring capabilities compared to external systems.
- Misconfigured rules can lock you out of Proxmox itself.
- Doesn’t replace full-featured solutions like pfSense or OPNsense (but complements them well when needed).
Configuring the Firewall in Proxmox#
As mentioned above, the firewall at the Datacenter level is disabled by default.
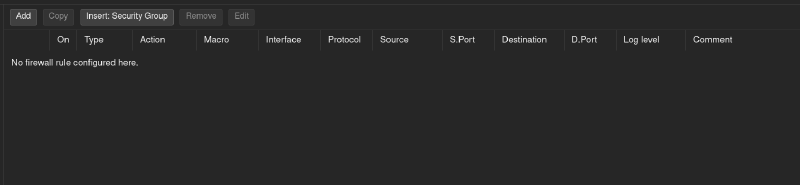
Never enable the firewall at the Datacenter level until you’ve configured the first three rules described below. By default, the firewall has no rules configured, which means everything is denied. Enabling the firewall without pre-configured rules will lock you out of the Proxmox web interface. Which means, my friend, a long journey with a keyboard and monitor to the physical device awaits you.
Enabling the Firewall in Datacenter and Configuring the Three Core Rules#
- Go to Datacenter → Firewall → Options and click Add.
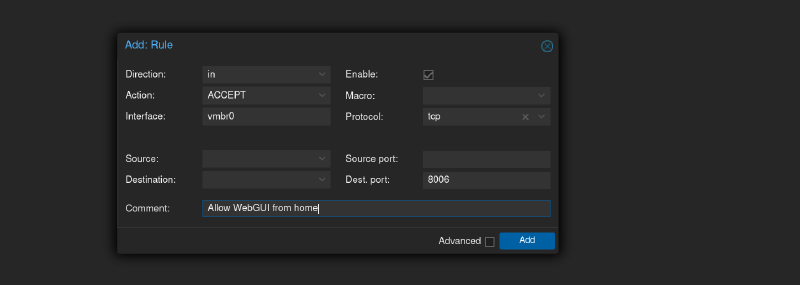
Rule 1: Allow Access to the Proxmox Web Interface#
- In the Rules section, add a rule:
- Action:
ACCEPT - Direction:
IN - Interface:
vmbr0 - Protocol:
tcp - Destination Port:
8006 - Comment:
Allow WebGUI from home
- Action:
Click add
In the Firewall section, go to the Options submenu and enable firewall
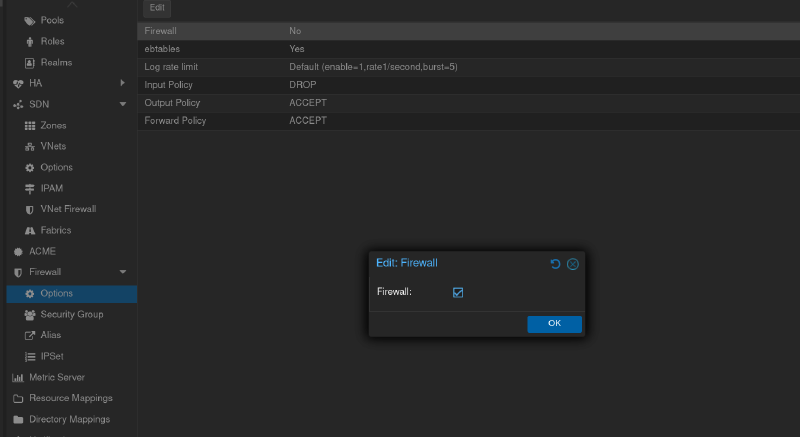
Now we need to check that we haven’t lost access to our Proxmox web interface. Just refresh the page, and if access is still there, we’re good to go.
Now we need to add two more rules: we need to allow DHCP requests and requests over http or dns, since right now the only thing that’s allowed is access to the web interface.
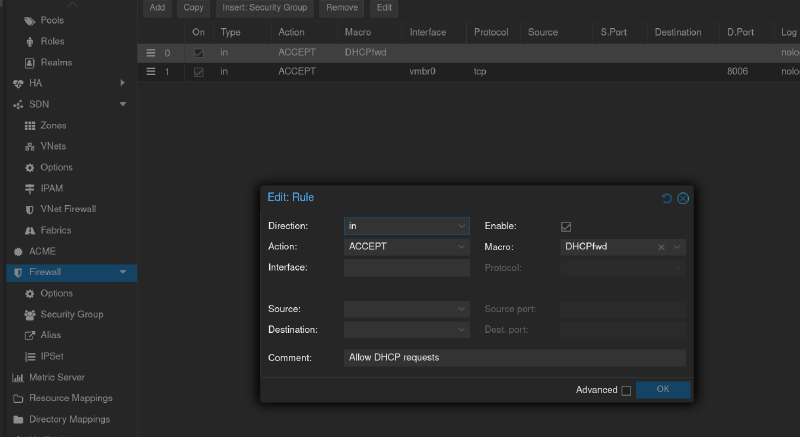
Rule 2: Allow DHCP Requests#
- In the Rules section, add a rule:
- Action:
ACCEPT - Direction:
IN - Macro:
DHCPfwd - Comment:
Allow DHCP requests
- Action:
Click add
Rule 3: Allow DNS Requests#
- In the Rules section, add a rule:
- Action:
ACCEPT - Direction:
IN - Macro:
DNS - Comment:
Allow DNS requests
- Action:
Click add
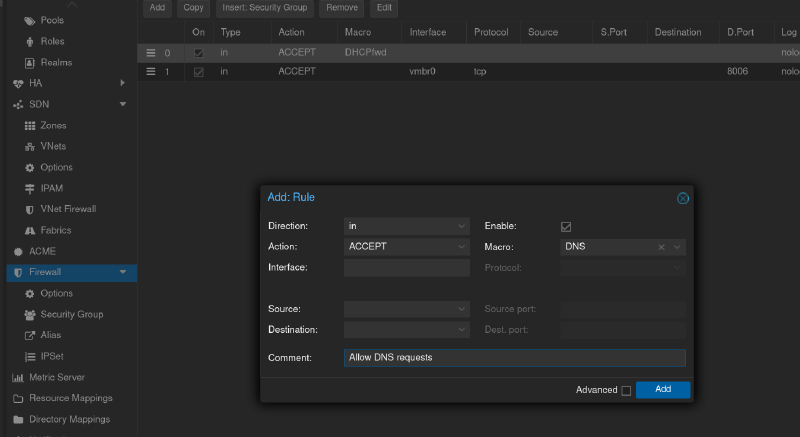
At this point we’ve configured three basic rules for the firewall at the Datacenter level. If you want to make full use of the Proxmox firewall, these are the essential, non-negotiable rules.
Since the firewall processes rules top to bottom in order, the rule for the web interface should come first, then the DHCP rule, and then the DNS rule. That’s how I see it, anyway.

At the same time, since these rules are set at the Datacenter level, they apply even if you have a cluster of two or three Proxmox nodes.
Creating Aliases and Security Groups in Proxmox#
We’ve configured rules at the Datacenter level and enabled the firewall there.
However, if we go down to the node level and open the firewall section, we’ll see that even though we haven’t configured any rules there yet, the firewall is already active.
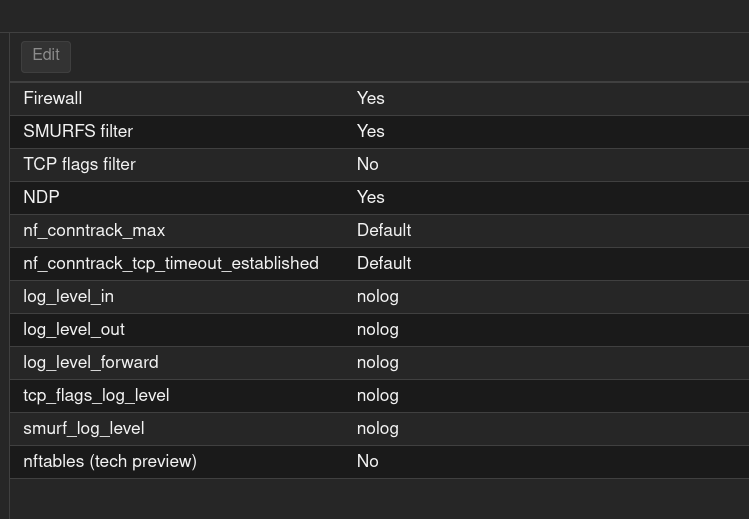
There’s one very important point here. If you have a cluster, the firewall, as you’d expect, is automatically enabled on all cluster nodes. And since we haven’t configured any rules yet, traffic between nodes is denied by default. That might be exactly what you want, but suppose you have a Ceph storage - it will immediately break without proper firewall rule configuration. Let’s fix that. First, let’s create a couple of aliases to make it easier to work with rules.
- Go to Datacenter → Firewall → Alias and click Add.
Creating an alias for the local network#
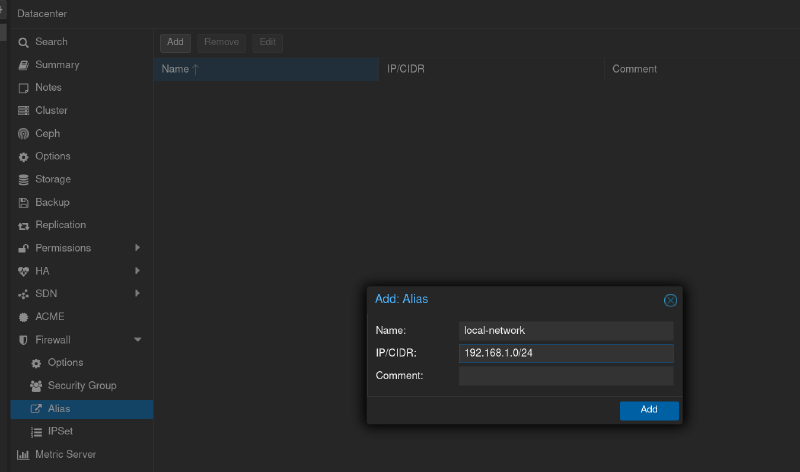
- In the alias section, enter the following:
- Name:
local-network - IP/CIDR:
192.168.1.0/24 - Comment:
optional
- Name:
The name is self-explanatory; as for the network - I specified my entire local network. Your range may be different, and your requirements may differ too. Adjust them to your needs. For example, you might want to allow traffic only between nodes and nothing else. But since I’m showing simple, basic things here, that’s the approach I’m taking.
Creating an Alias for the virtual network
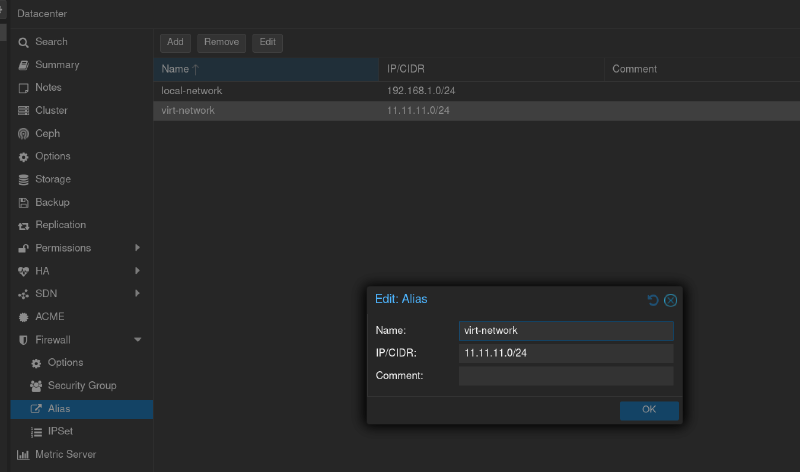
- In the alias section, enter the following:
- Name:
virt-network - IP/CIDR:
11.11.11.0/24 - Comment:
optional
- Name:
In this case I’m specifying the VNET network range. In the previous article we assigned it an address in the 11.11.11.0/24 range.
Creating an alias for the gateway of our physical local network
- In the alias section, enter the following:
- Name:
gateway - IP/CIDR:
192.168.1.1 - Comment:
optional
- Name:
Now that we’ve created three aliases to make things easier going forward, let’s create Security Groups.
- Go to Datacenter → Firewall → Security Groups and click Create.
Creating Security Groups#
Creating a group for the local network
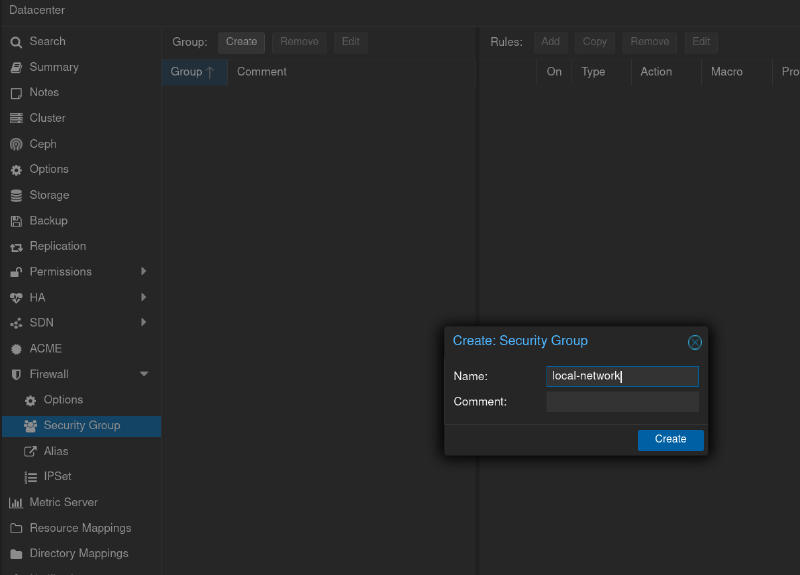
Now let’s open our group’s window and create a rule.
- Go to Datacenter → Firewall → Security Groups - Rules and click Add.
Let’s create a rule for our Security Group that includes our local network.
Rule 1: Allow Incoming Traffic from Our Local Network#
- In the Rules section, add a rule:
- Action:
ACCEPT - Direction:
IN - Source:
local-network - Comment:
optional
- Action:
Click Enable, then Add
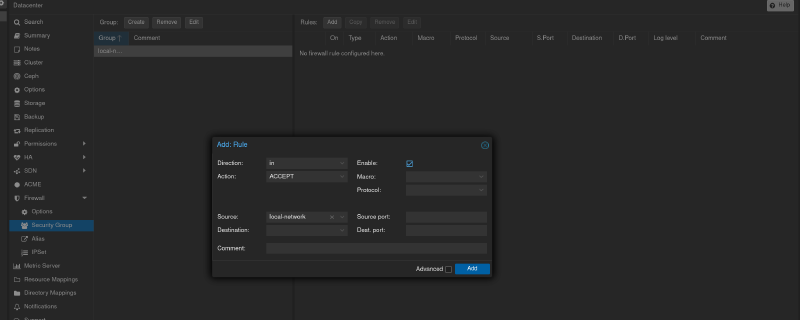
Rule 2: Allow Outgoing Traffic to Our Local Network#
- In the Rules section, add a rule:
- Action:
ACCEPT - Direction:
OUT - Destination:
local-network - Comment:
optional
- Action:
Click Enable, then Add
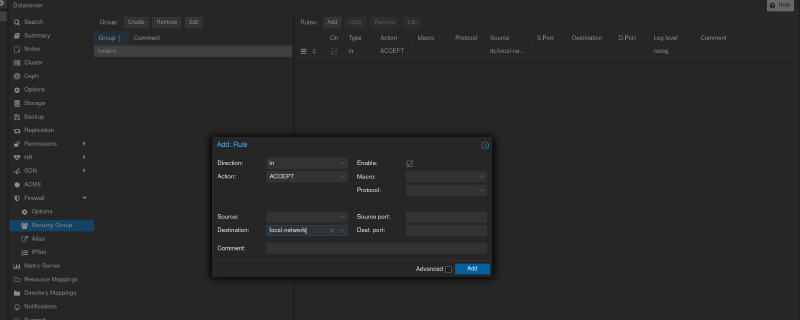
In other words, we’ve now allowed any traffic between our local network devices and the node in both directions.
Configuring Core Rules at the Proxmox Node Level#
- Go to Datacenter → Your node name → Firewall → Insert Security Groups and click Add.
In the dropdown, select our group, check Enable, and click Add.
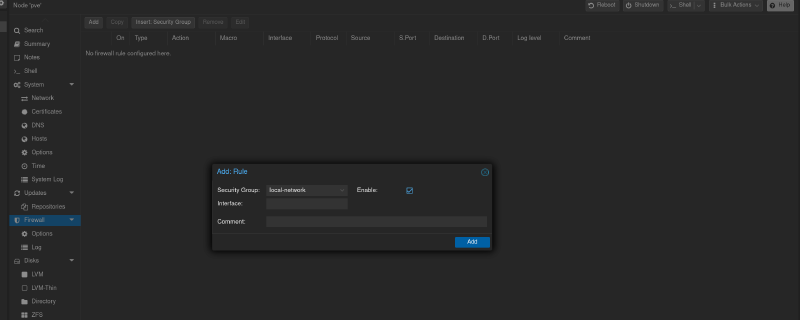
Accordingly, if you have several nodes, repeat this on each node.
Now we have a reasonably open firewall.
If you need more fine-grained settings, you have full freedom - go for it.
Configuring Core Rules at the VM or LXC Level in Proxmox#
Let’s move on to configuring the firewall at the level of individual VMs or containers in Proxmox.
- Go to Datacenter → Your node name → Firewall → Insert Security Groups and click Add.
Create a Security Group as before, but this time for the virtual network. I named it virt-network.
Select the newly created group, go to the Rules section, and create the first rule.
For example, let’s say we want to deny access from our virtual machines or containers to our local network.
- In the Rules section, add a rule:
- Action:
DROP - Direction:
OUT - Destination:
local-network - Comment:
optional
- Action:
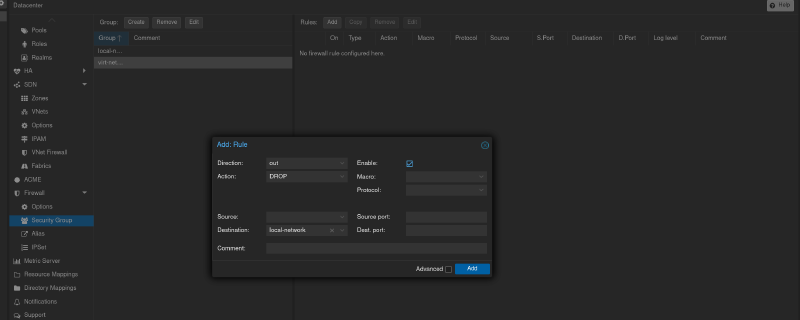
But by denying our VMs or containers access to the local network, we’ve also denied them access to the outside world, since our gateway is in the same address range that we just blocked. So we need to create one more rule.
- In the Rules section, add a rule:
- Action:
ACCEPT - Direction:
OUT - Destination:
gateway - Comment:
optional
- Action:
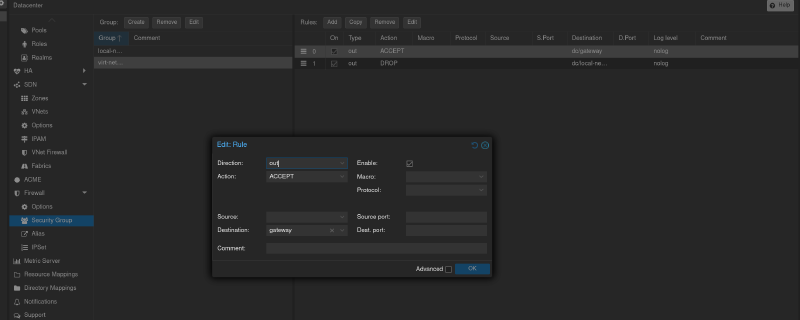
Pay attention to the rule order. The allow rule must be above the deny rule.
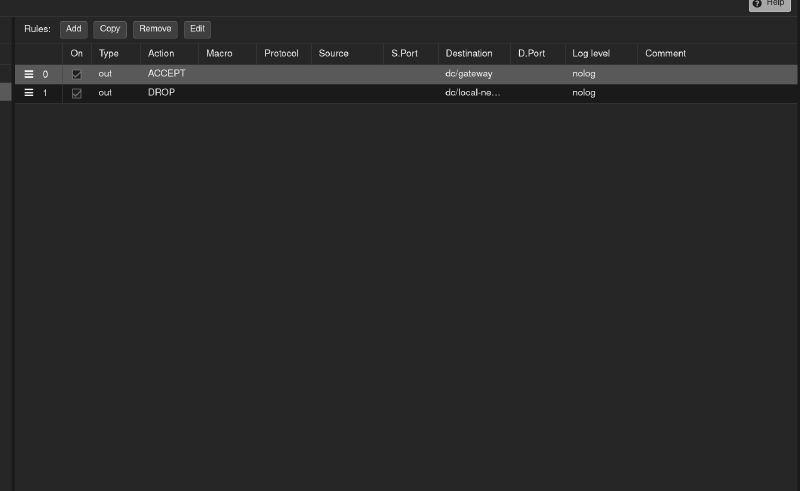
And optionally, just for clarity, let’s add one more supplementary rule - to really drive the point home.
- In the Rules section, add a rule:
- Action:
ACCEPT - Direction:
in - Source:
local-network - Comment:
optional
- Action:
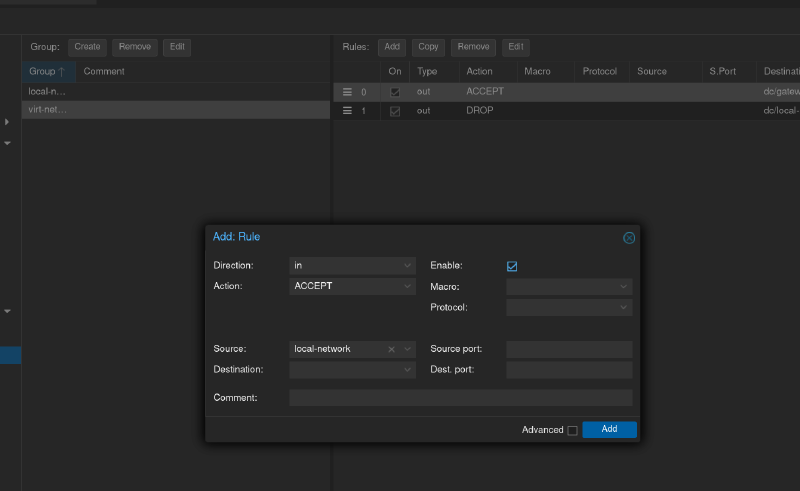
That is, we’ve allowed incoming traffic from the local network into our virtual network. Yes, there’s not much practical point in denying everything and then immediately allowing everything again. But as I said above, this is purely for illustration and to help you understand how the firewall works.
In the end we now have three rules.
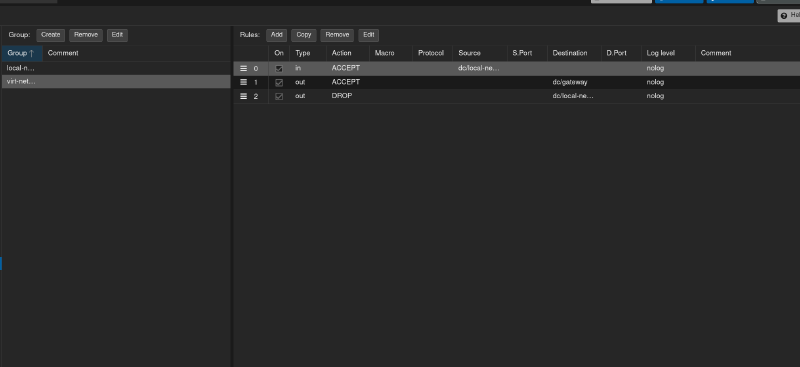
We allow incoming traffic from the local network. We allow traffic to the outside world, because we allowed outgoing traffic to our gateway’s address. We denied outgoing traffic from our virtual network to our local network. So no virtual machines or containers have access to our devices on our physical local network.
But right now these rules aren’t actually working.
What do I mean by that?
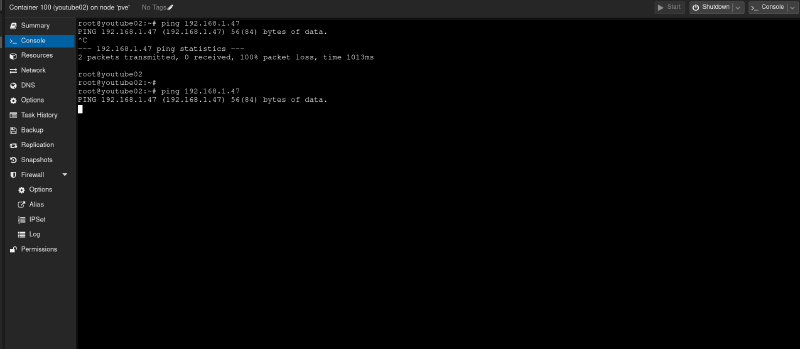
Let’s go to the command line - in my case, of an Ubuntu-based container - and ping the machine I’m currently writing this article on.
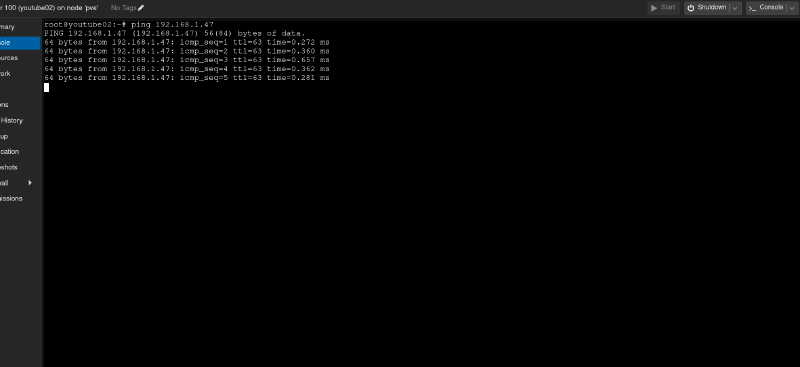
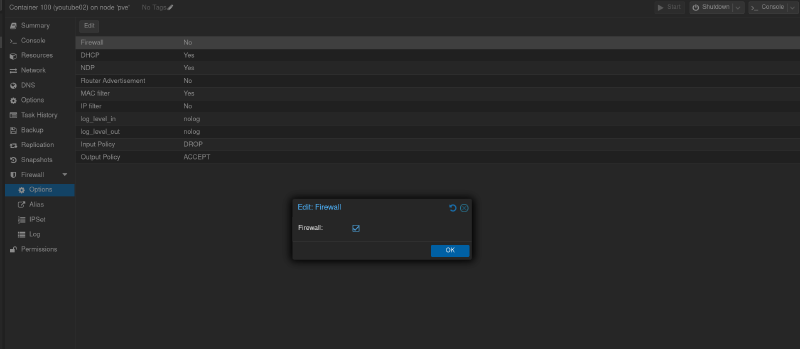
As you can see, the ping goes through. That’s because we haven’t enabled the firewall at the container level. So in our container’s menu, let’s go to Firewall → Options and enable the firewall.
Let’s go back up to the firewall menu of our container and enable our security group for the virtual network.
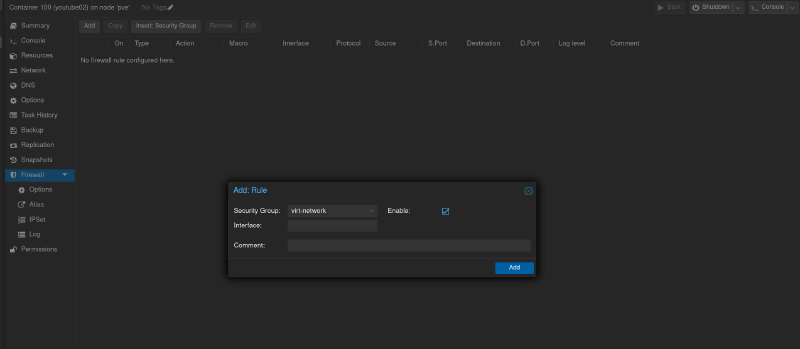
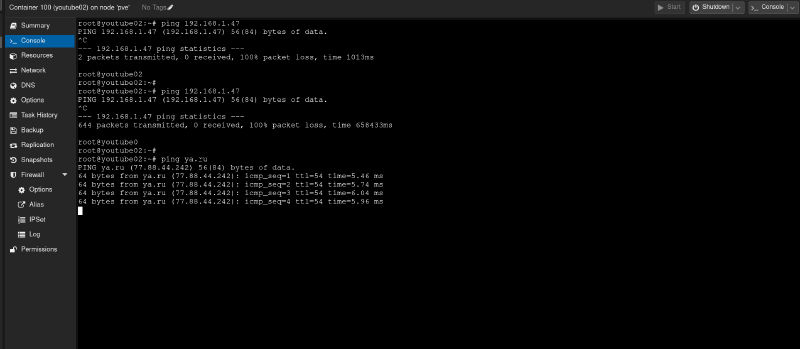
Now, when we try to ping our machine again, the response will be silence, because the machine on the local network isn’t part of the group for the virtual network.
But if, say, we try to reach the outside world and ping something like ya.ru, the signal will go through.
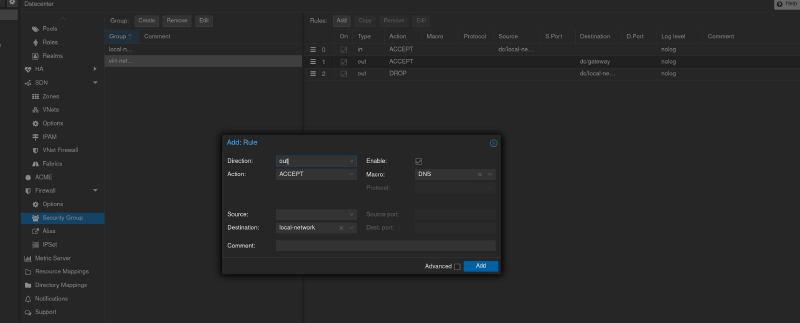
But as we all know, DNS is always to blame for something, and to avoid a situation where we can ping some IP on the outside world but can’t ping a domain name, let’s create one more rule for the Security Group at the Datacenter level that allows DNS access.
That’s where I’d like to wrap up the initial firewall setup in Proxmox. But before I finish, I want to reiterate some best practices for configuring firewall rules.
Best Practices for Configuring Firewall Rules for Beginners#
- Always start with ALLOW rules, then move on to blocking (
DROP). - Use Firewall Groups for easier management (e.g.,
ssh-access,web-access). - Test rules step by step so you don’t accidentally lock yourself out.
- For production environments, use the Proxmox firewall together with an external firewall (pfSense, OPNsense, iptables on the router).
Conclusion#
The firewall in Proxmox is a powerful tool for improving the security of your cluster and virtual machines. It lets you centrally manage access, filter traffic, and minimize the risk of attacks. Despite some limitations, the built-in firewall is a great fit for most homelab scenarios and small production setups.