
If you’ve got more than a dozen containers in your homelab, you’ve probably run into the problem of how to actually keep them updated:
- go through every
docker-compose.ymlby hand every couple of months and check image tags; - install some flavor of Watchtower and hope an automatic update of a
:latest-tagged container doesn’t break something important at the worst possible moment; - run Diun, which checks for new image versions and notifies you - but doesn’t remove the need to update manually.
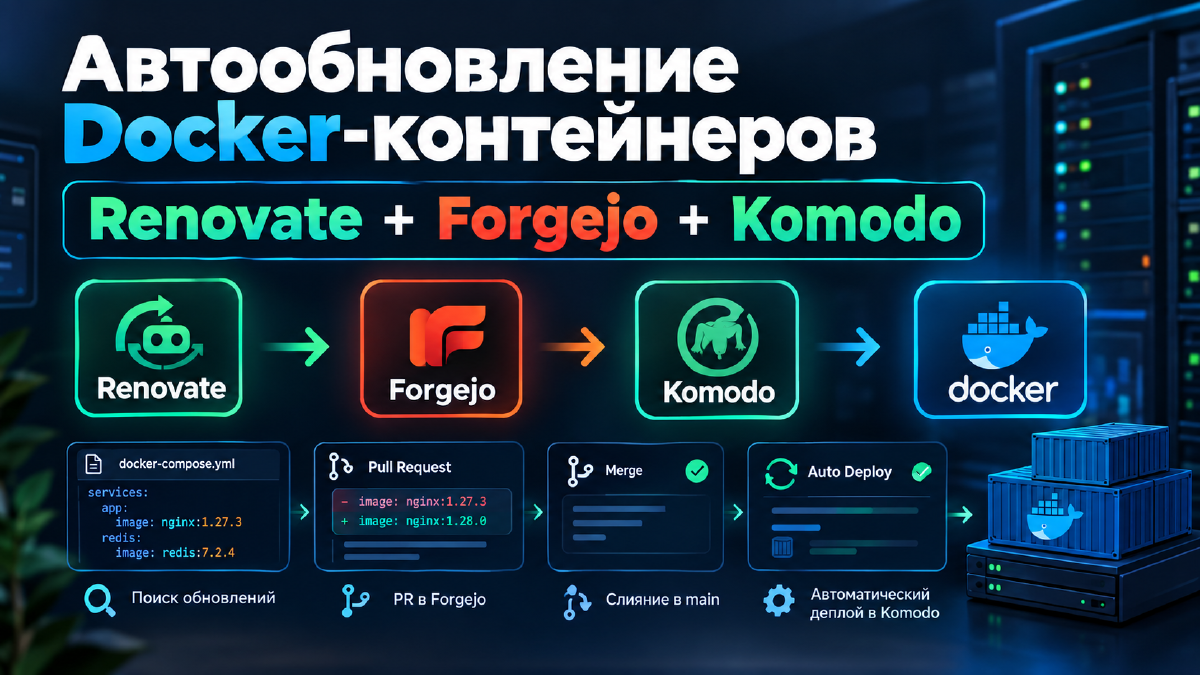
There’s a fourth, much more interesting option: pin images to specific versions and automate the update-checking process itself. Once a week, a bot scans every compose file you’ve committed to your Forgejo git repository, finds new tags, and opens a Pull Request with a changelog - and you decide whether to merge it right away or read the release notes first. After the merge, deployment happens without you lifting a finger.
Ideally, you’d also wire up an n8n automation to notify you in some messenger whenever an update shows up, along with a quick assessment of how important it is.
In this article I’ll walk through how I put this together on my own infrastructure: Forgejo as the git server, Renovate as the bot that finds updates, Komodo as the layer that manages Docker stacks and picks up changes after merge.
This article is a direct continuation of Forgejo + Komodo: Turning Docker Compose into GitOps, where I moved all my docker-compose stacks into a single monorepo, stilicho/youtube, on Forgejo, and set up a webhook that lets Komodo pull and redeploy changed stacks after every push to main. Komodo itself as a management panel gets its own separate article, Portainer to Komodo Migration: Full Setup Walkthrough. Renovate doesn’t replace or touch either of those components - it just adds one more way to land changes in main besides your own commits: it opens a PR, and once that’s merged, the same webhook you already have fires. If you haven’t read those two articles, some of the terminology and the repo layout here won’t be obvious.
Domains, usernames, and paths in the examples below are for demonstration only (stilicho.ru, user stilicho) - just swap in your own values.
Architecture#
flowchart LR
    A[Renovate
Forgejo Action] -->|once a week
scans compose files| B[(Repository
stilicho/youtube)]
    B -->|opens a PR
with a new image tag| C{Review}
    C -->|merge into main| B
    B -->|webhook on push| D[Komodo]
    D -->|Pull Repo +
Batch Deploy Stack If Changed| E[Docker host]
Key idea: Renovate and Komodo don’t know anything about each other directly. Renovate just opens PRs against the git repository. Deployment on merged code was already set up earlier - through the Forgejo → Komodo Procedure webhook (Pull Repo + Batch Deploy Stack If Changed). So there’s really only one new component here: Renovate itself.
Setting up a test stack#
Testing Renovate and immediately checking it against real stacks is a bad idea: if something goes wrong on the first run (say, automerge accidentally left on for a major update), you’d rather see a test nginx container break than Traefik, which routes every bit of traffic in your homelab. So before setting up the bot itself, spin up a separate, disposable stack - by the time Renovate is up and running, you’ll already have a live target to test against instead of an abstract idea.
1. Add a demo stack pinned to a deliberately old image version. In the same stilicho/youtube repository, create a demo-nginx folder with a real compose file rather than an abstract placeholder - behind Traefik, with the same label pattern used everywhere else on the site:
services:
    web:
        image: nginx:1.24.0
        container_name: nginx
        volumes:
            - /home/stilicho/docker/nginx:/etc/nginx/templates
        environment:
            - NGINX_HOST=nginx.stilicho.ru
            - NGINX_PORT=80
        labels:
            - "traefik.enable=true"
            - "traefik.http.routers.nginx.entrypoints=web"
            - "traefik.http.routers.nginx.rule=Host(`nginx.stilicho.ru`)"
            - "traefik.http.middlewares.nginx-https-redirect.redirectscheme.scheme=https"
            - "traefik.http.routers.nginx.middlewares=nginx-https-redirect"
            - "traefik.http.routers.nginx-secure.entrypoints=websecure"
            - "traefik.http.routers.nginx-secure.rule=Host(`nginx.stilicho.ru`)"
            - "traefik.http.routers.nginx-secure.tls=true"
            - "traefik.http.routers.nginx-secure.service=nginx"
            - "traefik.http.services.nginx.loadbalancer.server.port=80"
            - "traefik.docker.network=proxy"
        networks:
            proxy:
        security_opt:
            - no-new-privileges:true

networks:
    proxy:
        external: true
One detail here is technical, not cosmetic: the image tag is explicitly pinned to 1.24.0 instead of being left as plain nginx (which resolves to nginx:latest). Without a specific version, Renovate can’t propose anything - latest has no “next” version to bump to, so Renovate simply ignores images tagged that way. 1.24.0 is a real, but long-outdated tag (nginx dropped the separate stable/mainline branches back at 1.25 - it’s all one release line now, so by the time you’re reading this the current tag has almost certainly moved well past this one), so once Renovate is running, it’s guaranteed to find an update - you won’t have to guess whether the scan even works.
NGINX_HOST/NGINX_PORT and the volume mounted at /etc/nginx/templates are a built-in feature of the official nginx image: template files in that folder get run through envsubst and turned into a real config under /etc/nginx/conf.d, substituting in those environment variables. For a clean Renovate test this is overkill - a plain default page would do just fine - but since the stack is a real one behind Traefik anyway, it might as well look like something you’d actually deploy, not just a throwaway test.
2. Get the file into the repository. The method doesn’t matter - just like with traefik/whoami in the GitOps article, you can create the file directly in the Forgejo web UI (+ New File → path demo-nginx/docker-compose.yml → paste the content → Commit Changes to main), or from a terminal:
git add demo-nginx/docker-compose.yml
git commit -m "Add demo-nginx stack for Renovate testing"
git push
All that matters is the result - the file needs to land on the main branch of stilicho/youtube, however it gets there.
3. Register the stack in Komodo. The push alone doesn’t deploy anything yet - the deploy-on-push webhook, which we’ll set up later alongside Renovate, only reacts to changes in stacks Komodo already knows about, and it doesn’t know anything about demo-nginx yet. Set up a Stack resource exactly like in the GitOps article: Resources → Stacks → Create Stack, name it demo-nginx, Select Repo and point it at the same stilicho/youtube Repo resource, and set Run Directory to demo-nginx.
Don’t skip the File Paths field - by default Komodo looks for a file named compose.yaml, and ours is called docker-compose.yml. Without spelling out the filename here, the deploy will fail validation with Missing files: compose.yaml, even though the file is physically there - just under a different name. See the GitOps article for the full breakdown of Run Directory vs File Paths.
The same form also has Poll for Updates / Auto Update / Full Stack Auto Update toggles - leave them alone for this scenario. That’s a separate, independent Komodo mechanism for images on a floating tag like :latest: once a day it checks the registry by digest and optionally redeploys. Our tag is pinned explicitly and changes through a git commit from Renovate, not through a digest change on the same tag - Komodo’s own docs say it outright: “Auto-update requires a ‘rolling’ image tag like :latest. For pinned tags in git-sourced stacks, consider Renovate” - meaning for version pinning these are two mutually exclusive approaches, not “turn both on just in case.” Flipping these toggles won’t do anything here - the actual redeploy mechanism is the Pull Repo + Batch Deploy Stack If Changed webhook we’ll set up in Step 7.
Save and hit Deploy once by hand - this is the first deploy, there’s no webhook yet.
From this point on, demo-nginx is just another stack Komodo knows about, and it’ll get picked up by the same deploy-on-push Procedure as everything else, with no extra setup later. Check that the stack actually came up - either in the Komodo UI or directly on the host:
docker inspect --format='{{.Config.Image}}' nginxThis should return nginx:1.24.0. If the container isn’t there, the problem is in the Forgejo→Komodo pipeline from the previous article, not in Renovate - there’s no point going further until that part is sorted out.
The demo stack is deployed and waiting for its update - now let’s move on to setting up Renovate itself.
Step 1. Bot account in Forgejo#
Create the account. Don’t use your personal account - set up a separate
renovate-botuser (Admin Panel → Users → Create User). This screen only asks for a login, email, and password. A dedicated bot account gives you two benefits: the PR history immediately shows which changes were automated, and you can scope the bot’s access down to just the repository it needs.Grant access to the repository. This part happens under your own regular account (not
renovate-bot) - log in as usual and go into the repository with your stacks, the one that belongs to you and that Renovate should watch. Inside it: Settings → Collaborators → Add Collaborator → enterrenovate-bot(the user you created in step 1) → in the access-level dropdown that appears, pick Write.
Step 2. Access token#
Log in as renovate-bot and create an Access Token (Settings → Applications → Generate New Token) with these scopes:
read:repository,write:repositoryread:userread:organizationwrite:issue
You’ll need this token in the next step as the RENOVATE_TOKEN secret.
Without read:organization, Renovate fails with 403 Forbidden: GET /api/v1/orgs/<owner> and token does not have at least one of required scope(s): [read:organization] - it queries that endpoint to check whether the repository’s owner is an organization, even with RENOVATE_AUTODISCOVER=false and the repository named explicitly in RENOVATE_REPOSITORIES.
Step 3. Forgejo Actions runner on the docker host#
Renovate will run as a regular workflow rather than a standalone service - which means you need a registered runner on the host with your docker stacks. If you already set up a runner for building the site (like I did in the CI/CD article), the binary installation process is the same, just on a different host. Runner registration itself has changed since then, though - here’s the current way to do it.
Download and install the binary, and create a dedicated user:
export ARCH=$(uname -m | sed 's/x86_64/amd64/;s/aarch64/arm64/')
export RUNNER_VERSION=$(curl -s https://data.forgejo.org/api/v1/repos/forgejo/runner/releases/latest | jq -r .name | cut -c2-)
export FORGEJO_URL="https://code.forgejo.org/forgejo/runner/releases/download/v${RUNNER_VERSION}/forgejo-runner-${RUNNER_VERSION}-linux-${ARCH}"

wget -O forgejo-runner "${FORGEJO_URL}"
wget -O forgejo-runner.asc "${FORGEJO_URL}.asc"
Forgejo binaries are signed with the project’s GPG key - worth verifying before running anything on your host under a dedicated user that has access to the Docker socket:
gpg --keyserver hkps://keys.openpgp.org --recv EB114F5E6C0DC2BCDD183550A4B61A2DC5923710
gpg --verify forgejo-runner.asc forgejo-runner
You should see Good signature from "Forgejo <contact@forgejo.org>". If you get BAD signature instead, the file was corrupted or tampered with in transit - delete it, re-download, and don’t proceed until it checks out.
The WARNING: This key is not certified with a trusted signature! line you’ll see below that is normal and has nothing to do with the file’s integrity. It just means you personally haven’t signed this key into your own GPG web of trust (nobody does that for a one-off binary check) - not that anything is wrong with the signature itself. What matters is the Good signature from line and the fingerprint matching the one you requested from the keyserver (EB11 4F5E ... C592 3710).
chmod +x forgejo-runner
sudo mv forgejo-runner /usr/local/bin/forgejo-runner
forgejo-runner -v

sudo useradd --create-home runner
sudo usermod -aG docker runnerA lot of articles and videos about Forgejo Actions still show forgejo-runner register --instance ... --token ... --name ... - an interactive registration flow with a server address and a one-time token from the web UI. This command is officially marked as deprecated right in Forgejo’s own documentation - it still works, but it’s no longer the recommended path. The current approach is declarative, with no interactive prompt, and happens in two steps on two different machines.
You can get the UUID + secret pair through either of two equally valid methods - pick whichever is more convenient, the rest of the article doesn’t care which one you used.
Step 3.1, option A: via CLI on the Forgejo side. Log into the host where Forgejo itself runs (in my setup, that’s a docker exec into its container) and run:
docker exec -it forgejo forgejo forgejo-cli actions register \
  --name renovate-runner \
  --scope stilicho/youtube \
--secret $(openssl rand -hex 20)--scope- the level at which the runner will be visible: you can specify an organization, a user, or, as here, a specificowner/repo. Since Renovate only works with a single monorepo of stacks, there’s no point registering the runner for the whole instance.--secret- that 40-character hex string, generated ourselves viaopenssl rand -hex 20(20 bytes = 40 hex characters), not something to make up by hand.- The command prints out a UUID in response - you’ll need to copy it along with the secret for the next step.
Step 3.1, option B: through the web UI, no console at all. Runners in Forgejo have four levels at which they can be registered - pick the page that matches the --scope you’d use in option A:
- Whole instance -
https://forgejo.stilicho.ru/-/admin/actions/runners(requires instance admin rights). Not useful for this scenario - Renovate only works with one repository. - Organization -
https://forgejo.stilicho.ru/org/<org>/settings/actions/runners, if the repo with your stacks belongs to an organization rather than a personal account. - Personal account -
https://forgejo.stilicho.ru/user/settings/actions/runners- the runner will be visible to all of your repositories at once. - A specific repository -
https://forgejo.stilicho.ru/stilicho/youtube/settings/actions/runners- this level is exactly equivalent to--scope stilicho/youtubefrom option A, and it’s the one I’m using.
From any of these pages, the sequence is the same:
- Log in under your own regular account (not
renovate-bot- registering a runner has nothing to do with the bot’s repository permissions, it’s a separate thing entirely). - Open the page that matches your scope and click Create new runner.
- Enter
renovate-runneras the name (the optional description field can stay blank). - Click Create, and Forgejo immediately shows a page with a ready-made UUID and secret (generated automatically - no need to type anything through
opensslhere). - Copy both values - they go into
config.yamlin the next step, the exact same place the values from option A would go.
The secret is only shown once and isn’t stored anywhere in plain text afterward - if you close the page without copying it, you’ll have to delete that runner registration and create a new one.
Step 3.2. Write the resulting values into the runner’s config. This step can only be done through the console - the Forgejo web UI won’t help here, regardless of whether Forgejo, Komodo, and your docker stacks all live on the same host or on different ones. It’s not about the network between machines - it’s that the Forgejo web UI is a browser-based application that simply has no feature for writing arbitrary files to a server’s filesystem, including the runner’s config.yaml. This can only be done with shell access - SSH or a local console:
sudo -u runner forgejo-runner generate-config | sudo -u runner tee /home/runner/config.yaml > /dev/nullrunner is a dedicated system user we created earlier (useradd --create-home), and its home directory /home/runner isn’t readable or editable by your own regular account - only root and runner itself have access. Plain nano /home/runner/config.yaml under your own login will fail with Permission denied. From here on, use sudo for anything you need to read or edit under /home/runner - it grants the root privileges needed to get past that restriction.
The file generate-config produced isn’t a short, empty template - it’s the full example config, several hundred lines long, with every section and a detailed comment for each field (the same thing you’d see if you opened it yourself). You don’t need to understand all of it - just three specific spots need changing, everything else can stay as generated. Open the file:
sudo nano /home/runner/config.yamlFirst spot - the runner: section, labels field. It’s empty by default:
runner:
  ...
  labels: []
Replace it with a list containing one label - this is what the workflow in step 6 will use to find this runner (renovate.yml will have runs-on: docker, and the part before the colon needs to match):
runner:
  ...
  labels:
    - "docker:docker://node:22-trixie"
The image used as the job’s wrapper is node:22-trixie - Debian 13 (trixie) is currently the active stable branch.
Second spot - the server: section, connections field. In the generated file it’s at the very end of the server: section and empty by default - everything above it (# example:, # codeberg:) is commented out and just for illustration, leave it alone:
server:
  connections:
Right below that line, indented two spaces further than connections:, add your own block - forgejo here is just a key for this connection (call it whatever you like, it doesn’t affect behavior), followed by the three values from the previous step:
server:
  connections:
    forgejo:
      url: https://forgejo.stilicho.ru/
      uuid: <UUID_FROM_STEP_3.1>
      token: <THE_SAME_SECRET_AS___SECRET_ABOVE>
Third spot - the container: section, docker_host field. Renovate runs inside the renovate/renovate container via a docker-in-docker executor, and by default the runner doesn’t mount a Docker socket into the job container at all - the generated file has:
container:
  ...
  docker_host: "-"
"-" means “don’t mount any docker host” - with that value, the job can’t reach Docker at all. Change it to "automount" so the runner finds and mounts whatever Docker socket is available on the host:
container:
  ...
  docker_host: "automount"
Save (Ctrl+O, Enter) and exit (Ctrl+X).
On top of the docker_host change in the config, the runner user separately needs to be in the docker group on the host itself - we already did that with sudo usermod -aG docker runner during installation. Without both of these (the docker group and docker_host: "automount"), a Renovate job won’t be able to reach Docker.
The systemd unit for the runner is already prepared in the official repository - no need to write it by hand, just download it and point it at your config file:
sudo wget -O /etc/systemd/system/forgejo-runner.service \
  https://code.forgejo.org/forgejo/runner/raw/branch/main/contrib/forgejo-runner.service
sudo sed -i 's|/home/runner/runner-config.yml|/home/runner/config.yaml|' /etc/systemd/system/forgejo-runner.service
By default the unit points to /home/runner/runner-config.yml - the sed above swaps it for the file we generated in step 3.2 (config.yaml). From there it’s the usual routine for a new unit file - reload systemd and enable the service:
sudo systemctl daemon-reload
sudo systemctl enable --now forgejo-runner
Check that the runner actually started and connected to Forgejo through its logs:
journalctl -u forgejo-runner -fStep 4. Secret in the repository#
The secret goes into the same repository with your stacks (stilicho/youtube) - that’s where the workflow will run, and that’s where it’ll need the bot’s token to reach the API. Log in under your own regular account (not renovate-bot - repository secrets don’t have a separate concept of “owner,” they’re visible to anyone with admin rights on the repo, and renovate-bot doesn’t and shouldn’t have those): go into stilicho/youtube → Settings → Actions → Secrets → add RENOVATE_TOKEN with the bot’s token value from step 2.
Step 5. Renovate config#
In the root of that same repository with your stacks (stilicho/youtube - the same one you added the secret to on the previous step), add a renovate.json:
{
  "$schema": "https://docs.renovatebot.com/renovate-schema.json",
  "extends": ["config:recommended", ":disableRateLimiting"],
  "enabledManagers": ["docker-compose"],
  "dockerfile": { "enabled": false },
  "docker-compose": {
    "managerFilePatterns": ["/(^|/)docker-compose\\.ya?ml$/", "/(^|/)compose\\.ya?ml$/"]
  },
  "packageRules": [
    {
      "matchUpdateTypes": ["patch", "minor"],
      "automerge": false
    },
    {
      "matchUpdateTypes": ["major"],
      "labels": ["major-update"]
    }
  ],
  "schedule": ["every weekend"],
  "prConcurrentLimit": 5,
  "ignorePaths": [".env", "**/.env"]
}
A couple of notes:
- No
"platform": "forgejo"in this file - and that’s intentional, not an oversight:platformis a global self-hosted-config option, it belongs in an environment variable (RENOVATE_PLATFORM: forgejoin the workflow, step 6), not inrenovate.json, which describes settings for one specific repository. Duplicate it here and Renovate logsWARN: Found renovate config warnings- it still runs, but it’s noise you don’t need. managerFilePatterns(the current name for this option - it used to be calledfileMatch, and the old name still works but is deprecated, with Renovate offering to open an automatic Config Migration PR if it spots it) underdocker-composematters if, like me, you keep all your stacks in one monorepo: the regex needs to catch files at any depth, not just in the root. Note the slashes around each pattern (/.../) - without them the string is treated as a glob instead of a regex, and matches something else entirely.ignorePaths- my.envfiles are committed to the repo as-is (it’s a private repo), so I explicitly exclude them from scanning, just as a precaution.
For Forgejo (as a Gitea fork), people used to use the gitea platform module, but Renovate has had a dedicated forgejo module for a while now (the one we set in the RENOVATE_PLATFORM variable back in step 6) - the maintainers explicitly warn that support through the gitea module will be removed eventually, so we might as well use the correct name from the start (it works fine on both the 15.x LTS branch and 16.x - the Forgejo version doesn’t matter here).
Step 6. Workflow#
The workflow itself is just a regular file in the same repository with your stacks (stilicho/youtube). The path matters: it’s .forgejo/workflows/, not .github/workflows/ - if you’ve previously migrated a workflow over from GitHub Actions, that’s the first thing that changes. The file contents are identical either way - the only difference is how you get it into the repo: option A through the console, option B directly in the browser.
Option A: through the console. Clone the repository locally (or open it in an existing clone), create a .forgejo/workflows/ folder in the repo root, and drop renovate.yml in there:
mkdir -p .forgejo/workflows
nano .forgejo/workflows/renovate.yml
File contents:
name: Renovate
on:
  schedule:
    - cron: "0 3 * * 6"   # Saturday, 03:00
  workflow_dispatch: {}

jobs:
  renovate:
    runs-on: docker
    steps:
      - uses: actions/checkout@v4
      - name: Run Renovate
        uses: docker://renovate/renovate:44.107.2
        env:
          RENOVATE_TOKEN: ${{ secrets.RENOVATE_TOKEN }}
          RENOVATE_PLATFORM: forgejo
          RENOVATE_ENDPOINT: https://forgejo.stilicho.ru/api/v1
          RENOVATE_AUTODISCOVER: "false"
          RENOVATE_REPOSITORIES: "stilicho/youtube"
          RENOVATE_GIT_AUTHOR: "Renovate Bot <renovate-bot@stilicho.ru>"
Commit and push the file under your own regular account (not renovate-bot - this is a one-time commit you make yourself, by hand):
git add .forgejo/workflows/renovate.yml
git commit -m "Add Renovate workflow"
git push
Option B: right in the web UI, no cloning needed. Unlike step 3.2 (where the file lived on the runner’s local disk), the repository itself is exactly what the Forgejo web UI is built for, so it works here without any caveats:
- Go into the
stilicho/youtuberepository under your own regular account and open themainbranch. - Click + (or Add File → New File, depending on the interface version) and type
.forgejo/workflows/renovate.ymlstraight into the path field - Forgejo will create both missing folders on its own. - Paste the file contents from the block above into the built-in editor (it has YAML syntax highlighting and a preview mode too).
- Scroll down to “Commit Changes” and commit directly to
main(no separate branch or PR, same as option A).
Both options give you the exact same result - the only difference is which tool you use.
After the commit (either way), Forgejo will pick up the new workflow on its own - there’s no separate step to register or “enable” it, all that matters is that the file lives at the right path on main. To confirm it was picked up, check the Actions tab of the repository - you’ll see an entry for renovate.yml there even before it’s ever run.
Pin the renovate/renovate image to a specific version rather than :latest. Renovate occasionally has regressions specifically around Forgejo/Gitea support (for example, schema errors with organizations that have no email set on the account) - if a version suddenly breaks, it’s much easier to roll back one tag in the workflow than to figure out what changed. Check for updates every month or two and bump the version by hand.
Step 7. Deployment - already done#
And here’s the whole point of this setup: there’s nothing to configure in Komodo specifically for Renovate, because deployment was already built earlier, in the GitOps article. Quick recap of the mechanics from there:
- A Renovate PR gets merged into
mainof the samestilicho/youtuberepository that Komodo already watches. - Forgejo fires the same webhook on push to
mainthat’s already wired up to the Komodo Proceduredeploy-on-push. - The Procedure runs
Pull Repo(pulls the changed compose files) andBatch Deploy Stack If Changed(redeploys only the stacks where an image actually changed - not everything at once).
As far as Komodo is concerned, a commit from Renovate is technically no different from one of your own commits - it has no idea who actually merged the PR. That’s exactly why the whole setup stays so simple: Renovate and Komodo don’t know about each other directly (as I mentioned in the architecture section), and git plus the webhook you already had is what ties everything together.
Testing on the demo stack#
The demo-nginx stack is already deployed (see the “Setting up a test stack” section above) and waiting for its update - now you can test the whole Renovate → Forgejo → Komodo chain end to end.
1. Force-run Renovate. Don’t wait for the Saturday cron - trigger the workflow manually from the repository’s Actions tab (workflow_dispatch) and watch the runner logs. Renovate will walk through every docker-compose.yml/compose.yaml in the repository (including demo-nginx) and compare image tags against the registry - but a PR might not actually show up.
"schedule": ["every weekend"] in renovate.json doesn’t restrict when the bot itself runs - it restricts when it’s allowed to create PRs. If you hit force-run outside the weekend, Renovate will happily find the nginx update, but instead of a PR it’ll create (or update) a “Dependency Dashboard” issue in the repository - enabled by default since Renovate v26 through the config:recommended preset we’re extending. Inside that issue is a list of checkboxes for updates it found but held back:
- Open the “Dependency Dashboard” issue in the repository.
- Check the box next to the
nginxupdate line - that’s the “create this PR now, ignore the schedule” command. - Trigger the workflow again via
workflow_dispatch- only on that second run will Renovate read the checked box and actually open the PR. Checking the box by itself doesn’t create anything.
2. Merge the PR and confirm the stack was updated. The same webhook fires again - this time as a normal, fully automatic run, since Komodo already knows about demo-nginx. Komodo redeploys the stack with the new tag:
docker inspect --format='{{.Config.Image}}' nginxIf the version in the output changed, the entire Renovate → Forgejo → Komodo chain works end to end - from spotting an outdated image to an actual redeploy, with no manual step after the merge.
If the merge commit is already sitting in the repo’s history (visible on the PR page as Merge pull request ... into main), but docker inspect still shows the old tag - open the demo-nginx Stack page in Komodo and hit Refresh. This is confirmed directly in Komodo’s source code: the button calls the RefreshStackCache API method, documented as “Trigger a refresh of the cached compose file contents” - Komodo keeps a cached view of the stack’s state (including what it considers the “current” image for Batch Deploy Stack If Changed comparisons), and that cache updates periodically or through this exact method, not automatically the instant Pull Repo fetches a new commit. Refresh forces Komodo to re-read the files right now instead of waiting for the next cache cycle.
3. Remove the demo stack. It was only there for testing - once the check passes, delete the demo-nginx folder from the repository and commit (the same webhook fires once more), then delete the demo-nginx Stack resource itself from Komodo by hand - Delete Stack.
From there, the loop works exactly the same way on real stacks: a PR shows up → you check what changed → you merge it → Komodo redeploys everything on its own.
What’s next#
Some obvious improvements from here:
- Grouping updates through
packageRules- for example, one PR for every image in a stack instead of a pile of small ones. - Automerge for non-critical services and patch updates - carefully, and only where a breaking change is unlikely.
More on that in a future article.