
Traefik Reverse Proxy in Docker: A Complete Configuration Guide#
If you enjoyed this article, you can support the author by becoming a sponsor on Boosty.
A reverse proxy is a server that accepts requests from clients and forwards them to internal services. It acts as an intermediary between the user and your web application, hiding the real architecture and providing convenient features: load balancing, caching, SSL termination, domain-based routing, and much more.
In this article we’ll take a detailed look at what a reverse proxy is, why you need one, and walk through setting up Traefik in Docker.
What is a reverse proxy and why do you need one?#
A reverse proxy is an important component of modern infrastructure. Its main advantages:
- A single entry point for all services - you can use one IP and different domains or subdomains for many applications. There’s no need to open different ports on the router for different applications. We only need port 80 and 443.
- Security - hiding internal services behind a proxy, protection from direct access.
- SSL support - automatic generation and renewal of HTTPS certificates with Let’s Encrypt. Our connection is encrypted, and the browser doesn’t complain about an insecure connection.
- Load balancing - distributing requests across multiple containers or servers. Not as critical for a home setup, but in a production environment it’s simply a necessity.
- Flexible routing - you can configure rules, redirects, and rewrites for different applications.
Features of the Traefik reverse proxy#
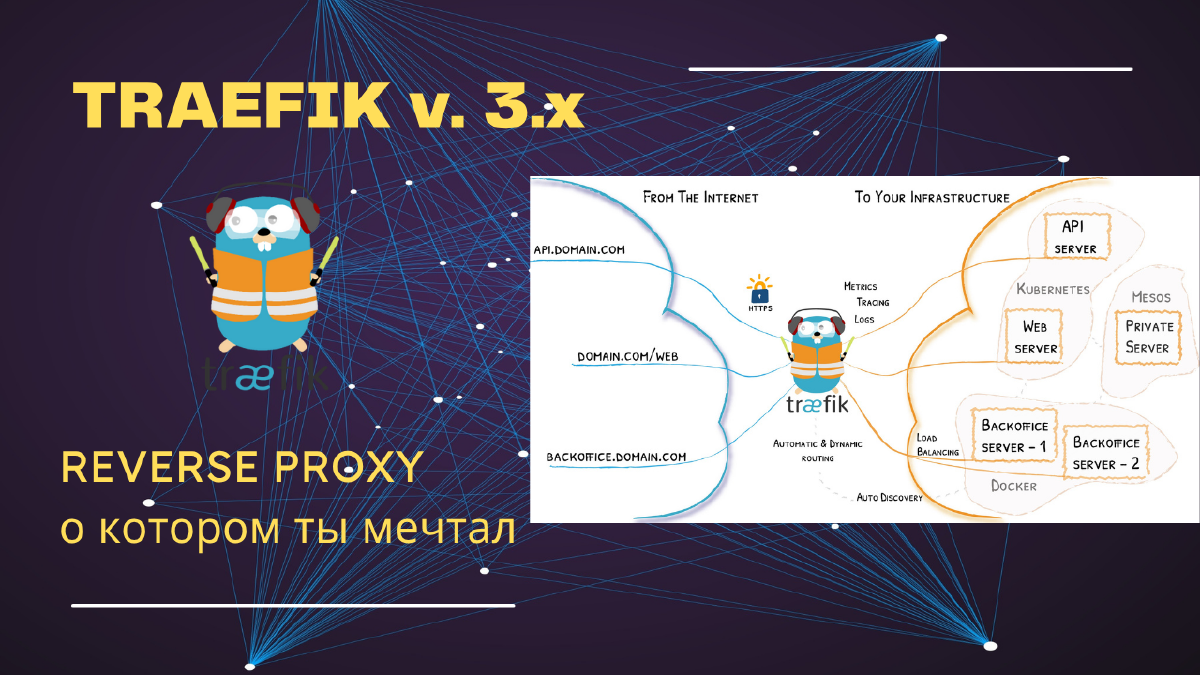
Traefik is a modern cloud-native reverse proxy and load balancer. Its distinguishing features:
- Dynamic configuration - Traefik dynamically discovers Docker containers and automatically configures routes. No need to restart to apply changes to the dynamic configuration.
- Let’s Encrypt integration with a built-in ACME client - automatic issuance and renewal of SSL certificates. No need to track the expiration date of your SSL certificate - Traefik renews it itself when needed.
- Support for multiple providers - Docker, Kubernetes, Consul, and so on.
- A handy monitoring panel - a web interface for viewing routes and status. Yes, it’s not a management panel, just a monitoring one, but a very informative one.
- Flexible routing and middleware - you can add authentication, redirects, rate limiting, and so on. This is really the whole point.
Traefik is a great fit for DevOps and production environments that use Docker Compose or Kubernetes. It’s also worth noting that Traefik has more functionality than Nginx Proxy Manager, which is popular in the homelab community, and if you pay attention, you’ll notice that many top YouTube bloggers use it precisely because of that functionality. It’s also used in popular applications like Pangolin or Netbird.
What Routers, Middlewares, and Services are in the Traefik reverse proxy#
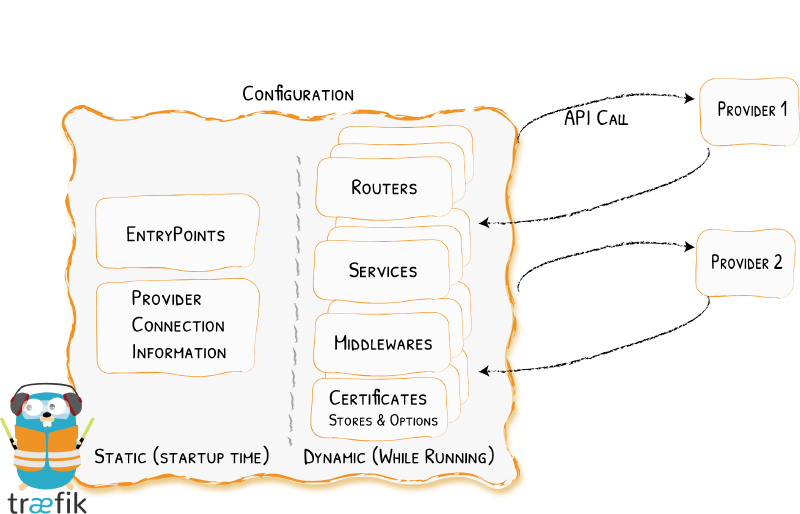
Traefik’s configuration uses three main components: routers, services, and middlewares.
Routers
Routers are like frontends: they manage incoming requests. In the “Routers” section you define the entrypoint, who resolves the certificates, and the rules for the request.
Services
Services are like backends: they define where to send requests. Here you specify the port that Traefik will use for proxying, and any additional load balancers.
One of the most complex, but also most interesting features of Traefik. Middlewares modify the request and effectively act as “middleware” between routers and services. You can easily add elements like headers, authentication, path prefixes, or combine them into groups (chains) for reuse.
With these three concepts we: identify incoming requests; determine where the request is routed; and choose how we want to modify the request as it’s routed.
Configuring Traefik#
There are many ways to configure Traefik, and it can be quite confusing for beginners. Who am I kidding - for beginners it will simply be very hard. Even with some experience, I sometimes can’t immediately figure out how to configure Traefik, or how to issue a certificate for some service whose setup might require special headers.
So let’s spend some time on a few important configuration details, namely static and dynamic configuration.
Dynamic configuration#
Traefik is a dynamic reverse proxy, meaning it can automatically (on the fly) add and remove routes as containers start or stop, and apply other changes as well.
Dynamic configuration can be specified in two places:
With the Docker provider, using labels in Docker Compose for each service. Note that although Traefik doesn’t require a restart, a service with labels does need to be recreated (I cover what these labels mean in the video, linked at the start of this article).
With the File Provider - YAML files in the “rules” folder (more on this below). This doesn’t require restarting or reinstalling any services and is genuinely dynamic. This is the method I demonstrate in this article.
Static configuration#
Although dynamic configuration is one of Traefik’s main advantages, it’s important to understand that Traefik also uses static configuration, which is defined differently and must be stored separately.
To apply changes to the static configuration, Traefik must be restarted. There are three different ways to define Traefik’s static configuration. Only one of them can be used at a time.
A configuration file - can be in different formats, but I use YAML (traefik.yaml).
Command-line arguments (CLI) - these arguments are passed when the Docker container starts. I don’t use this option, both because of the sheer number of commands and because it’s harder to grasp the volume of information. But that’s a matter of personal preference.
A list of all the variables can be found at this link
Setting up SSL certificate issuance#
What we need for a fully working reverse proxy#
- We need a qualified domain name. When buying a domain name, I recommend paying attention not to the purchase price (that’s usually roughly the same everywhere), but to the renewal price. Because the ratio between the purchase price and the renewal price can be an unpleasant surprise.
I personally use the services of smartape. The renewal cost for a domain in the .ru zone with them is 200 rubles. You can follow the referral link and check the current price. Not an ad.
Next, we need to point our domain name to external DNS servers. I personally use Cloudflare, but due to RKN blocking, access to their DNS might not work. And although I keep using Cloudflare, given the current restrictions I can’t really recommend them. That said, in this article I’ll demonstrate the setup specifically with Cloudflare. A list of DNS providers can be found in the Lego documentation - this is the exact ACME client used inside Traefik under the hood, and Traefik itself now simply pulls the current list from there. There are domestic services listed there too - you just need to check the provider code and environment variables when configuring.
It’s preferable to have a public IP address, which you can get from your internet provider, but it’s not required if you’re using DNS challenge.
Set up split DNS so that requests to subdomain names don’t leave the local network. You can find more detail in my video dedicated specifically to that topic.
DNS settings with Cloudflare#
I’m assuming you already have a registered domain name and it’s already pointed to the DNS servers of the corresponding provider. I’ll demonstrate everything using Cloudflare as an example. In this guide I use the domain name stilicho.ru The screenshots aren’t mine - they’re taken from the internet.
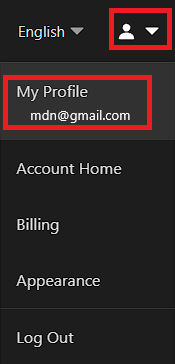
Go to your profile
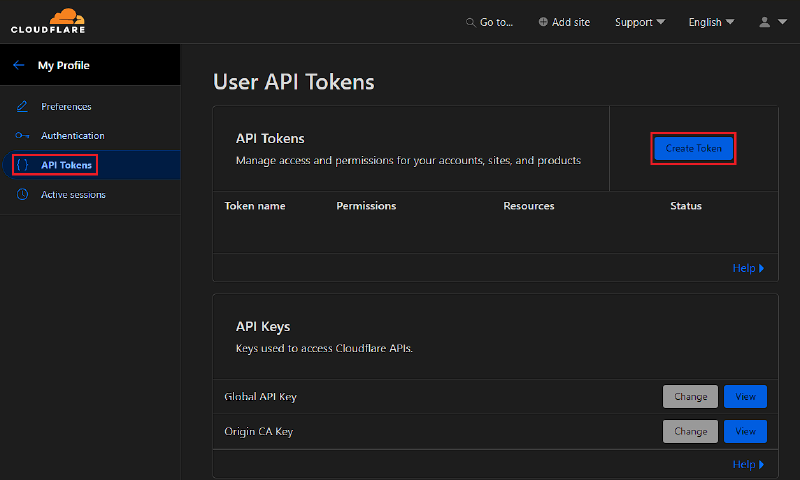
Go to the menu for creating a token
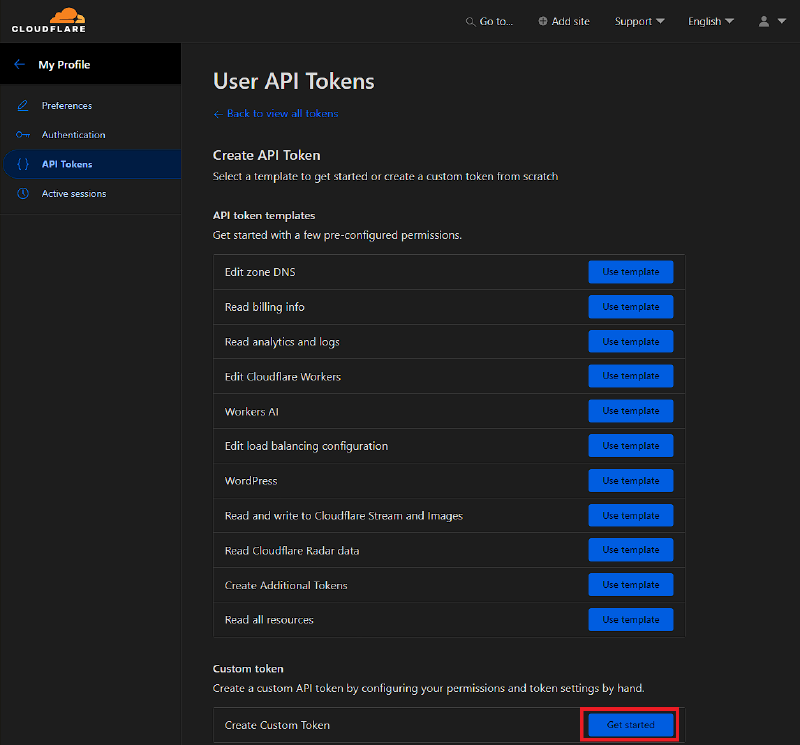
Start creating a custom token
Set the specific token settings
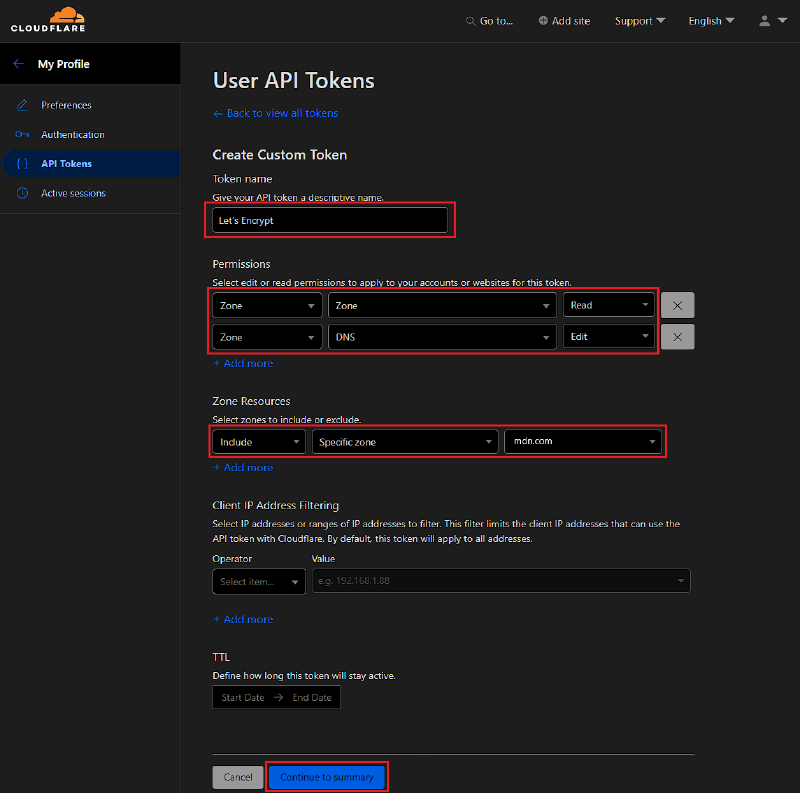
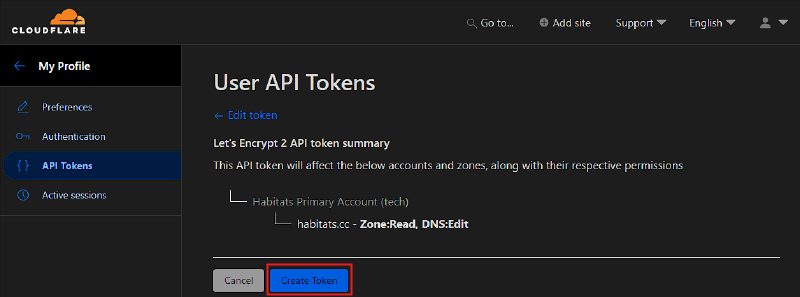
Create the token
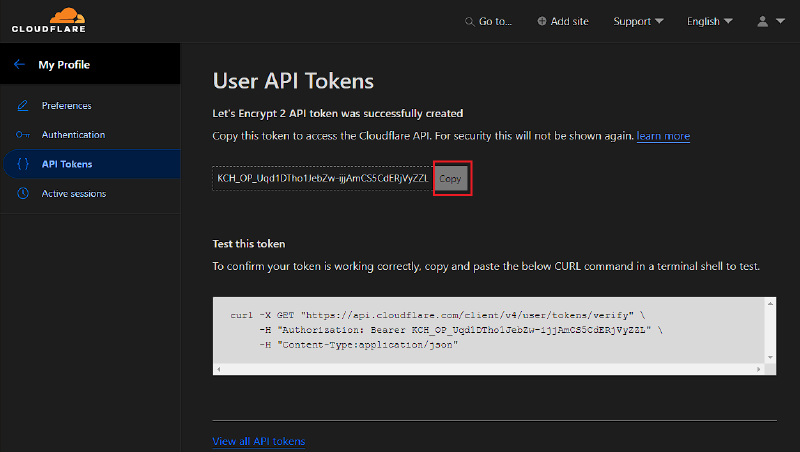
Copy your token value and save it somewhere safe, because you won’t be able to view the token value again in the Cloudflare profile. We’ll use the resulting token when configuring our proxy as a service, and it lets us manage our certificates through Cloudflare. If you lose the token, the only way out is to recreate it from scratch.
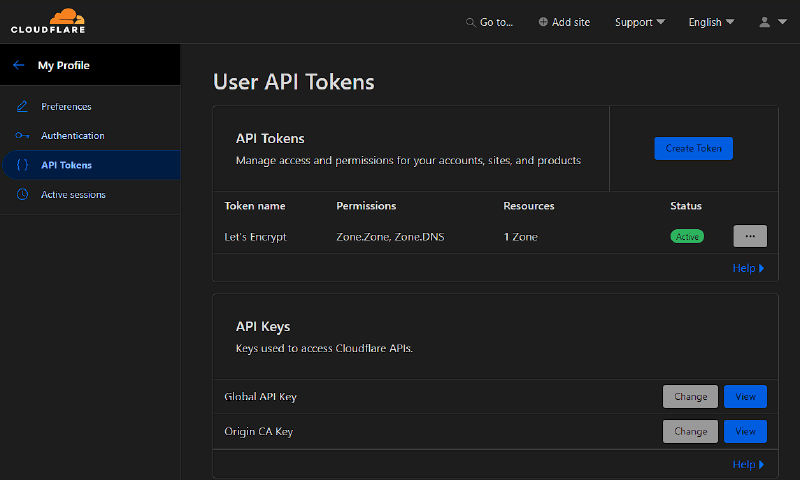
You can view all the tokens you’ve created via Cloudflare
Setting up Traefik in Docker#
Step 1. Create docker-compose.yml#
services:
  traefik:
    image: traefik:v3.7 # Pin the minor version (the current stable branch as of this article's update - v3.7). It's best not to use the latest tag - updating the image without warning could bring in a breaking change
    container_name: traefik # Container name
    restart: unless-stopped # Tell Docker to always try to restart the container in case of an unexpected stop
    security_opt:
      - no-new-privileges:true # Don't allow the container to gain additional privileges without our knowledge
    networks:
       proxy: # the container will run on a specific Docker network called 'proxy'
    ports:
      - 80:80 # define the HTTP port
      - 443:443 # define the HTTPS port
    environment:
      - CF_API_EMAIL=mail@gmail.com # Specify your email address, which serves as your Cloudflare account for obtaining an API token
      - CF_DNS_API_TOKEN=apitoken # specify the value of the obtained token
    volumes:
      - /etc/localtime:/etc/localtime:ro # sync the container's time with the host's time
      - /var/run/docker.sock:/var/run/docker.sock:ro # Allow Traefik to interact directly with Docker
      - /home/user/docker/traefik/traefik.yaml:/traefik.yaml:ro # specify where the Traefik static config file is located
      - /home/user/docker/traefik/acme.json:/acme.json # specify where all our SSL certificate data will be stored
      - /home/user/docker/traefik/config.yaml:/config.yaml:ro # Specify where the dynamic config file is stored
      - /home/user/docker/traefik/logs:/var/log/traefik # specify the path to the directory where Traefik logs and the access log will be stored
    labels:
      - "traefik.enable=true" # Enable Traefik for this service
      - "traefik.http.routers.traefik.entrypoints=http" # Define the HTTP entrypoint
      - "traefik.http.routers.traefik.rule=Host(`traefik-dashboard.user.ru`)" # Define the host rule for routing
      - "traefik.http.middlewares.traefik-auth.basicauth.users=user:password" # Attach basic authentication to protect our Traefik, specifying the login and password in hashed form
      - "traefik.http.middlewares.traefik-https-redirect.redirectscheme.scheme=https" # Specify that HTTP traffic should be redirected to HTTPS traffic
      - "traefik.http.middlewares.sslheader.headers.customrequestheaders.X-Forwarded-Proto=https" # Set the header forwarding for SSL
      - "traefik.http.routers.traefik.middlewares=traefik-https-redirect" # Apply the HTTPS redirect middleware to redirect HTTPS traffic
      - "traefik.http.routers.traefik-secure.entrypoints=https" # The secure entrypoint for HTTPS
      - "traefik.http.routers.traefik-secure.rule=Host(`traefik-dashboard.user.ru`)"  # Host rule for HTTPS routing
      - "traefik.http.routers.traefik-secure.middlewares=traefik-auth" # Apply the authentication middleware
      - "traefik.http.routers.traefik-secure.tls=true" # Enable TLS for a secure connection
      - "traefik.http.routers.traefik-secure.tls.certresolver=cloudflare" # Use Cloudflare to issue certificates
      - "traefik.http.routers.traefik-secure.tls.domains[0].main=user.ru" # The second-level domain name the SSL certificate is issued for
      - "traefik.http.routers.traefik-secure.tls.domains[0].sans=*.user.ru" # Issue a wildcard SSL certificate for all subdomain names within the domain defined by the rule above
      - "traefik.http.routers.traefik-secure.service=api@internal" # Define the internal service for the Traefik API

networks:
  proxy:
    name: proxy # Define the external network to join
    external: true # Specify that the network is external
Step 2. Create traefik.yaml#
api:
  dashboard: true #enable the dashboard
  debug: true # enable debug level
entryPoints: # define entry points
  http: # name of the entry point
    address: ":80" # the port associated with the name http
    http: # the following five lines tell us that at the global level we force all traffic arriving on port 80 to go to port 443
      redirections:
        entryPoint:
          to: https
          scheme: https
  https: # name of the entry point
    address: ":443" # the port associated with the name https
    http: # block with HTTP-specific settings for the entry point
      encodedCharacters:                  # Allowed encoded characters (important for Trilium)
        allowEncodedSlash: true           # Allow %2F
        allowEncodedPercent: true         # Allow %25
        allowEncodedHash: true            # Allow %23
serversTransport: # the following two lines allow us to use self-signed SSL certificates for services that use them, such as Proxmox
  insecureSkipVerify: true
providers: # define the configuration providers - Docker and the dynamic configuration file
  docker:
    endpoint: "unix:///var/run/docker.sock"
    exposedByDefault: false
  file:
    filename: /config.yaml
certificatesResolvers: # define who acts as the certificate resolver
  cloudflare: # who exactly, specify that acme should be used; specify the email used in Cloudflare
    acme:
      email: mail@gmail.com #add your email
      storage: acme.json # define the file where all the SSL certificate information will be stored
      dnsChallenge: # use the DNS challenge method for obtaining SSL certificates
        provider: cloudflare
        # provider: vultr
        resolvers:
          - "1.1.1.1:53"
          - "1.0.0.1:53"

log: # define the logging level and log path
  level: "INFO"
  filePath: "/var/log/traefik/traefik.log"
accessLog:
  filePath: "/var/log/traefik/access.log"
Step 3. Create the dynamic configuration file#
In the dynamic configuration, we specify which routes (routers) our services (services) live on. We specify which subdomain name a certificate should be issued for for a given service, and which middlewares need to be applied. In the file below, we issue an SSL certificate for our Proxmox node, so that the node is accessible via a nice-looking subdomain name.
http:
 #region routers
  routers:
    proxmox:
      entryPoints:
        - "https"
      rule: "Host(`proxmox.DOMAIN_NAME.ru`)"        # replace with your domain name
      middlewares:
        - default-headers
        - https-redirect
      tls: {}
      service: proxmox
#
#region services
#
  services:
    proxmox:
      loadBalancer:
        servers:
          - url: "https://ip:8006"            # specify your IP
        passHostHeader: true
#
# region middlewares
#
  middlewares:                                # define which middlewares we want to use going forward. Full list on the traefik.io website
    #
    https-redirect:    # redirects the request if the request scheme differs from the configured scheme
      redirectScheme:
        scheme: https
        permanent: true
#
    default-headers: # manages request and response headers
      headers:
        frameDeny: true
        browserXssFilter: true
        contentTypeNosniff: true
        forceSTSHeader: true
        stsIncludeSubdomains: true
        stsPreload: true
        stsSeconds: 15552000
        customFrameOptionsValue: SAMEORIGIN
        customRequestHeaders:
          X-Forwarded-Proto: https

    default-whitelist: # local firewall that works on the principle of allowing requests only from specific IPs
      ipAllowList:
        sourceRange:
        - "10.0.0.0/8"
        - "192.168.0.0/16"
        - "172.16.0.0/12"
Step 4. Create acme.json#
touch /etc/traefik/acme.json - create the file that will store our certificate data
chmod 600 /etc/traefik/acme.json - set the required permissions on the acme.json file. Otherwise Traefik simply won’t start. I think having this kind of safeguard against foolishness is a big plus.
Step 5. Starting the Traefik container#
docker network create proxy - create a Docker network named proxy
sudo apt install apache2-utils - install the Apache2 utilities package
echo $(htpasswd -nB user) | sed -e s/\\$/\\$\\$/g - create a hashed password for our dashboard
docker compose up -d - start the container
If everything’s fine on your end - you can check this in the traefik.log log - then when we navigate to the link for the Traefik dashboard at traefik-dashboard.user.ru, we should: first, get that access, and second, be able to see our certificate details in the browser. You can also view the certificate data in the acme.json file.
If everything’s fine, then you now have a fully prepared reverse proxy that’s standing by, ready to start issuing SSL certificates for everything. But of course, along with this article, it’s better to also watch the video, since it provides a visual walkthrough of how to issue certificates using labels in Docker.