

Introduction#
Traefik is a modern reverse proxy and load balancer, ideally suited for self-hosting and DevOps setups. In this article we’ll walk step by step through how to install Traefik in a Proxmox LXC container and run it as a systemd service, which gives you high reliability and integration with system initialization.
For convenience, I’ve split the description of this fairly non-trivial process into two parts. This article covers preparation and initial testing of our reverse proxy’s functionality.
If you enjoyed this article, you can support me by becoming a sponsor on Boosty (link in the contacts section).
Advantages of installing Traefik as a systemd unit#
- ✅ Starts automatically when the container boots
- ✅ Managed as a full-fledged service (
systemctl start/stop/status) - ✅ Runs reliably without Docker
- ✅ Simple integration with other services
Requirements#
Before you begin, make sure you have:
- ✅ An unprivileged (forget about privileged containers - in this specific case they’re a nightmare) LXC container on Proxmox
- ✅ Debian/Ubuntu inside the container, though it’s strongly preferable to use Debian. Never mind that its packages are older - what matters here is stability.
- ✅ SSH or console access.
- ✅ An external FQDN domain and a configured DNS server that clearly points all
*.domain.rurequests to the IP of your container where Traefik is installed.
Step 1: Creating the LXC container#
In Proxmox, create an unprivileged container:
- OS: Debian 12 or 13 (recommended)
- Type: Unprivileged (supported by Traefik) - this parameter is chosen at container creation time (the “Unprivileged container” checkbox in the Proxmox wizard); if the container was already created as privileged, it’s easier to recreate it as unprivileged than to change this parameter after the fact
- Network: Bridge (e.g.,
vmbr0)
An approximate container configuration
Template: Debian 12 or 13 Disk: 32G CPU: 2 Memory: 2048 Swap: 0 Network: static IPv4: 192.168.x.x/24
Be sure to do the following:
- Set the date and time. This matters. We’re going to be looking at this container’s logs, so we need the events to reflect the correct time. Moreover, we’ll later install
crowdsec, which makes a correct timezone doubly important. After all, the time of an attack needs to be recorded precisely.
Let’s check the time settings
timedatectlFind out the correct name of your timezone:
timedatectl list-timezonesSet your timezone following my example:
timedatectl set-timezone Europe/Moscow- Let’s update the container, or rather the operating system
apt full-upgrade- Let’s install the necessary dependencies. The list below is fairly loose, add whatever else you think is necessary.
apt install curl tar sudo lshw apt-transport-https wget nano gnupg htop lsb-release apache2-utilsStep 2: Setting up SSH-key-only access#
After installing Debian 13, it’s recommended to disable password authentication and use only SSH keys. This significantly increases server security and protects against automated password-guessing attempts.
Installing the public key#
Copy your public key to the server:
ssh-copy-id root@<SERVER_IP>Or manually add the contents of ~/.ssh/id_ed25519.pub to the file: /root/.ssh/authorized_keys
Verify that key-based login works before moving on to the next step.
Disabling password login#
Open the OpenSSH configuration file:
nano /etc/ssh/sshd_configChange or add the following parameters:
PubkeyAuthentication yes
PasswordAuthentication no
KbdInteractiveAuthentication no
PermitRootLogin prohibit-password
Where:
PubkeyAuthentication yes- allows login via SSH keys.PasswordAuthentication no- completely disables password login.KbdInteractiveAuthentication no- disables interactive authentication.PermitRootLogin prohibit-password- allows therootuser to log in only via an SSH key.
Applying the settings#
Before restarting the service, it’s recommended to validate the configuration:
sshd -tIf there are no errors, restart the service:
systemctl restart sshDebian 13 specifics#
On minimal Debian 13 installs (for example, in Proxmox LXC containers), you might run into this error:
Missing privilege separation directory: /run/sshdThis means the temporary /run/sshd directory, which OpenSSH needs, wasn’t automatically created. This can be fixed with a standard command:
systemd-tmpfiles --createAfter that, run the validation check again:
sshd -tand restart the service:
systemctl restart sshThe systemd-tmpfiles --create command doesn’t change the system configuration or reduce security. It only creates the temporary directories and files described in the systemd-tmpfiles rules, including /run/sshd, which OpenSSH needs to work correctly.
Verification#
Without closing the current SSH session, open a new connection and make sure key-based login works successfully. You can check which parameters took effect with the command:
sshd -T | grep -E 'passwordauthentication|permitrootlogin|pubkeyauthentication|kbdinteractiveauthentication'Expected result:
passwordauthentication no pubkeyauthentication yes permitrootlogin prohibit-password kbdinteractiveauthentication noOnly close the current SSH session after this check succeeds.
Step 3: Installing the Traefik binary and a first test run#
Go to the traefik GitHub repository.
# download the archive with the latest version of the reverse proxy
wget https://github.com/traefik/traefik/releases/download/v3.7.10/traefik_v3.7.10_linux_amd64.tar.gz
# extract the archive
tar -zxvf traefik_v3.7.10_linux_amd64.tar.gz# move the binary to where it belongs, alongside all the other binaries
mv traefik /usr/local/bin/Now you can delete the unneeded archive to avoid clutter.
Step 4: Creating the intended management structure for Traefik - namely, the place where we’ll store the static config, dynamic config, and logs#
All of our reverse proxy’s configuration consists of YAML files that define the static and dynamic configuration (yours might differ - or rather, the file locations might differ - the main thing is that the paths are configured correctly)
mkdir /etc/traefik- we’ll have one static configuration file
mkdir /etc/traefik/dynamic- all of our dynamic configuration files will be stored in the corresponding directory. You could of course use a single dynamic configuration file, but it would end up being at least 100 lines long (in reality more), and that much content in one file becomes fairly hard to work with over time.
touch /etc/traefik/acme.json- create the file that will store our certificate data
chmod 600 /etc/traefik/acme.json- set the required permissions on the acme.json file. Otherwise, Traefik simply won’t start. I think having this kind of safeguard against foolishness is a big plus.
We also create the directory where we’ll store the logs, namely: traefik.log and access.log
mkdir -p /var/log/traefik
chown root:root /var/log/traefik
We’ll set up log handling later.
Step 5: Running the test configuration#
At this stage, we create a test Traefik configuration that we need purely to verify that the reverse proxy itself works. We’ll expand and refine everything further down the road.
nano /etc/traefik/traefik.yaml# This is a simple static config. Once again, everything here runs natively, no Docker involved.
# Consider enabling the option to send anonymous usage statistics, since it helps the developers.
# The DEBUG logging level will show you all debug messages in the console while Traefik is running.
# Any yaml file placed in the `/etc/traefik/dynamic` directory is processed in real time, meaning it lets you change the routing, service, middleware, TLS, and server transport configuration "on the fly". This means we won't need to restart the service every time.
# We're specifying simple, still unsecured entry points web and websecure.
# We allow insecure (since we haven't issued certificates yet) access to the Traefik panel and API access.
# Since yaml format is sensitive to whitespace, if you have an extra space/indent somewhere in the file, the service simply won't start, but the logs should show you which line the error is on. Note that the line number reported may be inaccurate, so it's still worth staying vigilant.
# https://doc.traefik.io/traefik/contributing/data-collection/
global:
checkNewVersion: true
sendAnonymousUsage: true
# https://doc.traefik.io/traefik/operations/api/
api:
dashboard: true
insecure: true
debug: true
disableDashboardAd: false
# https://doc.traefik.io/traefik/observability/logs/
log:
level: DEBUG #TRACE DEBUG INFO WARN ERROR FATAL PANIC
# https://doc.traefik.io/traefik/routing/entrypoints/
entryPoints:
web:
address: ":80"
websecure:
address: ":443"
#------------: https://doc.traefik.io/traefik/providers/file/
providers:
file:
directory: /etc/traefik/dynamic
watch: trueapi.insecure: true opens the dashboard and API without any authentication on all of the container’s interfaces, and log.level: DEBUG writes excessively verbose logs. Only use this config to check functionality within a closed network segment. If you stop at this step and don’t move straight on to part 2 - be sure to set api.insecure back to false (or remove it entirely) and protect the dashboard with a separate authenticated router before exposing the ports to the outside.Checking functionality#
Let’s run the unexpected traefik command - to start our reverse proxy and verify that everything’s fine at this stage: the proxy is running and we can access the Traefik web panel.
Navigate to the IP address of our reverse proxy, which is available by default on port 8080
http://192.168.0.11:8080/dashboard/
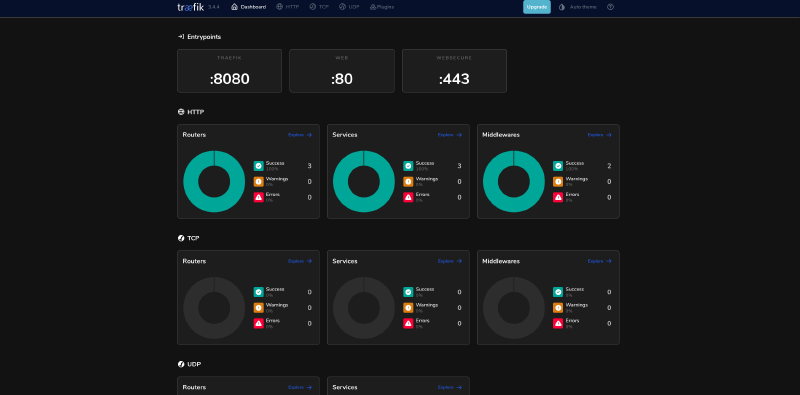
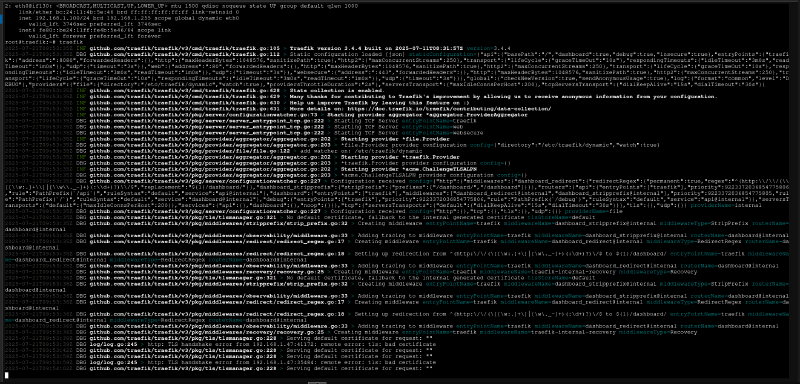
If everything went according to plan and it’s all working, we’ve now built the foundation for further work with the reverse proxy.
Step 6: Updating Traefik#
You might ask me how to update Traefik if it’s installed as a binary package. Good question. In fact it’s very simple - we’ll basically repeat the steps from point 2 of this guide.
Go to the Traefik GitHub page and find the latest release
Download the file you need with the command
wget https://github.com/traefik/traefik/releases/download/v3.*.*/traefik_v3.*.*_linux_amd64.tar.gz- Extract it
tar -zxvf traefik_v3.*.*_linux_amd64.tar.gz- Move the file to where all the binaries live
mv ./traefik /usr/local/binContinued in part 2, where we cover setting up a fully working instance of our reverse proxy.