
Trilium - a powerful personal knowledge system under your control#
Introduction: why you need Trilium - and why you need PKM tools at all#
In an age of information overload, we suffer not so much from a lack of knowledge as from the sheer volume of information that piles up on us every day, and from the chaos that this volume creates: scattered ideas, lost connections, forgotten context, and other horrors of digitalization. Not to mention attempts to manipulate you by telling you that your brain wasn’t made to hold anything in memory - as if you were some kind of computer with a limited amount of RAM. (Spoiler, spoiler - that’s not true.)
Tools exist to solve this problem, and the community has affectionately dubbed them Personal Knowledge Management (PKM) systems - personal knowledge bases.
Such systems let you:
- collect scattered notes, ideas, links, and drafts in one place;
- integrate different formats (text, images, diagrams, tables, code) in a single database;
- find connections between notes via links, graphs, search, and attributes;
- grow knowledge - not just record facts, but connect, deepen, and reassemble them;
- export / back up - so you don’t depend on someone else’s cloud.
Classic tools like Obsidian or Notion give you either a “file-based” approach (Markdown + plugins, as with Obsidian) or a cloud ecosystem with limitations. Given everything that’s happened recently, being cloud-based is itself a limitation - arguably even a barrier by now. Obsidian, Notion, and Joplin are all good, but Trilium goes further, offering a hybrid approach: a powerful tree structure, database flexibility, and the privacy of a self-hosted solution. That said, keep in mind that Obsidian and Notion aren’t open-source, and while Joplin is popular, it’s also far from perfect.
The hero of today’s article, Trilium, is an actively community-developed successor to the original project started by developer zadam. For a while the community fork lived under the name TriliumNext, but in 2025 the author handed the original repository and name back to it - so it’s simply Trilium again, not a fork.
Trilium is also not “just notes” - it’s a system in which a note is a data object with fields, templates, relations, attributes, and visual interfaces. When your database grows to hundreds or thousands of notes, that difference becomes especially noticeable.
What Trilium is: a brief overview of version 0.104.1 (the current version as of this article’s update date)#
Trilium’s main features:#
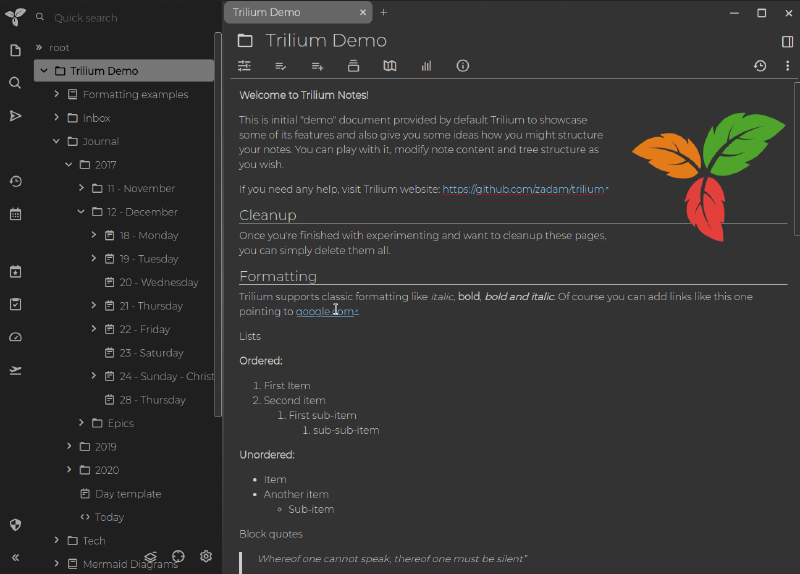
- Notes can be organized into a tree of arbitrary depth. One note can be placed in multiple locations in the tree.
- An advanced WYSIWYG note editor, including tables, images, and math formulas with automatic Markdown formatting
- Support for editing code notes, including syntax highlighting
- Fast and simple navigation between notes, full-text search, and note hoisting
- Seamless note revision management
- Note attributes can be used to organize notes, build queries, and create advanced scripts
- Direct OpenID and TOTP integration for more secure login
- Synchronization with your own sync server
- Publishing notes to a public space
- Reliable note encryption with per-note granularity
- Creating diagrams based on Excalidraw (the “canvas” note type)
- Relation maps and link maps (note maps) for visualizing notes and their relationships
- Mind maps based on Mind Elixir
- Geo maps with location markers and GPX tracks
- Scripting - see Advanced Showcases
- REST API for automation
- Scales well both in terms of usability and performance when handling more than 100,000 notes.
- A touch-optimized mobile interface for smartphones and tablets
- A built-in dark theme with support for custom themes
- Evernote and Markdown import/export
- A Web Clipper for conveniently saving web content
- A customizable UI (sidebar buttons, custom widgets, …)
- Metrics together with a Grafana dashboard
For more information about Trilium, you can also read:
- awesome-trilium for third-party themes, scripts, plugins, and more.
- TriliumRocks! - learning materials, guides, and more.
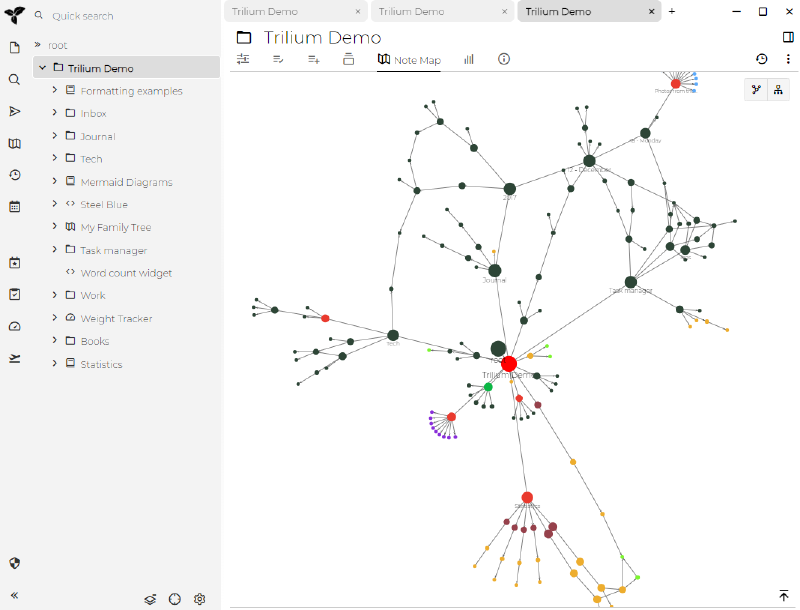
Trilium turns notes into data objects - each entry can have attributes, relations, a template, and visualizations. This makes the system feel closer to a knowledge base than a simple set of files.
-–
Installing and configuring Trilium#
Below is my docker-compose file, assuming I’m using the Traefik reverse proxy
services:
  trilium:                                # Define a service named "trilium"
    container_name: trilium               # Docker container name (for convenience)
    image: triliumnext/trilium:v0.104.1   # Official Trilium image, pinning a specific version. Don't use latest - the official docs explicitly warn that the tag can silently bump the minor version and break sync
    restart: always                       # The container will restart automatically on failure or Docker reboot
    environment:                          # Environment variables passed into the container
      TRILIUM_NETWORK_TRUSTEDREVERSEPROXY: 172.18.0.0/16 # Trusted network for the reverse proxy
      TRILIUM_DATA_DIR: /home/node/trilium-data   # Path to the directory where Trilium stores its data inside the container
      TZ: ${TZ}                                   # Set the timezone from an environment variable (usually defined in .env)
      TRILIUM_MULTIFACTORAUTHENTICATION_OAUTHBASEURL: "https://trilium.domain.ru"
        # Base URL for OIDC callbacks (Trilium needs to know its public address)
      TRILIUM_MULTIFACTORAUTHENTICATION_OAUTHCLIENTID: ${TRILIUM_CLIENT_ID}
        # OAuth client ID (taken from .env or a secret)
      TRILIUM_MULTIFACTORAUTHENTICATION_OAUTHCLIENTSECRET: ${TRILIUM_CLIENT_SECRET}
        # OAuth client secret (also from .env)
      TRILIUM_MULTIFACTORAUTHENTICATION_OAUTHISSUERBASEURL: "https://auth.domain.ru/application/o/trilium"
        # Identity Provider address (Authentik in this case)
      TRILIUM_MULTIFACTORAUTHENTICATION_OAUTHISSUERNAME: "Authentik"
        # Name of the auth provider shown in the Trilium UI
      TRILIUM_MULTIFACTORAUTHENTICATION_OAUTHISSUERICON: "https://cdn.jsdelivr.net/gh/selfhst/icons/svg/authentik.svg"
        # Auth provider icon (a nice UI touch)
    volumes:                              # Mount local directories into the container
      - /home/user/docker/trilium:/home/node/trilium-data
        # Main data volume (replaces Trilium's built-in directory)
      # If you want the container to inherit the system timezone, uncomment:
      # - /etc/localtime:/etc/localtime:ro
        # Mount the system's local time into the container (read-only)
    networks:
      proxy:                              # Attach the container to the external "proxy" network (used by Traefik)
    labels:                               # Labels for Traefik integration (reverse proxy)
      - "traefik.enable=true"                                      # Enable Traefik processing for the container
      - "traefik.http.routers.trilium.entrypoints=web"             # Define the HTTP entrypoint (port 80)
      - "traefik.http.routers.trilium.rule=Host(`trilium.domain.ru`)" # Traffic to this domain is routed to this container
      - "traefik.http.middlewares.trilium-https-redirect.redirectscheme.scheme=https" # Middleware to redirect HTTP to HTTPS
      - "traefik.http.routers.trilium.middlewares=trilium-https-redirect" # Apply the redirect middleware to the HTTP route
      - "traefik.http.routers.trilium-secure.entrypoints=websecure" # Define the HTTPS entrypoint (port 443)
      - "traefik.http.routers.trilium-secure.rule=Host(`trilium.domain.ru`)" # HTTPS route for the same domain
      - "traefik.http.routers.trilium-secure.tls=true" # Enable TLS (HTTPS)
      - "traefik.http.routers.trilium-secure.service=trilium" # Bind the HTTPS route to the Trilium service
      - "traefik.http.services.trilium.loadbalancer.server.port=8080" # Specify the internal port Trilium listens on in the container
      - "traefik.docker.network=proxy" # Tell Traefik to look for the container in the "proxy" network

networks:
  proxy:                                  # Definition of the external network for talking to Traefik
    external: true                        # The network was already created earlier (don't recreate)
and also the variables file
# Timezone
TZ=Europe/Moscow
# OAuth2 (Authentik)
TRILIUM_CLIENT_ID=client-id
TRILIUM_CLIENT_SECRET=client-secretTrilium is also supported on Kubernetes, via Cloudron, HomelabOS, a NixOS module, and others.
Keep in mind that Traefik versions 3.6.4 and above had some minor breaking changes. If you use Traefik as your reverse proxy, you need to add the following block to your static configuration file
  websecure:                              # Entrypoint for HTTPS (port 443)
    address: ":443"                       # Listen on port 443
    http:                                 # HTTP settings for HTTPS
      encodedCharacters:                  # Allowed encoded characters (important for Trilium)
        allowEncodedSlash: true           # Allow %2F
        allowEncodedPercent: true         # Allow %25
        allowEncodedHash: true            # Allow %23
Configuration location#
By default, config.ini, the database, and other important Trilium files are stored in the data directory. If you want to use a different location, you can set the TRILIUM_DATA_DIR environment variable, for example:
export TRILIUM_DATA_DIR=/home/myuser/data/my-trilium-data
Disabling / changing the upload limit#
If you run into the default 250 MB upload limit and want to raise it, you can set the TRILIUM_NO_UPLOAD_LIMIT=true environment variable to disable the limit entirely:
export TRILIUM_NO_UPLOAD_LIMIT=trueOr, if you just want to raise the limit to something bigger than 250 MB, you can use the MAX_ALLOWED_FILE_SIZE_MB variable, for example:
export MAX_ALLOWED_FILE_SIZE_MB=450Synchronization#
Trilium is an “offline-first” note-taking app: it stores all data locally on the desktop client, or on the so-called server installation described above. However, Trilium also lets you set up synchronization with a server instance, allowing multiple desktop clients to sync with a central server and vice versa. This creates a “star” topology. More details are in the synchronization documentation

In this configuration, a central server (called the sync server) and several client (or desktop) instances synchronize with the sync server. Once configured, synchronization becomes automatic and continuous, requiring no manual intervention.
Setting up synchronization#
Security considerations#
Secure server setup is critically important and may seem complicated at first. To ensure security and prevent potential vulnerabilities, it’s important to use a valid SSL certificate (HTTPS) rather than an unencrypted HTTP connection.
Syncing a desktop instance with the sync server#
This method is used when you already have a desktop instance of Trilium and want to set up a sync server on your web hosting or simply on a Docker machine.
- Deploy the server: make sure the server instance is deployed but not initialized.
- Desktop configuration: open the desktop instance, go to “Options” -> the “Sync” tab -> “Sync Configuration,” and enter your sync server’s address in the “Server instance address” field. Click “Save.”

3. Testing the sync: click the “Test Sync” button to check the connection to the sync server. On success, the client will start transferring all data to the server. This may take a while, but you can keep using Trilium in the meantime. Periodically check the server to confirm sync has completed. Once done, you’ll see the server login screen.
Syncing the sync server with a desktop app instance#
This method is used when you already have a sync server (our instance, set up in our homelab) and want to configure a new desktop instance to sync with it.
- Desktop setup: follow the instructions on the desktop installation page.
- Initial configuration: when prompted, choose the option to sync with the sync server.

- Server details: configure the Trilium server address and enter the correct username and password for authentication.
- Finish setup: click “Finish Setup.” On success, you’ll see the following screen:

Mobile frontend#
Trilium (server version) has a mobile web interface optimized for touch devices - smartphones and tablets. It activates automatically upon login, based on browser detection.
The mobile interface has limited functionality compared to the full-featured desktop interface.
Note that this isn’t an Android/iOS app, just a mobile-friendly web page hosted on the server.
Limitations#
The mobile interface provides only some of the full desktop interface’s features:
- you can browse the entire note tree, read and edit all note types, but can only create text notes
- reading and editing protected notes is possible, but creating them is not supported
- editing options are not supported
- note cloning is not supported
- uploading attachments is not supported
Web clipper#

Trilium Web Clipper is a browser extension that lets you clip text, screenshots, entire pages, and short notes and save them directly into Trilium Notes.
The project is hosted here.
Firefox and Chrome are supported, but the Chrome build should also work in other Chromium-based browsers.
I use this version
Functionality#
- select text and clip it via the right-click context menu
- click an image or link and save it via the context menu
- save an entire page from the popup or context menu
- save a screenshot (with a crop tool) from the popup or context menu
- create a short text note from the popup
Trilium will save these clippings as a new child note under the “Clipper Inbox” note.
By default this is a day note, but you can override this.
If there are multiple clippings from the same page (and on the same day), they’ll be added to the same note.
Configuration#
The extension needs to connect to a running Trilium instance. By default it scans a port range on the local machine to find a Trilium desktop instance.
You can also configure the server address if you’re not running the desktop app, or want it to work without the desktop app running.
Since this article has already gotten quite long, I’ll probably continue covering the app’s features in a separate article.